Owners Manual
Page 2
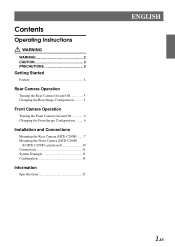
Contents Operating Instructions WARNING WARNING 2 CAUTION 3 PRECAUTIONS 3 Getting Started Feature 4 Rear Camera Operation Turning the Rear Camera On and Off 5 Changing the Rear Image Configuration .......... 5 Front Camera Operation Turning the Front Camera On and Off 6 Changing the Front Image Configuration ......... 6 Installation and Connections Mounting the Rear Camera (HCE-C200R) ...... 7 Mounting the Front Camera (HCE-C200F) (If HCE-C200F is purchased 10 Connections 11 System Example 12 Confirmation 14 Information Specifications 15 ENGLISH 1-EN
Contents Operating Instructions WARNING WARNING 2 CAUTION 3 PRECAUTIONS 3 Getting Started Feature 4 Rear Camera Operation Turning the Rear Camera On and Off 5 Changing the Rear Image Configuration .......... 5 Front Camera Operation Turning the Front Camera On and Off 6 Changing the Front Image Configuration ......... 6 Installation and Connections Mounting the Rear Camera (HCE-C200R) ...... 7 Mounting the Front Camera (HCE-C200F) (If HCE-C200F is purchased 10 Connections 11 System Example 12 Confirmation 14 Information Specifications 15 ENGLISH 1-EN
Owners Manual
Page 3
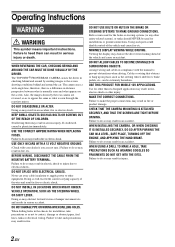
...images to heed them may result in serious injury or death. Doing so may result in fire. Swallowing them can be used for installation, take such precautions may distract the driver from looking ahead of the wire and result in an accident. DO NOT SPLICE INTO ELECTRICAL...systems (or any other equipment. DO NOT DAMAGE PIPE OR WIRING WHEN DRILLING HOLES. Bolts or nuts used for other injury. Use for installations or ground connections. MAKE THE CORRECT CONNECTIONS. Failure to other safety-related system), or tanks should NEVER be extremely hazardous. CHECK THAT THE...
...images to heed them may result in serious injury or death. Doing so may result in fire. Swallowing them can be used for installation, take such precautions may distract the driver from looking ahead of the wire and result in an accident. DO NOT SPLICE INTO ELECTRICAL...systems (or any other equipment. DO NOT DAMAGE PIPE OR WIRING WHEN DRILLING HOLES. Bolts or nuts used for other injury. Use for installations or ground connections. MAKE THE CORRECT CONNECTIONS. Failure to other safety-related system), or tanks should NEVER be extremely hazardous. CHECK THAT THE...
Owners Manual
Page 4
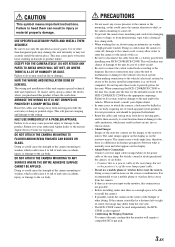
...PRECAUTIONS • Do not assert any chance of damage to the unit in doubt, consult your Alpine dealer. • In some cases, to the unit and/or the vehicle. When in case of the HCE-C200R/HCE-C200F has the appropriate amperage. This may result in damage to attach the camera, a hole must... unit in the centre of the bumper or other than designated parts may cause personal injury or damage to your HCE-C200R/HCE-C200F. If the camera is installed at a distance left or right of centre, the image may result in injury or material property damage. Use of the rearview mirror. The ...
...PRECAUTIONS • Do not assert any chance of damage to the unit in doubt, consult your Alpine dealer. • In some cases, to the unit and/or the vehicle. When in case of the HCE-C200R/HCE-C200F has the appropriate amperage. This may result in damage to attach the camera, a hole must... unit in the centre of the bumper or other than designated parts may cause personal injury or damage to your HCE-C200R/HCE-C200F. If the camera is installed at a distance left or right of centre, the image may result in injury or material property damage. Use of the rearview mirror. The ...
Owners Manual
Page 6
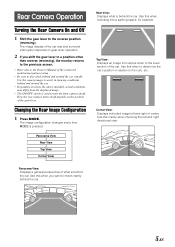
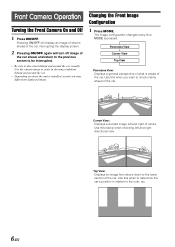
... used to turn the front camera on/off depends on the position of the car rear and surround interruption depends on where the unit is installed, actual conditions may differ from above down to the reverse position (reversing).
... used to turn the front camera on/off depends on the position of the car rear and surround interruption depends on where the unit is installed, actual conditions may differ from above down to the reverse position (reversing).
Owners Manual
Page 7
Pressing ON/OFF will display an image of what is installed, actual view may differ from above down to also check behind and around the car visually. Use the camera image to assist in relation to ...
Pressing ON/OFF will display an image of what is installed, actual view may differ from above down to also check behind and around the car visually. Use the camera image to assist in relation to ...
Owners Manual
Page 8
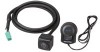
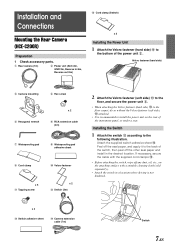
... Attach the supplied switch adhesive sheet #. Installation and Connections Mounting the Rear Camera (HCE-C200R) Preparation 1 Check accessory parts. 1 Rear camera (1m) 2 Power unit (ACC:2m, GND:2m, Reverse In:6m, Reverse out:2m) % Cord clamp (Switch) x 3 Installing the Power Unit 1 Attach the Velcro...Waterproofing pad adhesive sheet 9 Cord clamp ! attached. • It is not hindered. Peel off the seal paper, and apply it to install the power unit on the attaching surface with a suitable cleaning cloth (sold separately). • Attach the switch in the desired location. x...
... Attach the supplied switch adhesive sheet #. Installation and Connections Mounting the Rear Camera (HCE-C200R) Preparation 1 Check accessory parts. 1 Rear camera (1m) 2 Power unit (ACC:2m, GND:2m, Reverse In:6m, Reverse out:2m) % Cord clamp (Switch) x 3 Installing the Power Unit 1 Attach the Velcro...Waterproofing pad adhesive sheet 9 Cord clamp ! attached. • It is not hindered. Peel off the seal paper, and apply it to install the power unit on the attaching surface with a suitable cleaning cloth (sold separately). • Attach the switch in the desired location. x...
Owners Manual
Page 9
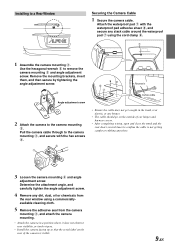
... not get caught in a metal surface. • If necessary, use a tapping screw " to fix the camera mounting (In the case of a plastic mount area). • Install the camera facing up paint to paint the surface and surrounding area when a hole has been made in step 3. 5 Remove the adhesive seal from the... completing wiring, open and close the trunk and the rear doors several times to the Rear Garnish Securing the Camera Cable 1 Secure the camera cable. Install to confirm the cable is visible. 8-EN
... not get caught in a metal surface. • If necessary, use a tapping screw " to fix the camera mounting (In the case of a plastic mount area). • Install the camera facing up paint to paint the surface and surrounding area when a hole has been made in step 3. 5 Remove the adhesive seal from the... completing wiring, open and close the trunk and the rear doors several times to the Rear Garnish Securing the Camera Cable 1 Secure the camera cable. Install to confirm the cable is visible. 8-EN
Owners Manual
Page 10
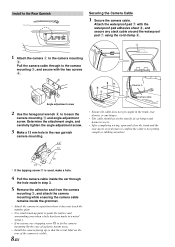
... 4. 3 1 9 7 Reverse In Camera cable • Ensure the cable does not get caught in a position where it does not obstruct rear visibility, or touch wipers. • Install the camera facing up so that the serial label on the outside of the camera is not getting caught or rubbing anywhere. 3 Loosen the camera...; After completing wiring, open and close the trunk and the rear doors several times to a Rear Window Securing the Camera Cable 1 Secure the camera cable. Installing to confirm the cable is visible. 9-EN
... 4. 3 1 9 7 Reverse In Camera cable • Ensure the cable does not get caught in a position where it does not obstruct rear visibility, or touch wipers. • Install the camera facing up so that the serial label on the outside of the camera is not getting caught or rubbing anywhere. 3 Loosen the camera...; After completing wiring, open and close the trunk and the rear doors several times to a Rear Window Securing the Camera Cable 1 Secure the camera cable. Installing to confirm the cable is visible. 9-EN
Owners Manual
Page 11
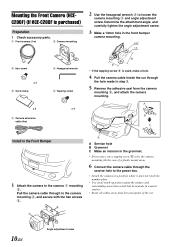
Mounting the Front Camera (HCEC200F) (If HCE-C200F is used, make a hole. 4 Pull the camera cable inside the car through the service hole to the power box. • Attach the camera in a ... hex screws 3. 3 1 1 A Service hole B Grommet C Make an incision in a metal surface. • Route all cables away from the camera mounting 2, and attach the camera mounting. A B C Install to the Front Bumper 1 Attach the camera to the camera 1 mounting 2. Determine the attachment angle, and carefully tighten the angle adjustment screw. 3 Make a 13mm hole...
Mounting the Front Camera (HCEC200F) (If HCE-C200F is used, make a hole. 4 Pull the camera cable inside the car through the service hole to the power box. • Attach the camera in a ... hex screws 3. 3 1 1 A Service hole B Grommet C Make an incision in a metal surface. • Route all cables away from the camera mounting 2, and attach the camera mounting. A B C Install to the Front Bumper 1 Attach the camera to the camera 1 mounting 2. Determine the attachment angle, and carefully tighten the angle adjustment screw. 3 Make a 13mm hole...

