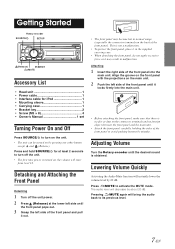
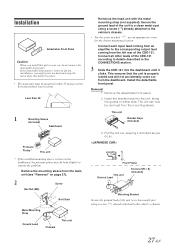
Owner's Manual (english, Espanol, French)
Page 8
... the connector terminals on the back of the front panel). Pressing /MUTE again will start from level 12. Press and hold SOURCE/ for iPod 1 • Mounting sleeve 1 • Carrying case 1 • Bracket key 2 • Screw (M5 × 8 4 • Owner's Manual 1 set Turning Power On and Off Press SOURCE/ to turn off the...
Owner's Manual (english, Espanol, French)
Page 28
...the dashboard, the pressure plates may be bent slightly to front. Remove the detachable front panel. 2. Remove the mounting sleeve from the left rear of the CDE-121. Install the detachable front panel. Connect each input lead coming from the main unit (see "Removal" on either ... and warp the metal plate that holds it clicks. Less than 35° 1 Mounting Sleeve (Included) Dashboard Pressure Plates* This unit * If the installed mounting sleeve is loose in the CONNECTlONS section. 3 Slide the CDE-121 into the unit, along the guides on page 27). 2 Screw Hex Nut (M5...