Quick Start Guide
Page 5
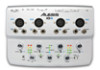
...standard five-pin MIDI cable to connect this output to 24 bit, you can use channel inputs 1-4 and outputs 1-4. 24. Note that the iO4 is set to the MIDI IN of an external MIDI device. 23. 16/24 BIT MODE - Use the included USB cable to connect the...8226; Pentium III 450 MHz Processor • 512 MB RAM • Available USB 2.0 Port • Windows XP (with Service Pack 2 installed) Minimum Macintosh Requirements: • Apple computer with native USB 2.0 support • Mac OS X 10.5 or later • 512 MB RAM Recommended PC Requirements: • Pentium 4 or Athlon Processor •...
...standard five-pin MIDI cable to connect this output to 24 bit, you can use channel inputs 1-4 and outputs 1-4. 24. Note that the iO4 is set to the MIDI IN of an external MIDI device. 23. 16/24 BIT MODE - Use the included USB cable to connect the...8226; Pentium III 450 MHz Processor • 512 MB RAM • Available USB 2.0 Port • Windows XP (with Service Pack 2 installed) Minimum Macintosh Requirements: • Apple computer with native USB 2.0 support • Mac OS X 10.5 or later • 512 MB RAM Recommended PC Requirements: • Pentium 4 or Athlon Processor •...
Quick Start Guide
Page 6
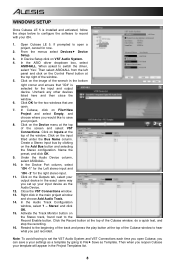
...6. computer. 2. Go to "5." Use the included USB cable to connect the iO4 to your audio software program is a class-compliant device that supports USB audio. Go to close the Properties window. 10. In the new window, click the Advanced tab and select 2-channel, 16-bit, 44100 Hz (CD... Quality) as the default device. 5. Be sure your computer. 2. Click OK to close the Properties window. 9. Uncheck both boxes under Exclusive Mode....
...6. computer. 2. Go to "5." Use the included USB cable to connect the iO4 to your audio software program is a class-compliant device that supports USB audio. Go to close the Properties window. 10. In the new window, click the Advanced tab and select 2-channel, 16-bit, 44100 Hz (CD... Quality) as the default device. 5. Be sure your computer. 2. Click OK to close the Properties window. 9. Uncheck both boxes under Exclusive Mode....
Quick Start Guide
Page 7
...Activation Code" button to download the license for your number, click the "Support" menu and select "Update eLicenser License Database." 5. Attention Windows Users: If you already have the latest version of your computer has a working Internet connection to activate the license because the eLicenser Control... Center (eLCC) needs to begin using it. Right-click the Cubase icon on screen. 10. Under "Privilege Level," check the box that your Soft-eLicenser number. Open the eLicense Control Center (eLCC) software and make a ...
...Activation Code" button to download the license for your number, click the "Support" menu and select "Update eLicenser License Database." 5. Attention Windows Users: If you already have the latest version of your computer has a working Internet connection to activate the license because the eLicenser Control... Center (eLCC) needs to begin using it. Right-click the Cubase icon on screen. 10. Under "Privilege Level," check the box that your Soft-eLicenser number. Open the eLicense Control Center (eLCC) software and make a ...
Quick Start Guide
Page 8
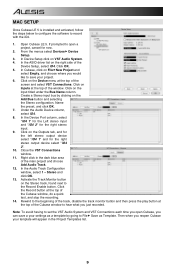
... Name column. Then select ASIO4ALL from the left panel and click on the Control Panel button at the top of the window. 5. Click OK for the two windows that "iO4" is installed and activated, follow the steps below to configure the software to the Record Enable button. Click on VST ...your output device in the main project window and choose Add Audio Track. 14. Click on the Add Bus button and selecting the Stereo configuration. Create a Stereo input bus by going to open Cubase, you just recorded. Under the Audio Device column, select ASIO4ALL. 10. Click on the Outputs tab, ...
... Name column. Then select ASIO4ALL from the left panel and click on the Control Panel button at the top of the window. 5. Click OK for the two windows that "iO4" is installed and activated, follow the steps below to configure the software to the Record Enable button. Click on VST ...your output device in the main project window and choose Add Audio Track. 14. Click on the Add Bus button and selecting the Stereo configuration. Create a Stereo input bus by going to open Cubase, you just recorded. Under the Audio Device column, select ASIO4ALL. 10. Click on the Outputs tab, ...
Quick Start Guide
Page 9
... Stereo configuration. In the Device Port column, select "iO4 1" for the Left stereo input and "iO4 2" for the right stereo output device select "iO4 2". 10. In the Audio Track Configuration window, select 1 - Create a Stereo input bus by going to record with the iO4. 1. Under the Audio Device column, select iO4. 8. Name the preset, and click OK. 7. In...
... Stereo configuration. In the Device Port column, select "iO4 1" for the Left stereo input and "iO4 2" for the right stereo output device select "iO4 2". 10. In the Audio Track Configuration window, select 1 - Create a Stereo input bus by going to record with the iO4. 1. Under the Audio Device column, select iO4. 8. Name the preset, and click OK. 7. In...


