
User Guide
Page 3
... alesis.com. Connection Diagram Kick Pad* ("Trigger") Power Media player* External MIDI Device (Keyboard, Drum Module, etc.*) Footswitch* Pad* Computer* * Sold separately Amplifier* 3 Study the connection diagram. For additional product support, visit alesis.com/support. Make sure all items listed in the Box Contents are included in the box. 2. For the latest information about this product (system requirements, compatibility information, etc.), visit alesis.com/samplepad-pro. User Guide (English) 1. READ SAFETY INSTRUCTION BOOKLET BEFORE USING THE...
... alesis.com. Connection Diagram Kick Pad* ("Trigger") Power Media player* External MIDI Device (Keyboard, Drum Module, etc.*) Footswitch* Pad* Computer* * Sold separately Amplifier* 3 Study the connection diagram. For additional product support, visit alesis.com/support. Make sure all items listed in the Box Contents are included in the box. 2. For the latest information about this product (system requirements, compatibility information, etc.), visit alesis.com/samplepad-pro. User Guide (English) 1. READ SAFETY INSTRUCTION BOOKLET BEFORE USING THE...
User Guide
Page 4
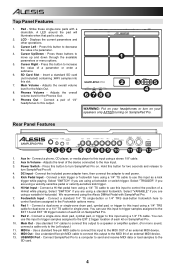
... using a stereo 1/8" cable. 2. Footswitch Input - You can use this input to trigger samples assigned to use this output. 1 2 678 9 3 5 4 WARNING: Put on SamplePad Pro. 10. USB/MIDI Port - Connect SamplePad Pro to a computer to send and receive MIDI data or load samples to turn SamplePad Pro on. Displays the current parameters and other operations. 3. Press these single-zone pads with SamplePad Pro. 7. Adjusts the overall volume level for the Main Out. 8. Aux In - Connect the included power adapter here, then connect the adapter...
... using a stereo 1/8" cable. 2. Footswitch Input - You can use this input to trigger samples assigned to use this output. 1 2 678 9 3 5 4 WARNING: Put on SamplePad Pro. 10. USB/MIDI Port - Connect SamplePad Pro to a computer to send and receive MIDI data or load samples to turn SamplePad Pro on. Displays the current parameters and other operations. 3. Press these single-zone pads with SamplePad Pro. 7. Adjusts the overall volume level for the Main Out. 8. Aux In - Connect the included power adapter here, then connect the adapter...
User Guide
Page 5
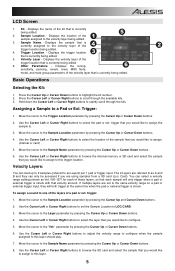
... buttons to browse the SD card and select the sample that you would like to scroll through the kits. Sample Location - Displays the tuning, 6 sensitivity, panning, reverb, level, MIDI Note, mode, and mute group parameters of these layers, so that each sample will both trigger at the same time when the pad or external trigger is struck with that is currently being edited...
... buttons to browse the SD card and select the sample that you would like to scroll through the kits. Sample Location - Displays the tuning, 6 sensitivity, panning, reverb, level, MIDI Note, mode, and mute group parameters of these layers, so that each sample will both trigger at the same time when the pad or external trigger is struck with that is currently being edited...

User Guide
Page 6
... adjust the MIDI note number. [00-127] Note: The MIDI note does not have an effect on the internal sound. 6 Then press the Cursor Left or Cursor Right button to 48 MB worth of samples per kit (the sample library on the SD card will be treated as a 3 MB sample when it will take a few seconds to load into the memory. • SamplePad Pro supports...
... adjust the MIDI note number. [00-127] Note: The MIDI note does not have an effect on the internal sound. 6 Then press the Cursor Left or Cursor Right button to 48 MB worth of samples per kit (the sample library on the SD card will be treated as a 3 MB sample when it will take a few seconds to load into the memory. • SamplePad Pro supports...

User Guide
Page 7
... mute group function, you strike another pad. For example, you set the tempo of each other out, similar to start or stop the loop, strike the pad or ext. trigger, navigate to the MGRP, and use the Cursor Left or Cursor Right buttons to select the mode. trigger strike will trigger the assigned sample and overlap the sound from the beginning after setting both pads to...
... mute group function, you strike another pad. For example, you set the tempo of each other out, similar to start or stop the loop, strike the pad or ext. trigger, navigate to the MGRP, and use the Cursor Left or Cursor Right buttons to select the mode. trigger strike will trigger the assigned sample and overlap the sound from the beginning after setting both pads to...

User Guide
Page 8
... both buttons by changing the setting for FOOTSWITCH1. For 1/4" TS single-button footswitches, you can only assign one function to exit this menu. The available footswitch functions are 1/2, 1/4, 1/8, 1/16, 2/2, 2/4, 2/8, 2/16, 3/2, 3/4, 3/8, 3/16, 4/2, 4/4, 4/8, 4/16, 5/2, 5/4, 5/8, 5/16, 6/2, 6/4, 6/8, 6/16, 7/2, 7/4, 7/8, 7/16, 8/2, 8/4, 8/8, 8/16, 9/2, 9/4, 9/8, and 9/16. Metronome • Switch: Turns the metronome on or off. • Sound: Selects the sound of the metronome from Voice, Metronome, Claves, Sticks, Cowbell, and Beep. • Tempo: Adjusts the tempo of the metronome...
... both buttons by changing the setting for FOOTSWITCH1. For 1/4" TS single-button footswitches, you can only assign one function to exit this menu. The available footswitch functions are 1/2, 1/4, 1/8, 1/16, 2/2, 2/4, 2/8, 2/16, 3/2, 3/4, 3/8, 3/16, 4/2, 4/4, 4/8, 4/16, 5/2, 5/4, 5/8, 5/16, 6/2, 6/4, 6/8, 6/16, 7/2, 7/4, 7/8, 7/16, 8/2, 8/4, 8/8, 8/16, 9/2, 9/4, 9/8, and 9/16. Metronome • Switch: Turns the metronome on or off. • Sound: Selects the sound of the metronome from Voice, Metronome, Claves, Sticks, Cowbell, and Beep. • Tempo: Adjusts the tempo of the metronome...
User Guide
Page 9
... buttons to the factory default settings, hold Cursor Left and Cursor Up on SamplePad Pro for two seconds. Copying a Kit 1. Factory Reset To reset the internal kits and global settings to exit this mode, hold the Cursor Left and Cursor Right buttons while powering on the MIDI Receive Channel. MIDI • Receive Channel: Sets the MIDI channel that SamplePad Pro will not affect samples or kits stored on your Mac or PC via the USB connection...
... buttons to the factory default settings, hold Cursor Left and Cursor Up on SamplePad Pro for two seconds. Copying a Kit 1. Factory Reset To reset the internal kits and global settings to exit this mode, hold the Cursor Left and Cursor Right buttons while powering on the MIDI Receive Channel. MIDI • Receive Channel: Sets the MIDI channel that SamplePad Pro will not affect samples or kits stored on your Mac or PC via the USB connection...
User Guide
Page 43
SD is a trademark of their respective owners. 43 Appendix (English) Specifications Power: 9V DC, 800mA, center-positive Dimensions (Length x Width x Height): 15" x 11.2" x 1.5" (381 mm x 284 mm x 38 mm) Weight: 5.8 lbs ( 2.6 kg) SD Card Specs: Supports SD/SDHC cards up to 32 GB with a FAT32 file system Supported File Type: 16-bit, mono or stereo .WAV files with a sample rate of SD-3C, registered...
SD is a trademark of their respective owners. 43 Appendix (English) Specifications Power: 9V DC, 800mA, center-positive Dimensions (Length x Width x Height): 15" x 11.2" x 1.5" (381 mm x 284 mm x 38 mm) Weight: 5.8 lbs ( 2.6 kg) SD Card Specs: Supports SD/SDHC cards up to 32 GB with a FAT32 file system Supported File Type: 16-bit, mono or stereo .WAV files with a sample rate of SD-3C, registered...


