User Manual
Page 6
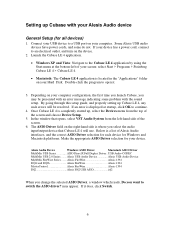
...setup guide, and properly setting up , select the Devices menu from the left of Alesis Audio interfaces, and the correct ASIO Driver selection for each device for Windows and Macintosh platforms. Make the appropriate...Vista: Navigate to open it does, click Switch. 6 USB Audio CODEC MultiMix USB 2.0 Series.......Alesis USB Audio Device Alesis USB Audio Device MultiMix FireWire Series.......Alesis FireWire Alesis 1394 IO|14 and IO|26 Alesis FireWire Alesis 1394 MasterControl Alesis FireWire Alesis 1394 IO|2 Alesis IO|2 USB ASIO io|2 When you change the selected ASIO Driver, ...
...setup guide, and properly setting up , select the Devices menu from the left of Alesis Audio interfaces, and the correct ASIO Driver selection for each device for Windows and Macintosh platforms. Make the appropriate...Vista: Navigate to open it does, click Switch. 6 USB Audio CODEC MultiMix USB 2.0 Series.......Alesis USB Audio Device Alesis USB Audio Device MultiMix FireWire Series.......Alesis FireWire Alesis 1394 IO|14 and IO|26 Alesis FireWire Alesis 1394 MasterControl Alesis FireWire Alesis 1394 IO|2 Alesis IO|2 USB ASIO io|2 When you change the selected ASIO Driver, ...

User Manual
Page 9
Below is a list of Alesis interfaces, and the total number of stereo inputs that your interface supports. Set the Count to Stereo (Fig. 6). Then click OK. Set Configuration to match the total number of supported stereo inputs. Your screen will now look something like this (Fig. 7): Fig. 7 9 Alesis Audio Device MultiMix 8 USB 2.0 MultiMix 16 USB 2.0 MultiMix 8 FireWire MultiMix 12 FireWire MultiMix 16 FireWire I/O 14 I/O 26 Stereo Input Busses 5 9 5 7 9 7 13 6. Fig. 6 5.
Below is a list of Alesis interfaces, and the total number of stereo inputs that your interface supports. Set the Count to Stereo (Fig. 6). Then click OK. Set Configuration to match the total number of supported stereo inputs. Your screen will now look something like this (Fig. 7): Fig. 7 9 Alesis Audio Device MultiMix 8 USB 2.0 MultiMix 16 USB 2.0 MultiMix 8 FireWire MultiMix 12 FireWire MultiMix 16 FireWire I/O 14 I/O 26 Stereo Input Busses 5 9 5 7 9 7 13 6. Fig. 6 5.

User Manual
Page 10
... like, you will be easily recalled. 10. Close the VST Connections window. Fig. 9 Now, all the inputs on your interface supports. Alesis Audio Device Mono Input Busses MultiMix 8 USB 2.0 10 MultiMix 16 USB 2.0 18 MultiMix 8 FireWire 10 MultiMix 12 FireWire 14 MultiMix 16 FireWire 18 I/O 14 14 I/O 26 9. Name the preset, and click OK (Fig. 9). Click on the Add Preset...
... like, you will be easily recalled. 10. Close the VST Connections window. Fig. 9 Now, all the inputs on your interface supports. Alesis Audio Device Mono Input Busses MultiMix 8 USB 2.0 10 MultiMix 16 USB 2.0 18 MultiMix 8 FireWire 10 MultiMix 12 FireWire 14 MultiMix 16 FireWire 18 I/O 14 14 I/O 26 9. Name the preset, and click OK (Fig. 9). Click on the Add Preset...

User Manual
Page 13
Click on your interface. 4. In Cubase LE 4, click on the Device menu at the top of the inputs on Inputs at the top of the screen and select VST Connections. You'll need to delete it. Audio configuration Cubase LE 4, by default, starts up your VST Connections. 1. Set Configuration to create a new configuration...
Click on your interface. 4. In Cubase LE 4, click on the Device menu at the top of the inputs on Inputs at the top of the screen and select VST Connections. You'll need to delete it. Audio configuration Cubase LE 4, by default, starts up your VST Connections. 1. Set Configuration to create a new configuration...

User Manual
Page 17
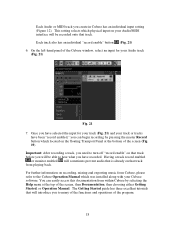
... a timeline on the first square button in the upper left and in Fig. 19). You will be created. 17 Fig. 19 Hint: The Cubase user interface has many icons and buttons that describes the button's function. 5. Select the Project menu from the top of your mouse over a button or icon for... top. If there is divided into sections. You should see two grey columns on the left of the screen and choose Add Track and then Audio (Fig. 20). Fig. 20 A new Audio track will appear that are not labeled.
... a timeline on the first square button in the upper left and in Fig. 19). You will be created. 17 Fig. 19 Hint: The Cubase user interface has many icons and buttons that describes the button's function. 5. Select the Project menu from the top of your mouse over a button or icon for... top. If there is divided into sections. You should see two grey columns on the left of the screen and choose Add Track and then Audio (Fig. 20). Fig. 20 A new Audio track will appear that are not labeled.
User Manual
Page 18
...Cubase window, select an input for your track (Fig. 21) and your track or tracks have selected the input for your Audio/MIDI interface will sometimes prevent audio that will be recorded onto that track. For further information on that track before you will introduce you can easily access this ... the screen (Fig. 19). Once you have been "record enabled," you to many of the functions and operations of the program. 18 Each Audio or MIDI track you need to turn off "record enable" on the floating Transport Panel at the top of the screen, then Documentation, then...
...Cubase window, select an input for your track (Fig. 21) and your track or tracks have selected the input for your Audio/MIDI interface will sometimes prevent audio that will be recorded onto that track. For further information on that track before you will introduce you can easily access this ... the screen (Fig. 19). Once you have been "record enabled," you to many of the functions and operations of the program. 18 Each Audio or MIDI track you need to turn off "record enable" on the floating Transport Panel at the top of the screen, then Documentation, then...

Quick Start Guide
Page 22
TECHNICAL SPECIFICATIONS INPUT CHANNELS EQUALIZATION AUX SENDS AUX RETURNS CHANNEL LEVELS MASTER LEVELS 1/4" INPUTS RCA INPUTS 1/4" OUTPUTS RCA OUTPUTS USB AUDIO INTERFACE MIC INPUT Sensitivity Range: -69dBu to -19dBu nominal, +18dBu maximum LINE INPUT Sensitivity Range: -49dBu to -+1dBu nominal, +18dBu ...+18dBV maximum MAIN OUT / MONITOR OUT / AUX SEND: +4dBu nominal, +18dBu maximum 2 TRACK OUT Level: -9dBV nominal, +19dBV maximum Resolution: Sampling Rate: Interface: 16-bit DAC: 32, 44.1, 48 kHz ADC: 8, 11.025, 16, 22.05, 32, 44.1, 48 kHz USB1.1 or better * Specifications are subject...
TECHNICAL SPECIFICATIONS INPUT CHANNELS EQUALIZATION AUX SENDS AUX RETURNS CHANNEL LEVELS MASTER LEVELS 1/4" INPUTS RCA INPUTS 1/4" OUTPUTS RCA OUTPUTS USB AUDIO INTERFACE MIC INPUT Sensitivity Range: -69dBu to -19dBu nominal, +18dBu maximum LINE INPUT Sensitivity Range: -49dBu to -+1dBu nominal, +18dBu ...+18dBV maximum MAIN OUT / MONITOR OUT / AUX SEND: +4dBu nominal, +18dBu maximum 2 TRACK OUT Level: -9dBV nominal, +19dBV maximum Resolution: Sampling Rate: Interface: 16-bit DAC: 32, 44.1, 48 kHz ADC: 8, 11.025, 16, 22.05, 32, 44.1, 48 kHz USB1.1 or better * Specifications are subject...
