User Manual
Page 5
...;15.119 of time. if the TV has been exposed to qualified service personnel under the following conditions: - Operation is connected to the TV, be sure the service technician uses replacement parts specified by the operating instructions. Never spill liquid of antenna discharge unit, connection to normal. • When replacement parts are covered by the manufacturer or those controls that are required, be sure the antenna or cable system is...
...;15.119 of time. if the TV has been exposed to qualified service personnel under the following conditions: - Operation is connected to the TV, be sure the service technician uses replacement parts specified by the operating instructions. Never spill liquid of antenna discharge unit, connection to normal. • When replacement parts are covered by the manufacturer or those controls that are required, be sure the antenna or cable system is...

User Manual
Page 7
... 1:08 PM Page 7 A Guide to Digital TV What is High Definition Television (HDTV). Digital television (DTV) is a new way of Dolby digital audio formats from a detailed program guide, ordering products on the same TV channel) and datacasting (providing electronic program guides and interactive television). HDTV program formats include 1080-line interlaced (1080i) and 720-line progressive (720p). Dolby Surround Sound With DTV, you to Dolby Digital 5.1 surround, using your TV set. choosing programs from Dolby Surround 2.0 to...
... 1:08 PM Page 7 A Guide to Digital TV What is High Definition Television (HDTV). Digital television (DTV) is a new way of Dolby digital audio formats from a detailed program guide, ordering products on the same TV channel) and datacasting (providing electronic program guides and interactive television). HDTV program formats include 1080-line interlaced (1080i) and 720-line progressive (720p). Dolby Surround Sound With DTV, you to Dolby Digital 5.1 surround, using your TV set. choosing programs from Dolby Surround 2.0 to...

User Manual
Page 9
... with many existing TV antennas. English - 9 How can provide broadcast DTV signals via a master TV antenna system to receive DTV signals indoors? So you won't have to watch OTA DTV and HDTV programs. They're free, unlike subscription satellite TV or premium cable TV. Residents of neighborhood associations to enjoy clear, sharp widescreen images and high-quality audio. However, DTV broadcast channel assignments are no noise, ghosting, static...
... with many existing TV antennas. English - 9 How can provide broadcast DTV signals via a master TV antenna system to receive DTV signals indoors? So you won't have to watch OTA DTV and HDTV programs. They're free, unlike subscription satellite TV or premium cable TV. Residents of neighborhood associations to enjoy clear, sharp widescreen images and high-quality audio. However, DTV broadcast channel assignments are no noise, ghosting, static...
User Manual
Page 10
... Regular Audio and Video Jacks 24 Connecting a Digital TV Set-Top Box 25 Connecting to DVI (Digital Visual Interface 25 Connecting a Digital Audio System 26 Connecting to an Analog Amplifier 26 Installing Batteries in the Remote Control 27 Chapter 3: Operation Turning the TV On and Off ...28 Plug & Play Feature ...28 Adjusting the Screen Automatically (Self Focus 30 Deactivating the Automatic Execution of the Self Focus 31 Removing the "Self Focus" Message from the Display 31 Adjusting Convergence Manually 32 Viewing...
... Regular Audio and Video Jacks 24 Connecting a Digital TV Set-Top Box 25 Connecting to DVI (Digital Visual Interface 25 Connecting a Digital Audio System 26 Connecting to an Analog Amplifier 26 Installing Batteries in the Remote Control 27 Chapter 3: Operation Turning the TV On and Off ...28 Plug & Play Feature ...28 Adjusting the Screen Automatically (Self Focus 30 Deactivating the Automatic Execution of the Self Focus 31 Removing the "Self Focus" Message from the Display 31 Adjusting Convergence Manually 32 Viewing...
User Manual
Page 11
... Your VCR 9 (Cable box or DVD player 80 9 Remote Control Codes 81 9 9 Chapter 5: Troubleshooting 0 Identifying Problems ...82 0 0 Appendix 1 Cleaning and Maintaining Your TV 83 2 Using Your TV in Another Country 83 3 Specifications ...83 4 4 5 6 English - 11 Analog 69 0 Viewing Closed Captions (On-Screen Text Messages) - Digital 58 3 Choosing a Multi-Channel Sound (MTS) track - BP68-00516A-01 (P62A_Akai_Eng) 7/5/05 1:08 PM Page 11 CONTENTS Chapter 3: Operation (continued) 2 Sound Control ...47 2 Adjusting the Volume 48 3 Using the MUTE Button 48...
... Your VCR 9 (Cable box or DVD player 80 9 Remote Control Codes 81 9 9 Chapter 5: Troubleshooting 0 Identifying Problems ...82 0 0 Appendix 1 Cleaning and Maintaining Your TV 83 2 Using Your TV in Another Country 83 3 Specifications ...83 4 4 5 6 English - 11 Analog 69 0 Viewing Closed Captions (On-Screen Text Messages) - Digital 58 3 Choosing a Multi-Channel Sound (MTS) track - BP68-00516A-01 (P62A_Akai_Eng) 7/5/05 1:08 PM Page 11 CONTENTS Chapter 3: Operation (continued) 2 Sound Control ...47 2 Adjusting the Volume 48 3 Using the MUTE Button 48...
User Manual
Page 12
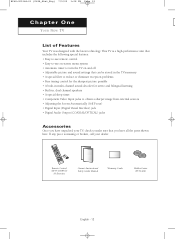
... tuning control for the sharpest picture possible • A built-in multi-channel sound decoder for stereo and bilingual listening • Built-in, dual channel speakers • A special sleep timer • Component Video Input jacks to obtain a sharper image from external sources • Adjusting the Screen Automatically (Self Focus) ENTER • Digital Input (Digital Visual Interface) jack • Digital Audio Output (COAXIAL/OPTICAL) jacks Accessories ENTER Once you have all the parts shown...
... tuning control for the sharpest picture possible • A built-in multi-channel sound decoder for stereo and bilingual listening • Built-in, dual channel speakers • A special sleep timer • Component Video Input jacks to obtain a sharper image from external sources • Adjusting the Screen Automatically (Self Focus) ENTER • Digital Input (Digital Visual Interface) jack • Digital Audio Output (COAXIAL/OPTICAL) jacks Accessories ENTER Once you have all the parts shown...
User Manual
Page 15
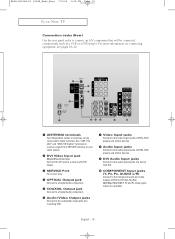
...; OPTICAL Output jack Connect to a Digital Audio component. ˆ COAXIAL Output jack Connect to a Digital Audio component. Ø Audio/Video Output jacks Connect to the audio/video input jacks of a recording VCR. ∏ Video Input jacks Connect to the video output jacks of DVD or DTV Set-Top Box. 480i/480p/720p/1080i Y, PB and PR video signal inputs are available. Use "ANT 1 IN (Air)" and "ANT 2 IN (Cable)" terminals to receive a signal from VHF/UHF antennas or your cable system. ´ DVI Video Input jack (Digital...
...; OPTICAL Output jack Connect to a Digital Audio component. ˆ COAXIAL Output jack Connect to a Digital Audio component. Ø Audio/Video Output jacks Connect to the audio/video input jacks of a recording VCR. ∏ Video Input jacks Connect to the video output jacks of DVD or DTV Set-Top Box. 480i/480p/720p/1080i Y, PB and PR video signal inputs are available. Use "ANT 1 IN (Air)" and "ANT 2 IN (Cable)" terminals to receive a signal from VHF/UHF antennas or your cable system. ´ DVI Video Input jack (Digital...
User Manual
Page 16
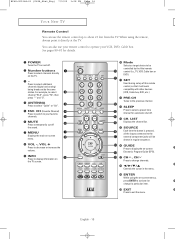
... using the on -screen menu. - See pages 80~81 for automatic shut off the sound. ∏ MENU Displays the main on -screen menus, press ENTER to activate (or ◊ change channels. POWER TV VCR CABLE DVD SET ˝ Mode Selects a target device to be shown in the menu. LIST Displays the channel list. Æ SOURCE Each time the button is pressed, all the inputs connected to the external component jacks will work compatibly with other devices (VCR, Cable box, DVD...
... using the on -screen menu. - See pages 80~81 for automatic shut off the sound. ∏ MENU Displays the main on -screen menus, press ENTER to activate (or ◊ change channels. POWER TV VCR CABLE DVD SET ˝ Mode Selects a target device to be shown in the menu. LIST Displays the channel list. Æ SOURCE Each time the button is pressed, all the inputs connected to the external component jacks will work compatibly with other devices (VCR, Cable box, DVD...
User Manual
Page 17
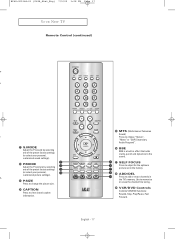
... picture set in effect that adds clarity, punch and dynamics to view closed caption information. BBE BBE is a built-in the factory. ÷ ADD/DEL Press to choose "Stereo", "Mono" or "SAP (Secondary Audio Program)". - PRE-CH ANTENNA FAV.CH CH. s, ◊ P.SIZE Press to change the picture size. ± CAPTION Press to the sound. - Use to memorize or erase the channel fine tuning. ® VCR/DVD Controls Controls VCR/DVD...
... picture set in effect that adds clarity, punch and dynamics to view closed caption information. BBE BBE is a built-in the factory. ÷ ADD/DEL Press to choose "Stereo", "Mono" or "SAP (Secondary Audio Program)". - PRE-CH ANTENNA FAV.CH CH. s, ◊ P.SIZE Press to change the picture size. ± CAPTION Press to the sound. - Use to memorize or erase the channel fine tuning. ® VCR/DVD Controls Controls VCR/DVD...
User Manual
Page 24
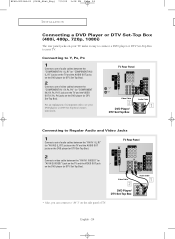
... 24 INSTALLATION Connecting a DVD Player or DTV Set-Top Box (480i, 480p, 720p, 1080i) The rear panel jacks on the DVD player (or DTV Set-Top Box). TV Rear Panel Video Cable 2 DVD Player/ DTV Set-Top Box Audio Cable 1 Connecting to Regular Audio and Video Jacks 1 Connect a set of Component video, see your DVD player's (or DTV Set-Top Box) owner's instruction. TV Rear Panel 2 Connect a video cable between the "COMPONENT IN 1 (Y, PB, PR)" (or "COMPONENT IN 2 (Y, PB, PR)") jacks on the TV and the VIDEO OUT (Y, PB, PR) jacks on the DVD player...
... 24 INSTALLATION Connecting a DVD Player or DTV Set-Top Box (480i, 480p, 720p, 1080i) The rear panel jacks on the DVD player (or DTV Set-Top Box). TV Rear Panel Video Cable 2 DVD Player/ DTV Set-Top Box Audio Cable 1 Connecting to Regular Audio and Video Jacks 1 Connect a set of Component video, see your DVD player's (or DTV Set-Top Box) owner's instruction. TV Rear Panel 2 Connect a video cable between the "COMPONENT IN 1 (Y, PB, PR)" (or "COMPONENT IN 2 (Y, PB, PR)") jacks on the TV and the VIDEO OUT (Y, PB, PR) jacks on the DVD player...

User Manual
Page 25
... inputting a high-bandwidth Digital Content Protection high-definition picture source to the DVI INPUT jack on the TV, high-definition pictures can be displayed on the screen in their digital form. 1 Connect a set of a personal computer. • Use a DVI 25-pin cable (commercially available) in order to digitally connect the TV with a DTV decoder. TV Rear Panel 2 DVI Cable 1 Audio Cable From Cable or From Antenna DTV Set-Top Box Notes • The DVI INPUT jack is not compatible with the picture signal of audio cables between the "DVI...
... inputting a high-bandwidth Digital Content Protection high-definition picture source to the DVI INPUT jack on the TV, high-definition pictures can be displayed on the screen in their digital form. 1 Connect a set of a personal computer. • Use a DVI 25-pin cable (commercially available) in order to digitally connect the TV with a DTV decoder. TV Rear Panel 2 DVI Cable 1 Audio Cable From Cable or From Antenna DTV Set-Top Box Notes • The DVI INPUT jack is not compatible with the picture signal of audio cables between the "DVI...

User Manual
Page 26
... black cover from the optical output before inserting the cable. 3 If your audio system. Be certain to the "OPTICAL OUT" jack on the TV. TV Rear Panel English - 26 Do not connect both coaxial and optical digital audio inputs, AKAI recommends you use the optical digital output on the TV. A transmission system of digital audio in the form of a light wave, S/PDIF format using a glass conductor. • COAXIAL: The digital audio signal is received through glass fibers. TV Rear Panel or 1 2 Audio System • OPTICAL: Converts...
... black cover from the optical output before inserting the cable. 3 If your audio system. Be certain to the "OPTICAL OUT" jack on the TV. TV Rear Panel English - 26 Do not connect both coaxial and optical digital audio inputs, AKAI recommends you use the optical digital output on the TV. A transmission system of digital audio in the form of a light wave, S/PDIF format using a glass conductor. • COAXIAL: The digital audio signal is received through glass fibers. TV Rear Panel or 1 2 Audio System • OPTICAL: Converts...

User Manual
Page 29
... have received a digital signal, the time will be updated automatically." When you live ." OK d... "Set to the appropriate time zone on . 6 Press the ▲ or ▼ button to highlight the time zone for your local area (and to move the highlight to daylight savings time." Air Channel 15 Stop Auto Program Auto Program is automatically displayed. Daylight Savings Time : Off On "Select the time zone in which you locate...
... have received a digital signal, the time will be updated automatically." When you live ." OK d... "Set to the appropriate time zone on . 6 Press the ▲ or ▼ button to highlight the time zone for your local area (and to move the highlight to daylight savings time." Air Channel 15 Stop Auto Program Auto Program is automatically displayed. Daylight Savings Time : Off On "Select the time zone in which you locate...

User Manual
Page 34
...; button to display, change or use the MENU, CH / , VOL+/-, and √ √ (ENTER) buttons on the screen. Viewing the Display The display identifies the current channel and the status of certain picture and sound settings and the current time. Air 13 Mono Picture Mode : Dynamic Sound Mode : Custom MTS : Stereo No Time Information English - 34 The TV displays the current channel, the status of certain audio-video settings. The "Input" menu appears on the control panel of the TV to...
...; button to display, change or use the MENU, CH / , VOL+/-, and √ √ (ENTER) buttons on the screen. Viewing the Display The display identifies the current channel and the status of certain picture and sound settings and the current time. Air 13 Mono Picture Mode : Dynamic Sound Mode : Custom MTS : Stereo No Time Information English - 34 The TV displays the current channel, the status of certain audio-video settings. The "Input" menu appears on the control panel of the TV to...

User Manual
Page 44
... adjust the settings according to your personalized picture settings. 1 Press the MENU button. English - 44 Using Automatic Picture Settings Your TV has automatic picture settings ("Dynamic", "Standard", and "Movie") that are preset at the factory. T V Mode Mode : DDyynnaammicic Contrast Brightness Sharpness Color Standard 100 Movie 45 Custom 75 50 Tint G 50 R50 Color Tone : Cool 1 Reset Alternate method: Simply press the P.MODE button on the remote control repeatedly to select one of picture which automatically recalls...
... adjust the settings according to your personalized picture settings. 1 Press the MENU button. English - 44 Using Automatic Picture Settings Your TV has automatic picture settings ("Dynamic", "Standard", and "Movie") that are preset at the factory. T V Mode Mode : DDyynnaammicic Contrast Brightness Sharpness Color Standard 100 Movie 45 Custom 75 50 Tint G 50 R50 Color Tone : Cool 1 Reset Alternate method: Simply press the P.MODE button on the remote control repeatedly to select one of picture which automatically recalls...

User Manual
Page 62
... Timer Set on the remote control. 3 T V Press the ... or † button to the next step. Hour Minute am/pm Antenna ▲ 01 00 am /pm Activation ▲ 12 00 pm No ▼ œ Auto Power Off When you set the timer "On", the television will appear every time you press the INFO button. œ You can set the Hour, Minute, Channel, and Volume directly by timer. or † button to adjust "Hour...
... Timer Set on the remote control. 3 T V Press the ... or † button to the next step. Hour Minute am/pm Antenna ▲ 01 00 am /pm Activation ▲ 12 00 pm No ▼ œ Auto Power Off When you set the timer "On", the television will appear every time you press the INFO button. œ You can set the Hour, Minute, Channel, and Volume directly by timer. or † button to adjust "Hour...
User Manual
Page 64
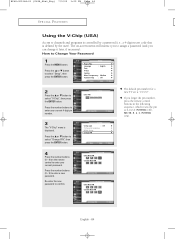
... 4-digit pin number. or † button to select "Change PIN", then press the ENTER button. œ The default pin number for a new TV set is "0 0 0 0". œ If you forget the pin number, press the remote control buttons in the following sequence, which resets the pin to 0-0-0-0: POWER (Off), MUTE, 8, 2, 4, POWER (On). 4 Press the number buttons (0 ~ 9) on -screen menu will instruct you can change it later, if necessary). Re-enter the new password...
... 4-digit pin number. or † button to select "Change PIN", then press the ENTER button. œ The default pin number for a new TV set is "0 0 0 0". œ If you forget the pin number, press the remote control buttons in the following sequence, which resets the pin to 0-0-0-0: POWER (Off), MUTE, 8, 2, 4, POWER (On). 4 Press the number buttons (0 ~ 9) on -screen menu will instruct you can change it later, if necessary). Re-enter the new password...

User Manual
Page 74
... the Red button on the remote control and repeatedly press the ENTER button the appropriate time is Mini Guide. Highlight the program and press the INFO button to search information about upcoming programs of additional details depends on the remote control to normal viewing mode. Press the Yellow button on the remote control.The set default guide is displayed. DTV Predator Tonight Show 7 - 1 KBS D - 2 8:00 News... The EPG supplies information, such as program lists...
... the Red button on the remote control and repeatedly press the ENTER button the appropriate time is Mini Guide. Highlight the program and press the INFO button to search information about upcoming programs of additional details depends on the remote control to normal viewing mode. Press the Yellow button on the remote control.The set default guide is displayed. DTV Predator Tonight Show 7 - 1 KBS D - 2 8:00 News... The EPG supplies information, such as program lists...
User Manual
Page 82
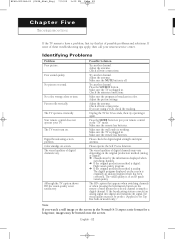
... SOURCE button. Check the antenna connections. Make sure the remote has batteries. The visual quality is off. The HD caption that appears when switching channels or when pressing the Information button on the screen is originally an analog program which has been converted. The TV operates erratically. The TV won't turn on screen. The visual qualities of these troubleshooting tips apply, then call your nearest service center. Adjust the picture settings. Adjust the antenna. Check...
... SOURCE button. Check the antenna connections. Make sure the remote has batteries. The visual quality is off. The HD caption that appears when switching channels or when pressing the Information button on the screen is originally an analog program which has been converted. The TV operates erratically. The TV won't turn on screen. The visual qualities of these troubleshooting tips apply, then call your nearest service center. Adjust the picture settings. Adjust the antenna. Check...
Brochure
Page 2
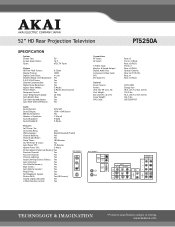
...HD Rear Projection Television PT5250A SPECIFICATION System Screen Size: Screen Aspect Ratio: Tuner: 52" 16:9 ATSC TV Tuner Picture HD Fine Pitch Screen: Display Format Digital Comb Filter: Dynamic Black Level Expansion: 2:2/3:2 Pull Down: Gamma Compensation: Digital Noise Reduction: Aspect Ratio (Wide): Picture Mode: Sharpness Control: Color Temperature Adjust: Auto Kinetic Bias: Scan Velocity Modulation: Auto Pixel Shift (CRT Burn): 0.52mm 1080i 4-Line Yes Yes Yes Yes 5 Modes 4 Modes (Each Source) Yes 20-Step Yes Yes Yes Audio Sound System: Sound Output: BBE...
...HD Rear Projection Television PT5250A SPECIFICATION System Screen Size: Screen Aspect Ratio: Tuner: 52" 16:9 ATSC TV Tuner Picture HD Fine Pitch Screen: Display Format Digital Comb Filter: Dynamic Black Level Expansion: 2:2/3:2 Pull Down: Gamma Compensation: Digital Noise Reduction: Aspect Ratio (Wide): Picture Mode: Sharpness Control: Color Temperature Adjust: Auto Kinetic Bias: Scan Velocity Modulation: Auto Pixel Shift (CRT Burn): 0.52mm 1080i 4-Line Yes Yes Yes Yes 5 Modes 4 Modes (Each Source) Yes 20-Step Yes Yes Yes Audio Sound System: Sound Output: BBE...


