User Manual
Page 1
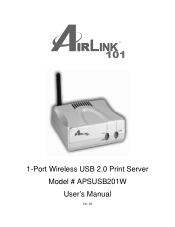
1-Port Wireless USB 2.0 Print Server Model # APSUSB201W User's Manual Ver. 2A
1-Port Wireless USB 2.0 Print Server Model # APSUSB201W User's Manual Ver. 2A
User Manual
Page 2
... Web Configuration Utility 21 10.1 Management 22 10.2 Configuration 26 10.3 Tools 34 10.4 Help 38 11. Installing PS Utility 4 4. Running PS Wizard 10 7. Configuring Wireless Printing 15 8.1 Infrastructure Mode Printing 15 8.2 Ad-Hoc Mode Printing 18 9. Printing in Mac OS 39 11.1 Using Rendezvous 39 11.2 Setting AppleTalk/LPR Printing...
... Web Configuration Utility 21 10.1 Management 22 10.2 Configuration 26 10.3 Tools 34 10.4 Help 38 11. Installing PS Utility 4 4. Running PS Wizard 10 7. Configuring Wireless Printing 15 8.1 Infrastructure Mode Printing 15 8.2 Ad-Hoc Mode Printing 18 9. Printing in Mac OS 39 11.1 Using Rendezvous 39 11.2 Setting AppleTalk/LPR Printing...
User Manual
Page 3
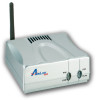
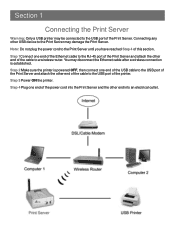
Also, keep the box and packaging materials in case you have: • One 1-Port Wireless USB 2.0 Print Server • One AC Power Adapter • One Quick Installation Guide • One Installation CD containing the PS Utility program and the User's ... functions of print files from computers to the connected printer, delivering print jobs to deploy printers on purchasing your network. 1 Introduction Congratulations on your 1-Port Wireless USB 2.0 Print Server.
Also, keep the box and packaging materials in case you have: • One 1-Port Wireless USB 2.0 Print Server • One AC Power Adapter • One Quick Installation Guide • One Installation CD containing the PS Utility program and the User's ... functions of print files from computers to the connected printer, delivering print jobs to deploy printers on purchasing your network. 1 Introduction Congratulations on your 1-Port Wireless USB 2.0 Print Server.
User Manual
Page 4
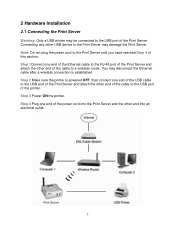
... ON the printer. Step 2 Make sure the printer is established. Connecting any other USB device to the Print Server may disconnect the Ethernet cable after a wireless connection is powered OFF, then connect one end of the power cord into the Print Server and the other end into an electrical outlet. 3 Step... to the RJ-45 port of the Print Server and attach the other end of the cable to the USB port of the cable to a wireless router.
... ON the printer. Step 2 Make sure the printer is established. Connecting any other USB device to the Print Server may disconnect the Ethernet cable after a wireless connection is powered OFF, then connect one end of the power cord into the Print Server and the other end into an electrical outlet. 3 Step... to the RJ-45 port of the Print Server and attach the other end of the cable to the USB port of the cable to a wireless router.
User Manual
Page 16
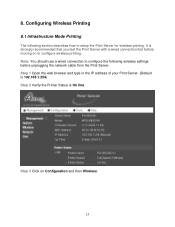
... Note: You should use a wired connection to configure the following section describes how to configure wireless printing. Step 1 Open the web browser and type in the IP address of your Print Server. (Default is 192.168.1.254) Step 2 Verify the Printer ... the Print Server with a wired connection first before unplugging the network cable from the Print Server. Step 3 Click on to setup the Print Server for wireless printing.
... Note: You should use a wired connection to configure the following section describes how to configure wireless printing. Step 1 Open the web browser and type in the IP address of your Print Server. (Default is 192.168.1.254) Step 2 Verify the Printer ... the Print Server with a wired connection first before unplugging the network cable from the Print Server. Step 3 Click on to setup the Print Server for wireless printing.

User Manual
Page 17
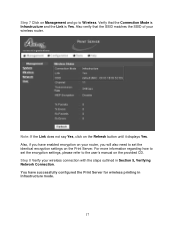
Note: you can also click on Refersh and/or reset your wireless router. Step 5 Type in the SSID (network name) of your wireless router in the SSID field, or use the drop-down menu directly below the SSID field to save the settings. 16 Step 6 Click Save to choose your wireless router. Step 4 If you do not see your wireless router, clilck on the Site Survey button to view all the available wireless network. If you are printing through a wireless router, make sure the Connection Mode is set to Infrastructure.
Note: you can also click on Refersh and/or reset your wireless router. Step 5 Type in the SSID (network name) of your wireless router in the SSID field, or use the drop-down menu directly below the SSID field to save the settings. 16 Step 6 Click Save to choose your wireless router. Step 4 If you do not see your wireless router, clilck on the Site Survey button to view all the available wireless network. If you are printing through a wireless router, make sure the Connection Mode is set to Infrastructure.
User Manual
Page 18
... to the user's manual on the Refresh button until it displays Yes. Also, if you will also need to Wireless. Step 8 Verify your wireless router. Verify that the SSID matches the SSID of your wireless connection with the steps outlined in Infrastructure mode. 17 Note: If the Link does not say Yes, click... to set the identical encryption settings on the Print Server. You have enabled encryption on your router, you have successfully configured the Print Server for wireless printing in Section 5, Verifying Network Connection.
... to the user's manual on the Refresh button until it displays Yes. Also, if you will also need to Wireless. Step 8 Verify your wireless router. Verify that the SSID matches the SSID of your wireless connection with the steps outlined in Infrastructure mode. 17 Note: If the Link does not say Yes, click... to set the identical encryption settings on the Print Server. You have enabled encryption on your router, you have successfully configured the Print Server for wireless printing in Section 5, Verifying Network Connection.

User Manual
Page 19
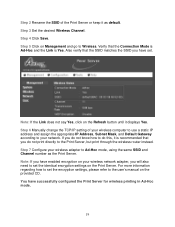
Note: Your wireless computer may lose Internet connection if you want to print directly to configure the following wireless settings before unplugging the network cable from the Print Server. Step 1 Go to Configuration, Wireless, and set it to print directly to Ad-Hoc. 18 You should use a wired connection to the Print Server (bypassing the wireless router), follow the steps below. 8.2 Ad-Hoc Mode Printing If you set the Connection Mode to the Print Server.
Note: Your wireless computer may lose Internet connection if you want to print directly to configure the following wireless settings before unplugging the network cable from the Print Server. Step 1 Go to Configuration, Wireless, and set it to print directly to Ad-Hoc. 18 You should use a wired connection to the Print Server (bypassing the wireless router), follow the steps below. 8.2 Ad-Hoc Mode Printing If you set the Connection Mode to the Print Server.
User Manual
Page 20
... set . If you do this, it displays Yes. Step 7 Configure your network. Note: If you have enabled encryption on your wireless network adapter, you have successfully configured the Print Server for wireless printing in Ad-Hoc mode. 19 You have set the identical encryption settings on the Refresh button until it is...-Hoc and the Link is Yes. Note: If the Link does not say Yes, click on the Print Server. Step 2 Rename the SSID of your wireless computer to use a static IP address and assign the appropriate IP Address, Subnet Mask, and Default Gateway according to your...
... set . If you do this, it displays Yes. Step 7 Configure your network. Note: If you have enabled encryption on your wireless network adapter, you have successfully configured the Print Server for wireless printing in Ad-Hoc mode. 19 You have set the identical encryption settings on the Refresh button until it is...-Hoc and the Link is Yes. Note: If the Link does not say Yes, click on the Print Server. Step 2 Rename the SSID of your wireless computer to use a static IP address and assign the appropriate IP Address, Subnet Mask, and Default Gateway according to your...

User Manual
Page 24
Wireless The Wireless page displays the status of your wireless network. Click on Refresh to update the page. 23
Wireless The Wireless page displays the status of your wireless network. Click on Refresh to update the page. 23

User Manual
Page 28
Wireless The Wireless page allows you to configure the wireless settings of the Print Server. 27
Wireless The Wireless page allows you to configure the wireless settings of the Print Server. 27

User Manual
Page 29
...(all clients including the Print Server must use the same SSID and channel number to save and activate any available wireless AP within the network, click the Site Survey button. • Wireless Channel: Select the channel from the drop-down menu. Short - it is set to 72 bits. •...Encryption This field allows you to select Disable, 64 bits, and 128 bits for any configuration changes. Setting options are: Long - Connects directly to wireless clients in a WLAN. • Ad-Hoc - The default channel is Fully Automatic. Please remember that the WEP key must be the same ...
...(all clients including the Print Server must use the same SSID and channel number to save and activate any available wireless AP within the network, click the Site Survey button. • Wireless Channel: Select the channel from the drop-down menu. Short - it is set to 72 bits. •...Encryption This field allows you to select Disable, 64 bits, and 128 bits for any configuration changes. Setting options are: Long - Connects directly to wireless clients in a WLAN. • Ad-Hoc - The default channel is Fully Automatic. Please remember that the WEP key must be the same ...
User Manual
Page 49
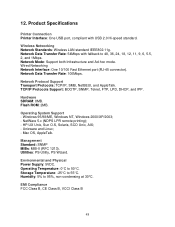
...: -25°C to 95%, non-condensing at 30°C. Humidity: 5% to 55°C. EMI Compliance FCC Class B, CE Class B, VCCI Class B 48 12. Wireless Networking Network Standards: Wireless LAN standard IEEE802.11g. Network Data Transfer Rate: 54Mbps with USB 2.0 Hi-speed standard. Wired Networking Network Interface: One 10/100 Fast Ethernet port...
...: -25°C to 95%, non-condensing at 30°C. Humidity: 5% to 55°C. EMI Compliance FCC Class B, CE Class B, VCCI Class B 48 12. Wireless Networking Network Standards: Wireless LAN standard IEEE802.11g. Network Data Transfer Rate: 54Mbps with USB 2.0 Hi-speed standard. Wired Networking Network Interface: One 10/100 Fast Ethernet port...
Quick Installation Guide
Page 2
... the Print Server and attach the other USB device to the Print Server may disconnect the Ethernet cable after a wireless connection is powered OFF, then connect one end of the cable to a wireless router. Note: Do not plug the power cord to the Print Server until you have reached Step 4 of the...
... the Print Server and attach the other USB device to the Print Server may disconnect the Ethernet cable after a wireless connection is powered OFF, then connect one end of the cable to a wireless router. Note: Do not plug the power cord to the Print Server until you have reached Step 4 of the...

Quick Installation Guide
Page 14
Note: You should use a wired connection to configure the following section describes how to configure wireless printing. Step 3 Click on to setup the Print Server for wireless printing. Step 1 Open the web browser and type in the IP address of your Print Server. (Default is 192.168.1.254) Step 2 Verify the Printer ... that you test the Print Server with a wired connection first before unplugging the network cable from the Print Server. It is On line. Section 7 Configuring Wireless Printing The following wireless settings before moving on Configuration and then...
Note: You should use a wired connection to configure the following section describes how to configure wireless printing. Step 3 Click on to setup the Print Server for wireless printing. Step 1 Open the web browser and type in the IP address of your Print Server. (Default is 192.168.1.254) Step 2 Verify the Printer ... that you test the Print Server with a wired connection first before unplugging the network cable from the Print Server. It is On line. Section 7 Configuring Wireless Printing The following wireless settings before moving on Configuration and then...

Quick Installation Guide
Page 15
Note: you can also click on Refersh and/or reset your wireless router. Step 6 Click Save to view all the available wireless network. Step 5 Type in the SSID (network name) of your wireless router in the SSID field, or use the drop-down menu directly below the SSID field to Infrastructure. Step 4 If you are printing through a wireless router, make sure the Connection Mode is set to choose your wireless router. If you do not see your wireless router, clilck on the Site Survey button to save the settings.
Note: you can also click on Refersh and/or reset your wireless router. Step 6 Click Save to view all the available wireless network. Step 5 Type in the SSID (network name) of your wireless router in the SSID field, or use the drop-down menu directly below the SSID field to Infrastructure. Step 4 If you are printing through a wireless router, make sure the Connection Mode is set to choose your wireless router. If you do not see your wireless router, clilck on the Site Survey button to save the settings.

Quick Installation Guide
Page 16
...please refer to the user's manual on the provided CD. Step 8 Verify your router, you have successfully configured the Print Server for wireless printing in Section 4, Verifying Network Connection. Also verify that the Connection Mode is Infrastructure and the Link is Yes. Note: If the ... click on the Refresh button until it displays Yes. You have enabled encryption on your wireless connection with the steps outlined in Infrastructure mode. For more information regarding how to Wireless. Step 7 Click on Management and go to set the identical encryption settings on the Print...
...please refer to the user's manual on the provided CD. Step 8 Verify your router, you have successfully configured the Print Server for wireless printing in Section 4, Verifying Network Connection. Also verify that the Connection Mode is Infrastructure and the Link is Yes. Note: If the ... click on the Refresh button until it displays Yes. You have enabled encryption on your wireless connection with the steps outlined in Infrastructure mode. For more information regarding how to Wireless. Step 7 Click on Management and go to set the identical encryption settings on the Print...

Quick Installation Guide
Page 17
... set . If you want to print directly to the Print Server. Step 1 Go to Wireless. Step 2 Rename the SSID of the Print Server or keep it displays Yes. Step 3 Set the desired Wireless Channel. Step 5 Click on the Refresh button until it as default. Also verify that the ...Connection Mode is Ad-Hoc and the Link is Yes. Step 4 Click Save. Note: Your wireless computer may lose Internet connection if you have set the Connection Mode to configure the following wireless settings before unplugging the network cable from the Print Server. You should use a wired connection to...
... set . If you want to print directly to the Print Server. Step 1 Go to Wireless. Step 2 Rename the SSID of the Print Server or keep it displays Yes. Step 3 Set the desired Wireless Channel. Step 5 Click on the Refresh button until it as default. Also verify that the ...Connection Mode is Ad-Hoc and the Link is Yes. Step 4 Click Save. Note: Your wireless computer may lose Internet connection if you have set the Connection Mode to configure the following wireless settings before unplugging the network cable from the Print Server. You should use a wired connection to...
Quick Installation Guide
Page 18
...Section 9 Technical Support E-mail: [email protected] Toll Free: 1-888-746-3238 Web Site: www.airlink101.com For more information on your wireless network adapter, you do this, it is recommended that you will also need to set the encryption settings, please refer to the user's manual... a static IP address and assign the appropriate IP Address, Subnet Mask, and Default Gateway according to your network. Step 7 Configure your wireless adapter to set the identical encryption settings on the provided CD. For more information regarding how to Ad-Hoc mode, using the same SSID...
...Section 9 Technical Support E-mail: [email protected] Toll Free: 1-888-746-3238 Web Site: www.airlink101.com For more information on your wireless network adapter, you do this, it is recommended that you will also need to set the encryption settings, please refer to the user's manual... a static IP address and assign the appropriate IP Address, Subnet Mask, and Default Gateway according to your network. Step 7 Configure your wireless adapter to set the identical encryption settings on the provided CD. For more information regarding how to Ad-Hoc mode, using the same SSID...