User Manual
Page 3
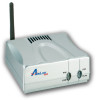
... includes a powerful software called, PS Utility, a user-friendly program that allows you to ship the unit in the future. 1.2 System Requirements Operating System: • Microsoft Windows 95/98/ME/NT/2000/XP/2003 • Apple Mac OS (with Apple Talk support) For Web Configuration: • Java-enabled web browser, such as...
... includes a powerful software called, PS Utility, a user-friendly program that allows you to ship the unit in the future. 1.2 System Requirements Operating System: • Microsoft Windows 95/98/ME/NT/2000/XP/2003 • Apple Mac OS (with Apple Talk support) For Web Configuration: • Java-enabled web browser, such as...

User Manual
Page 7
... need these information later. Step 5 Make sure the Print Server is listed under the Device Name and click on Start, Run, and type command (for Windows 95/98/ME) or cmd (for the IP Address, Subnet Mask, and Default Gateway. Step 3 Write down the information for...
... need these information later. Step 5 Make sure the Print Server is listed under the Device Name and click on Start, Run, and type command (for Windows 95/98/ME) or cmd (for the IP Address, Subnet Mask, and Default Gateway. Step 3 Write down the information for...

User Manual
Page 13
Step 7 Run the PS Wizard on the Print Server Name, select the Printer Port Name, and click Next. Step 5 Double-click on all the computers in your network that will use the Print Server. 12 Step 6 Click Finish and OK. (For Windows 95/98/ME, you'll need to reboot the computer).
Step 7 Run the PS Wizard on the Print Server Name, select the Printer Port Name, and click Next. Step 5 Double-click on all the computers in your network that will use the Print Server. 12 Step 6 Click Finish and OK. (For Windows 95/98/ME, you'll need to reboot the computer).

User Manual
Page 14
Please note that the instructions below are for Windows XP, but the steps are similar for all the other Windows operating systems. Step 1 Click on the printer that is to the Print Server and select Properties. 13 7. Step 2 Right-click on Start, Settings, Printers and Faxes. Performing Operating System Print Test The final step in setting up the Print Server is connected to perform an operating system print test.
Please note that the instructions below are for Windows XP, but the steps are similar for all the other Windows operating systems. Step 1 Click on the printer that is to the Print Server and select Properties. 13 7. Step 2 Right-click on Start, Settings, Printers and Faxes. Performing Operating System Print Test The final step in setting up the Print Server is connected to perform an operating system print test.

User Manual
Page 15
Windows should print out a test page. Step 3 Click on the Print Test Page button. You have successfully configured the Print Server for printing. 14
Windows should print out a test page. Step 3 Click on the Print Test Page button. You have successfully configured the Print Server for printing. 14

User Manual
Page 43
... the instructions below. Change your Macintosh computer in order to 192.168.1.x, where x is 192.168.1.254. Step 2 Open the System Preference window and click Network. In the Network window, select the AppleTalk tab and check the Make AppleTalk Active check box. 42 11.2 Setting AppleTalk/LPR Printing If you want to...
... the instructions below. Change your Macintosh computer in order to 192.168.1.x, where x is 192.168.1.254. Step 2 Open the System Preference window and click Network. In the Network window, select the AppleTalk tab and check the Make AppleTalk Active check box. 42 11.2 Setting AppleTalk/LPR Printing If you want to...
User Manual
Page 45
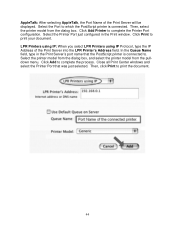
... the Printer Port configuration. Then, select the printer model from the pulldown menu. Click Add to print the document. 44 Close all Print Center windows and select the Printer Port that the PostScript printer is connected. Select the printer model from the dialog box, and select the printer model from... the dialog box. Then, click Print to complete the process. Click Print to . In the Queue Name field, type in the Print window. LPR Printers using IP: When you select LPR Printers using IP Protocol, type the IP Address of the Print Server will be displayed.
... the Printer Port configuration. Then, select the printer model from the pulldown menu. Click Add to print the document. 44 Close all Print Center windows and select the Printer Port that the PostScript printer is connected. Select the printer model from the dialog box, and select the printer model from... the dialog box. Then, click Print to complete the process. Click Print to . In the Queue Name field, type in the Print window. LPR Printers using IP: When you select LPR Printers using IP Protocol, type the IP Address of the Print Server will be displayed.

User Manual
Page 47
... displayed within the right column. Step 2 In the left column of the Printer Port you are using. Step 3 Double-click the name of the Chooser window, select the desired printer.
... displayed within the right column. Step 2 In the left column of the Printer Port you are using. Step 3 Double-click the name of the Chooser window, select the desired printer.
User Manual
Page 49
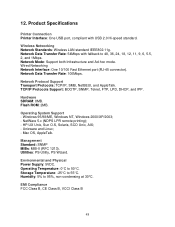
Windows 95/98/ME, Windows NT, Windows 2000/XP/2003; - Management Standard: SNMP MIBs: MIB-II (RFC 1213). Environmental and Physical Power Supply: 5VDC. EMI Compliance FCC Class B, CE Class B, VCCI Class B ...
Windows 95/98/ME, Windows NT, Windows 2000/XP/2003; - Management Standard: SNMP MIBs: MIB-II (RFC 1213). Environmental and Physical Power Supply: 5VDC. EMI Compliance FCC Class B, CE Class B, VCCI Class B ...

Quick Installation Guide
Page 5
... 3 Configuring Network Setting Before configuring the Print Server's network setting, please take note of your computer's TCP/IP setting. Step 3 Write down the information for Windows 2000/ XP) and click OK. Step 2 At the command prompt, type ipconfig and press Enter. Step 5 Make sure the Print Server is listed under the...
... 3 Configuring Network Setting Before configuring the Print Server's network setting, please take note of your computer's TCP/IP setting. Step 3 Write down the information for Windows 2000/ XP) and click OK. Step 2 At the command prompt, type ipconfig and press Enter. Step 5 Make sure the Print Server is listed under the...

Quick Installation Guide
Page 11
Step 5 Double-click on all the computers in your network that will use the print server. Step 6 Click Finish and OK. (For Windows 95/98/ME, you'll need to reboot the computer). Step 7 Run the PS Wizard on the Print Server Name, select the Printer Port Name, and click Next.
Step 5 Double-click on all the computers in your network that will use the print server. Step 6 Click Finish and OK. (For Windows 95/98/ME, you'll need to reboot the computer). Step 7 Run the PS Wizard on the Print Server Name, select the Printer Port Name, and click Next.

Quick Installation Guide
Page 12
Section 6 Performing Operating System Print Test The final step in setting up the Print Server is connected to perform an operating system print test. Please note that is to the Print Server and select Properties. Step 2 Right-click on the printer that the instructions below are for Windows XP, but the steps are similar for all the other Windows operating systems. Step 1 Click on Start, Settings, Printers and Faxes.
Section 6 Performing Operating System Print Test The final step in setting up the Print Server is connected to perform an operating system print test. Please note that is to the Print Server and select Properties. Step 2 Right-click on the printer that the instructions below are for Windows XP, but the steps are similar for all the other Windows operating systems. Step 1 Click on Start, Settings, Printers and Faxes.

Quick Installation Guide
Page 13
You have successfully configured the Print Server for printing. Windows should print out a test page. Step 3 Click on the Print Test Page button.
You have successfully configured the Print Server for printing. Windows should print out a test page. Step 3 Click on the Print Test Page button.