
User Manual
Page 1
Office NAS 3.5" IDE/SATA Network Attached Storage Model # ANAS350 User's Manual Ver. 2.3
Office NAS 3.5" IDE/SATA Network Attached Storage Model # ANAS350 User's Manual Ver. 2.3

User Manual
Page 2
...System Time ...19 5. Access Control 22 6. Local Network...30 8.3 Status - Accessing the NAS device Configuration 9 4. LAN ...18 4.3 Setup - Firmware Upgrade 27 7.3 Administration - ... Download Assistant ...24 6.1 Download Assistant - Management 27 7.2 Administration - Log ...31 9. Table of Contents 1. Introduction...3 1.1 Package Contents ...3 1.2 Features ...3 1.3 NAS Diagram...4 2. Hard Drive Installation ...5 3. Setup Configuration ...13 4.1 Setup - Wizard...13 4.2 Setup - Storage Configuration...20 5.1 Storage Configuration - HTTP Configuration 25 6.3 ...
...System Time ...19 5. Access Control 22 6. Local Network...30 8.3 Status - Accessing the NAS device Configuration 9 4. LAN ...18 4.3 Setup - Firmware Upgrade 27 7.3 Administration - ... Download Assistant ...24 6.1 Download Assistant - Management 27 7.2 Administration - Log ...31 9. Table of Contents 1. Introduction...3 1.1 Package Contents ...3 1.2 Features ...3 1.3 NAS Diagram...4 2. Hard Drive Installation ...5 3. Setup Configuration ...13 4.1 Setup - Wizard...13 4.2 Setup - Storage Configuration...20 5.1 Storage Configuration - HTTP Configuration 25 6.3 ...
User Manual
Page 3
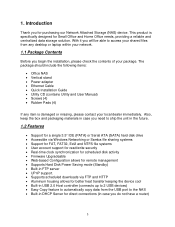
... • Supports scheduled downloads via FTP and HTTP • Aluminum housing allows for direct connections (in case you will be able to the NAS • Built-in DHCP Server for better heat transfer keeping the device cool • Built-in USB 2.0 Host controller (connects up to...USB port to access your shared files from any item is specifically designed for purchasing our Network Attached Storage (NAS) device. The package should include the following items: • Office NAS • Vertical stand • Power adapter • Ethernet Cable • Quick Installation Guide •...
... • Supports scheduled downloads via FTP and HTTP • Aluminum housing allows for direct connections (in case you will be able to the NAS • Built-in DHCP Server for better heat transfer keeping the device cool • Built-in USB 2.0 Host controller (connects up to...USB port to access your shared files from any item is specifically designed for purchasing our Network Attached Storage (NAS) device. The package should include the following items: • Office NAS • Vertical stand • Power adapter • Ethernet Cable • Quick Installation Guide •...

User Manual
Page 4
... device to factory default settings. Press and hold for 6 seconds to reset the device to the Hard Drive. Powers down the Drive before powering off. 1.3 NAS Diagram LED Indicators: LED Light Off Light Solid Blinking Power LAN HDD R/W HDD Status USB 1 USB 2 Status/Backup No power No network connection present Not...
... device to factory default settings. Press and hold for 6 seconds to reset the device to the Hard Drive. Powers down the Drive before powering off. 1.3 NAS Diagram LED Indicators: LED Light Off Light Solid Blinking Power LAN HDD R/W HDD Status USB 1 USB 2 Status/Backup No power No network connection present Not...

User Manual
Page 5
Hard Drive Installation This section provides instructions on how to the power outlet when performing the following assembly procedure. Step 1 Unfasten two screws at the rear side of device, and pull out the back cover. WARNING: The Network Storage device is turned off and not connected to properly install a hard drive into the NAS device. Step 2 Pull out the front panel. 5 Please make sure that it is not hot-swappable. 2.
Hard Drive Installation This section provides instructions on how to the power outlet when performing the following assembly procedure. Step 1 Unfasten two screws at the rear side of device, and pull out the back cover. WARNING: The Network Storage device is turned off and not connected to properly install a hard drive into the NAS device. Step 2 Pull out the front panel. 5 Please make sure that it is not hot-swappable. 2.

User Manual
Page 7
Step 6 Re-attach the back panel to your computer with the two screws removed in step 1. Step 5 Re-attach the front panel to function.) 7 Plug the power cord into a power outlet. (Note: connecting this device to the device and secure it with the provided Ethernet cable, and connect the supplied power adapter. Step 7 Connect Office NAS to your router or your computer directly is not recommended since many features will not be able to the device.
Step 6 Re-attach the back panel to your computer with the two screws removed in step 1. Step 5 Re-attach the front panel to function.) 7 Plug the power cord into a power outlet. (Note: connecting this device to the device and secure it with the provided Ethernet cable, and connect the supplied power adapter. Step 7 Connect Office NAS to your router or your computer directly is not recommended since many features will not be able to the device.

User Manual
Page 9
This is only available for Windows operating systems. Insert the Utility CD into your CD-ROM drive and select Install NAS Configuration Utility. When the setup wizard coming up, follow the screen instructions and click Next to access the NAS configuration. 3. Step1 There are multiple methods to finish installing the NAS Configuration Utility. 9 Accessing the NAS device Configuration Before using the NAS device you may need to do some configuration which can be accessed in a few different ways. Method 1: Use the Configuration Utility found on the Utility CD.
This is only available for Windows operating systems. Insert the Utility CD into your CD-ROM drive and select Install NAS Configuration Utility. When the setup wizard coming up, follow the screen instructions and click Next to access the NAS configuration. 3. Step1 There are multiple methods to finish installing the NAS Configuration Utility. 9 Accessing the NAS device Configuration Before using the NAS device you may need to do some configuration which can be accessed in a few different ways. Method 1: Use the Configuration Utility found on the Utility CD.

User Manual
Page 10
When prompted for login access, type in default username and password admin for both blanks and click OK button. 10 To open the NAS Configuration Utility go to Start > (All) Programs > Airlink101 NAS Configuration Utility > Airlink101 NAS Configuration Utility.
When prompted for login access, type in default username and password admin for both blanks and click OK button. 10 To open the NAS Configuration Utility go to Start > (All) Programs > Airlink101 NAS Configuration Utility > Airlink101 NAS Configuration Utility.
User Manual
Page 11
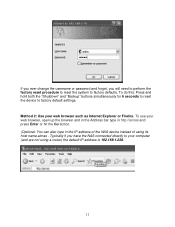
... Address bar type in http://airnas and press Enter or hit the Go button. (Optional: You can also type in the IP address of the NAS device instead of using a router) the default IP address is 192.168.1.230. 11 If you ever change the username or password and forget, you...
... Address bar type in http://airnas and press Enter or hit the Go button. (Optional: You can also type in the IP address of the NAS device instead of using a router) the default IP address is 192.168.1.230. 11 If you ever change the username or password and forget, you...
User Manual
Page 12
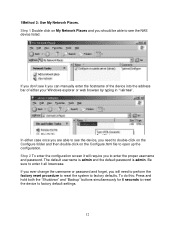
... typing in "\\airnas". Step 2 To enter the configuration screen it you to factory defaults. Step 1 Double click on the Configure.html file to see the NAS device listed. 1Method 3: Use My Network Places. In either case once you are able to see it will need to double-click on the Configure...
... typing in "\\airnas". Step 2 To enter the configuration screen it you to factory defaults. Step 1 Double click on the Configure.html file to see the NAS device listed. 1Method 3: Use My Network Places. In either case once you are able to see it will need to double-click on the Configure...
User Manual
Page 13
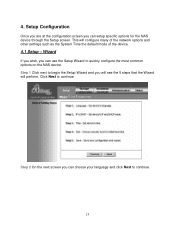
Click Next to quickly configure the most common options on the NAS device. Step 2 On the next screen you will see the 5 steps that the Wizard will configure many of the network options and other settings such ... wish, you can use the Setup Wizard to continue. Setup Configuration Once you are at the configuration screen you can setup specific options for the NAS device through the Setup screen. 4.
Click Next to quickly configure the most common options on the NAS device. Step 2 On the next screen you will see the 5 steps that the Wizard will configure many of the network options and other settings such ... wish, you can use the Setup Wizard to continue. Setup Configuration Once you are at the configuration screen you can setup specific options for the NAS device through the Setup screen. 4.
User Manual
Page 14
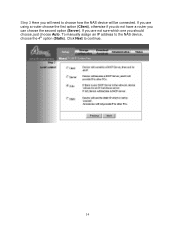
If you are not sure which one you should choose, just choose Auto. Click Next to choose how the NAS device will need to continue. 14 Step 3 Here you will be connected. If you are using a router choose the first option (Client), otherwise if you do not have a router you can choose the second option (Server). To manually assign an IP address to the NAS device, choose the 4th option (Static).
If you are not sure which one you should choose, just choose Auto. Click Next to choose how the NAS device will need to continue. 14 Step 3 Here you will be connected. If you are using a router choose the first option (Client), otherwise if you do not have a router you can choose the second option (Server). To manually assign an IP address to the NAS device, choose the 4th option (Static).
User Manual
Page 15
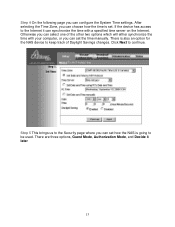
... to continue. If the device has access to the Security page where you can choose how the time is set how the NAS is also an option for the NAS device to keep track of the other two options which will either synchronize the time with a specified time server on the Internet...
... to continue. If the device has access to the Security page where you can choose how the time is set how the NAS is also an option for the NAS device to keep track of the other two options which will either synchronize the time with a specified time server on the Internet...

User Manual
Page 17
Step 5c If you are satisfied with the options you have selected click the Save Settings button to complete the Setup Wizard process. Congratulations! the setup of all the options you chose. If you are not sure which option you want to choose or wish to set the option later, you will see a summary of your NAS device is correct and go back to make any corrections if necessary. Double check to make sure everything is complete! 17 Step 6 After setting the Security level you can choose the third option to decide later.
Step 5c If you are satisfied with the options you have selected click the Save Settings button to complete the Setup Wizard process. Congratulations! the setup of all the options you chose. If you are not sure which option you want to choose or wish to set the option later, you will see a summary of your NAS device is correct and go back to make any corrections if necessary. Double check to make sure everything is complete! 17 Step 6 After setting the Security level you can choose the third option to decide later.
User Manual
Page 18
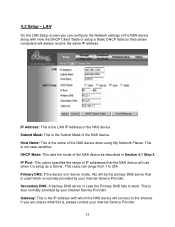
... Service Provider. 18 If you can range from 1 to work. Subnet Mask: This is used which the NAS device will always receive the same IP address. DHCP Mode: This sets the mode of the NAS device. Gateway: This is the IP address with view the DHCP Client Table or setup a Static DHCP... table so that is the Subnet Mask of the NAS device when using My Network Places. This is not case-sensitive. IP Address: This is normally provided by your Internet Service Provider. LAN On the...
... Service Provider. 18 If you can range from 1 to work. Subnet Mask: This is used which the NAS device will always receive the same IP address. DHCP Mode: This sets the mode of the NAS device. Gateway: This is the IP address with view the DHCP Client Table or setup a Static DHCP... table so that is the Subnet Mask of the NAS device when using My Network Places. This is not case-sensitive. IP Address: This is normally provided by your Internet Service Provider. LAN On the...
User Manual
Page 19
... normally it may change when the computer is powered on the computers MAC Address. Note that this button and Enabling the MAC Address Control, the NAS can be setup to specifically assign an IP address to the System Time setting as described in the Setup Wizard in Server Mode. Fixed Mapping... applicable if the device is similar to a certain computer based on /off. 4.3 Setup - This way the IP address of all DHCP Clients connected to the NAS device. System Time This page is in Section 4.1 Step 4. 19
... normally it may change when the computer is powered on the computers MAC Address. Note that this button and Enabling the MAC Address Control, the NAS can be setup to specifically assign an IP address to the System Time setting as described in the Setup Wizard in Server Mode. Fixed Mapping... applicable if the device is similar to a certain computer based on /off. 4.3 Setup - This way the IP address of all DHCP Clients connected to the NAS device. System Time This page is in Section 4.1 Step 4. 19
User Manual
Page 20
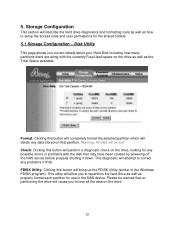
... Configuration This section will describe the hard drive diagnostics and formatting tools as well as properly format each partition for use in the NAS device. Format: Clicking this button will completely format the selected partition which will cause you to setup the access rules and user... attempt to the Windows FDISK program). 5. This diagnostic will perform a diagnostic check on that may have been caused by powering off the NAS device before properly shutting it finds. This utility will bring up the FDISK Utility (similar to correct any possible errors or problems with the...
... Configuration This section will describe the hard drive diagnostics and formatting tools as well as properly format each partition for use in the NAS device. Format: Clicking this button will completely format the selected partition which will cause you to setup the access rules and user... attempt to the Windows FDISK program). 5. This diagnostic will perform a diagnostic check on that may have been caused by powering off the NAS device before properly shutting it finds. This utility will bring up the FDISK Utility (similar to correct any possible errors or problems with the...

User Manual
Page 21
... is independent of the device when viewed from My Network Places. Server Comment: A short description of the NAS device when viewed from My Network Places. Note that this option is recognized on the Internet. FTP: This option will be viewed. Language: This ...the proper language set to WORKGROUP. Having the incorrect language set may cause some folder/file names to the NAS device. For more information. File Sharing Under the File Sharing Menu of the NAS device. Workgroup: The current workgroup under the Control Panel and the default is generally found in Section 4.1 ...
... is independent of the device when viewed from My Network Places. Server Comment: A short description of the NAS device when viewed from My Network Places. Note that this option is recognized on the Internet. FTP: This option will be viewed. Language: This ...the proper language set to WORKGROUP. Having the incorrect language set may cause some folder/file names to the NAS device. For more information. File Sharing Under the File Sharing Menu of the NAS device. Workgroup: The current workgroup under the Control Panel and the default is generally found in Section 4.1 ...

User Manual
Page 22
...is recommended for each connection with an adequate data transfer speed (as specific settings for each user is the maximum number of the NAS Configuration you can make with the FTP Server. Quota Configuration: If this option is enabled, each mode. FTP Max Connections per ...a specific amount of connections that the FTP server will allow . Each user must have a username and password and maximum number of the NAS device as well as determined by the administrator). 5.3 Storage Configuration - Note that multiple files can configure the file sharing mode of different ...
...is recommended for each connection with an adequate data transfer speed (as specific settings for each user is the maximum number of the NAS Configuration you can make with the FTP Server. Quota Configuration: If this option is enabled, each mode. FTP Max Connections per ...a specific amount of connections that the FTP server will allow . Each user must have a username and password and maximum number of the NAS device as well as determined by the administrator). 5.3 Storage Configuration - Note that multiple files can configure the file sharing mode of different ...

User Manual
Page 24
... you are going to connect to along with the folder path and filename of the FTP server and can be anything you to setup the NAS device to port 21, but may be different. Please contact your FTP server administrator to use a computer. Name: This is set to download files ... or scheduled for a later time and will describe the one of the NAS device to automatically download files via either FTP or HTTP directly to the NAS device by itself without needing to verify. 24 While in Section 5.2 the NAS device itself was discussed previously in features of the built in Section 5.2. ...
... you are going to connect to along with the folder path and filename of the FTP server and can be anything you to setup the NAS device to port 21, but may be different. Please contact your FTP server administrator to use a computer. Name: This is set to download files ... or scheduled for a later time and will describe the one of the NAS device to automatically download files via either FTP or HTTP directly to the NAS device by itself without needing to verify. 24 While in Section 5.2 the NAS device itself was discussed previously in features of the built in Section 5.2. ...