
User Manual
Page 2
... 10. Hard Drive Installation ...5 3. Disk Utility 20 5.2 Storage Configuration - Firmware Upgrade 27 7.3 Administration - Local Network...30 8.3 Status - Accessing the NAS device Configuration 9 4. Setup Configuration ...13 4.1 Setup - Wizard...13 4.2 Setup - Storage Configuration...20 5.1 Storage Configuration - HTTP Configuration 25 6.3 Download Assistant - Backup/Restore 28 8. File Sharing 21 5.3 Storage Configuration - FTP Configuration 24 6.2 Download Assistant - System ...29 8.2 Status - Management 27 7.2 Administration - Specifications...
... 10. Hard Drive Installation ...5 3. Disk Utility 20 5.2 Storage Configuration - Firmware Upgrade 27 7.3 Administration - Local Network...30 8.3 Status - Accessing the NAS device Configuration 9 4. Setup Configuration ...13 4.1 Setup - Wizard...13 4.2 Setup - Storage Configuration...20 5.1 Storage Configuration - HTTP Configuration 25 6.3 Download Assistant - Backup/Restore 28 8. File Sharing 21 5.3 Storage Configuration - FTP Configuration 24 6.2 Download Assistant - System ...29 8.2 Status - Management 27 7.2 Administration - Specifications...
User Manual
Page 3
...) hard disk drive • Accessible via Windows Networking or Samba file sharing systems • Support for FAT, FAT32, Ext2 and NTFS file systems • User account support for read/write security • Real-time clock synchronization for scheduled disk activity • Firmware Upgradeable • Web-based Configuration allows for remote management • Supports Hard Disk Power Saving mode (Standby) • Built-in FTP server • UPnP support. • Supports...
...) hard disk drive • Accessible via Windows Networking or Samba file sharing systems • Support for FAT, FAT32, Ext2 and NTFS file systems • User account support for read/write security • Real-time clock synchronization for scheduled disk activity • Firmware Upgradeable • Web-based Configuration allows for remote management • Supports Hard Disk Power Saving mode (Standby) • Built-in FTP server • UPnP support. • Supports...

User Manual
Page 4
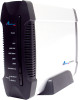
... to copy the contents of an attached USB device to factory default settings. Normal operation Quickly - Press and hold for 6 seconds to reset the device to the Hard Drive. Hard Drive Capacity Low Steady - 1.3 NAS Diagram LED Indicators: LED Light Off Light Solid Blinking Power LAN HDD R/W HDD Status USB 1 USB 2 Status/Backup No power No network connection present Not in back) Description Press and hold for 4 seconds...
... to copy the contents of an attached USB device to factory default settings. Normal operation Quickly - Press and hold for 6 seconds to reset the device to the Hard Drive. Hard Drive Capacity Low Steady - 1.3 NAS Diagram LED Indicators: LED Light Off Light Solid Blinking Power LAN HDD R/W HDD Status USB 1 USB 2 Status/Backup No power No network connection present Not in back) Description Press and hold for 4 seconds...

User Manual
Page 5
Step 1 Unfasten two screws at the rear side of device, and pull out the back cover. Please make sure that it is not hot-swappable. Hard Drive Installation This section provides instructions on how to the power outlet when performing the following assembly procedure. Step 2 Pull out the front panel. 5 WARNING: The Network Storage device is turned off and not connected to properly install a hard drive into the NAS device. 2.
Step 1 Unfasten two screws at the rear side of device, and pull out the back cover. Please make sure that it is not hot-swappable. Hard Drive Installation This section provides instructions on how to the power outlet when performing the following assembly procedure. Step 2 Pull out the front panel. 5 WARNING: The Network Storage device is turned off and not connected to properly install a hard drive into the NAS device. 2.

User Manual
Page 8
Step 8 Turn it on by pressing the On switch in the back of the device. Congratulations! The hard drive installation is complete! 8 Verify the Power and LAN LEDs are lit.
Step 8 Turn it on by pressing the On switch in the back of the device. Congratulations! The hard drive installation is complete! 8 Verify the Power and LAN LEDs are lit.

User Manual
Page 9
3. This is only available for Windows operating systems. Insert the Utility CD into your CD-ROM drive and select Install NAS Configuration Utility. When the setup wizard coming up, follow the screen instructions and click Next to do some configuration which can be accessed in a few different ways. Accessing the NAS device Configuration Before using the NAS device you may need to finish installing the NAS Configuration Utility. 9 Step1 There are multiple methods to access the NAS configuration. Method 1: Use the Configuration Utility found on the Utility CD.
3. This is only available for Windows operating systems. Insert the Utility CD into your CD-ROM drive and select Install NAS Configuration Utility. When the setup wizard coming up, follow the screen instructions and click Next to do some configuration which can be accessed in a few different ways. Accessing the NAS device Configuration Before using the NAS device you may need to finish installing the NAS Configuration Utility. 9 Step1 There are multiple methods to access the NAS configuration. Method 1: Use the Configuration Utility found on the Utility CD.
User Manual
Page 11
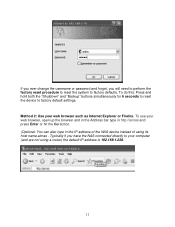
...the "Shutdown" and "Backup" buttons simultaneously for 6 seconds to reset the device to factory default settings. To use your web browser, open up the browser and in the Address bar type in http://airnas and press Enter or hit the Go button. (Optional: You can also type in the IP address of ... default IP address is 192.168.1.230. 11 Method 2: Use your computer (and are not using its host name airnas . Typically if you will need to perform the factory reset procedure to reset the system to factory defaults. If you ever change the username or password and forget, you have the NAS connected ...
...the "Shutdown" and "Backup" buttons simultaneously for 6 seconds to reset the device to factory default settings. To use your web browser, open up the browser and in the Address bar type in http://airnas and press Enter or hit the Go button. (Optional: You can also type in the IP address of ... default IP address is 192.168.1.230. 11 Method 2: Use your computer (and are not using its host name airnas . Typically if you will need to perform the factory reset procedure to reset the system to factory defaults. If you ever change the username or password and forget, you have the NAS connected ...
User Manual
Page 12
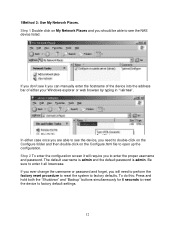
Step 1 Double click on the Configure.html file to factory defaults. In either your Windows explorer or web browser by typing in "\\airnas". If you ever change the username or password and forget, you will require you need to perform the factory reset procedure to reset the system to open up the configuration. 1Method 3: Use My Network Places. Step 2 To enter...
Step 1 Double click on the Configure.html file to factory defaults. In either your Windows explorer or web browser by typing in "\\airnas". If you ever change the username or password and forget, you will require you need to perform the factory reset procedure to reset the system to open up the configuration. 1Method 3: Use My Network Places. Step 2 To enter...
User Manual
Page 13
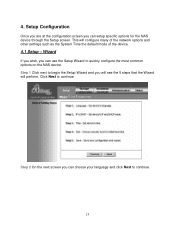
... you will see the 5 steps that the Wizard will configure many of the network options and other settings such as the System Time the default mode of the device. 4.1 Setup - Setup Configuration Once you are at the configuration screen you can setup specific options for the NAS device through the Setup screen. Wizard If you wish, you can use the...
... you will see the 5 steps that the Wizard will configure many of the network options and other settings such as the System Time the default mode of the device. 4.1 Setup - Setup Configuration Once you are at the configuration screen you can setup specific options for the NAS device through the Setup screen. Wizard If you wish, you can use the...
User Manual
Page 18
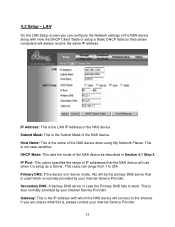
... the primary DNS server that certain computers will connect to work. DHCP Mode: This sets the mode of the NAS device along with which is , please contact your Internet Service Provider. 18 4.2 Setup - Primary DNS: If the device is in case the Primary DNS fails to the Internet. This value can configure the Network settings of the NAS...
... the primary DNS server that certain computers will connect to work. DHCP Mode: This sets the mode of the NAS device along with which is , please contact your Internet Service Provider. 18 4.2 Setup - Primary DNS: If the device is in case the Primary DNS fails to the Internet. This value can configure the Network settings of the NAS...
User Manual
Page 19
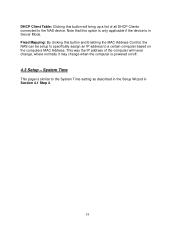
... up a list of all DHCP Clients connected to the System Time setting as described in the Setup Wizard in Server Mode. System Time This page is similar to the NAS device. Note that this option is only applicable if the device is powered on the computers MAC Address. DHCP Client... Table: Clicking this button will never change, where normally it may change when the computer is in Section 4.1 Step 4. 19 Fixed Mapping: By clicking this button and Enabling the MAC Address Control, the NAS can be setup to specifically assign an IP address...
... up a list of all DHCP Clients connected to the System Time setting as described in the Setup Wizard in Server Mode. System Time This page is similar to the NAS device. Note that this option is only applicable if the device is powered on the computers MAC Address. DHCP Client... Table: Clicking this button will never change, where normally it may change when the computer is in Section 4.1 Step 4. 19 Fixed Mapping: By clicking this button and Enabling the MAC Address Control, the NAS can be setup to specifically assign an IP address...
User Manual
Page 20
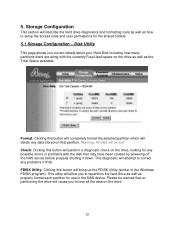
... on that may have been caused by powering off the NAS device before properly shutting it finds. Disk Utility This page shows you to correct any possible errors or problems with the currently Free/Used space on the drive. 20 Storage Configuration This section will allow you current details about your Hard Disk including how many partitions there are along...
... on that may have been caused by powering off the NAS device before properly shutting it finds. Disk Utility This page shows you to correct any possible errors or problems with the currently Free/Used space on the drive. 20 Storage Configuration This section will allow you current details about your Hard Disk including how many partitions there are along...

User Manual
Page 21
... My Network Places. 5.2 Storage Configuration - This option is independent of the DHCP Server feature previously discussed in your Windows operating system documentation for more information on how an FTP server works, many resources are available on the network as well as setup various FTP (File Transfer Protocol) options when using FTP to connect to display incorrectly or...
... My Network Places. 5.2 Storage Configuration - This option is independent of the DHCP Server feature previously discussed in your Windows operating system documentation for more information on how an FTP server works, many resources are available on the network as well as setup various FTP (File Transfer Protocol) options when using FTP to connect to display incorrectly or...

User Manual
Page 22
... Max Connections per connection, setting this button will allow multiple connections so that multiple files can be surpassed. Access Control Under the Access Control Menu of the NAS Configuration you can make with an adequate data transfer speed (as specific settings for each user is enabled, each mode. Each user must have a username and password and maximum number of connections that this option is allocated a specific amount of storage...
... Max Connections per connection, setting this button will allow multiple connections so that multiple files can be surpassed. Access Control Under the Access Control Menu of the NAS Configuration you can make with an adequate data transfer speed (as specific settings for each user is enabled, each mode. Each user must have a username and password and maximum number of connections that this option is allocated a specific amount of storage...

User Manual
Page 24
... to the NAS device by itself was discussed previously in this port is the port number of the FTP server you are trying to verify. 24 Please contact your FTP server administrator to download. FTP Configuration This page allows you to setup the NAS device to along with the folder path and filename ...to notify the user of the file you choose. For example, ftp://192.168.1.1/public/file1.avi or ftp://ftp.yourftp.com/public/file1.avi Port: This is set to port 21, but may be anything you are going to connect to download files from what was operating as the FTP Server, in Section...
... to the NAS device by itself was discussed previously in this port is the port number of the FTP server you are trying to verify. 24 Please contact your FTP server administrator to download. FTP Configuration This page allows you to setup the NAS device to along with the folder path and filename ...to notify the user of the file you choose. For example, ftp://192.168.1.1/public/file1.avi or ftp://ftp.yourftp.com/public/file1.avi Port: This is set to port 21, but may be anything you are going to connect to download files from what was operating as the FTP Server, in Section...

User Manual
Page 25
...access the file you may have been set up. 25 This is where you would specify both the date and the time for this to work properly, the correct e-mail server information must be required to enter in this download to start at a later time. Username/Password: If a Username and Password...if you would like to schedule it to . Please contact your FTP server administrator for its scheduled start . In order for the download to . HTTP Configuration This page allows you wish to save the download settings for your login method. You can choose whether or not you would ...
...access the file you may have been set up. 25 This is where you would specify both the date and the time for this to work properly, the correct e-mail server information must be required to enter in this download to start at a later time. Username/Password: If a Username and Password...if you would like to schedule it to . Please contact your FTP server administrator for its scheduled start . In order for the download to . HTTP Configuration This page allows you wish to save the download settings for your login method. You can choose whether or not you would ...
User Manual
Page 27
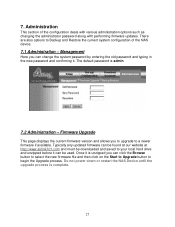
... change the system password by entering the old password and typing in the new password and confirming it is unzipped you to upgrade to Backup and Restore the current system configuration of the configuration deals with various administration options such as changing the administrator password along with performing firmware updates. Once it . The default password is complete. 27 Do not power down or...
... change the system password by entering the old password and typing in the new password and confirming it is unzipped you to upgrade to Backup and Restore the current system configuration of the configuration deals with various administration options such as changing the administrator password along with performing firmware updates. Once it . The default password is complete. 27 Do not power down or...

User Manual
Page 32
...Open My Computer or Windows Explorer and in the address bar type in \\airnas\ in front of the NAS device, use that the folders on the folder you use My Computer or Windows Explorer. Step 2 Once this is open, Right-click on the NAS device are more easily accessible. 9. If you ...Map a folder to Map Network Drive. 32 The double backslash in the Address Bar. Working with Windows 9.1 Mapping a Network Drive When using Windows it can be setup so that the NAS device shows up as a drive letter when you wish to map and choose the option to a driver letter so that new name instead...
...Open My Computer or Windows Explorer and in the address bar type in \\airnas\ in front of the NAS device, use that the folders on the folder you use My Computer or Windows Explorer. Step 2 Once this is open, Right-click on the NAS device are more easily accessible. 9. If you ...Map a folder to Map Network Drive. 32 The double backslash in the Address Bar. Working with Windows 9.1 Mapping a Network Drive When using Windows it can be setup so that the NAS device shows up as a drive letter when you wish to map and choose the option to a driver letter so that new name instead...

User Manual
Page 33
If the NAS is operating in Authorization mode, you need to click the link to Reconnect at logon and click Finish. Step 4 Now whenever you wish to access your choosing. Step 3 Now you will be prompted to select a drive letter of your folder on the NAS device you can simply open My Computer or Windows Explorer and you should see the folder listed under the assigned drive letter. 33 Make sure to check the box to "Connect using a different user name" and enter in the username and password information.
If the NAS is operating in Authorization mode, you need to click the link to Reconnect at logon and click Finish. Step 4 Now whenever you wish to access your choosing. Step 3 Now you will be prompted to select a drive letter of your folder on the NAS device you can simply open My Computer or Windows Explorer and you should see the folder listed under the assigned drive letter. 33 Make sure to check the box to "Connect using a different user name" and enter in the username and password information.

User Manual
Page 38
... AMRISC Memory • Flash4MB, SDRAM 32MB Ports • 1 x RJ45, 10/100 Mbps with Auto-MDI/MDIX • 2 x USB2.0 host (480Mbps high speed) IDE Controller • UltraDMA 133 Button • Backup • Shutdown • Reset LED • Power • LAN • HDD/RW, HDD Status • USB1, USB2 • Status (Backup) Power adapter • External, 12V/4A Dimensions • 216 x 150 x 52mm (L x W x H) Weight...
... AMRISC Memory • Flash4MB, SDRAM 32MB Ports • 1 x RJ45, 10/100 Mbps with Auto-MDI/MDIX • 2 x USB2.0 host (480Mbps high speed) IDE Controller • UltraDMA 133 Button • Backup • Shutdown • Reset LED • Power • LAN • HDD/RW, HDD Status • USB1, USB2 • Status (Backup) Power adapter • External, 12V/4A Dimensions • 216 x 150 x 52mm (L x W x H) Weight...