Quick Start Guide
Page 2
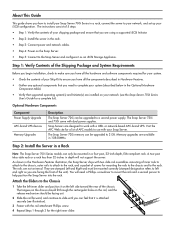
... be upgraded to 2 GB. The Snap Server 730i and 750i come with a USB- You will not support the server. A two-post telco-style rack or a rack less than 32-inches in a rack, connect the server to your network, and set up your iSCSI configuration. The rails are installed on the Snap Server. • Step 5: Connect to the Snap Server and configure it as you are designed to work with dual power supplies. Attach...
... be upgraded to 2 GB. The Snap Server 730i and 750i come with a USB- You will not support the server. A two-post telco-style rack or a rack less than 32-inches in a rack, connect the server to your network, and set up your iSCSI configuration. The rails are installed on the Snap Server. • Step 5: Connect to the Snap Server and configure it as you are designed to work with dual power supplies. Attach...
Quick Start Guide
Page 3
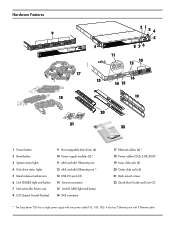
... button 7 Not active (for future use) 8 LCD (Liquid Crystal Display) 9 Hot-swappable disk drives (4) 10 Power supply modules (2) * 11 eth0 and eth1 Ethernet ports 12 eth2 and eth3 Ethernet ports * 13 USB 2.0 ports (2) 14 Service connector 15 Unit ID (UID) light and button 16 SAS connector 17 Ethernet cables (4) * 18 Power cables (2 US, 2 UK, 2 EU)* 19 Inner slide rails (2) 20 Outer slide rails (4) 21 Rack mount screws 22 Quick Start Guide and User CD * The Snap Server...
... button 7 Not active (for future use) 8 LCD (Liquid Crystal Display) 9 Hot-swappable disk drives (4) 10 Power supply modules (2) * 11 eth0 and eth1 Ethernet ports 12 eth2 and eth3 Ethernet ports * 13 USB 2.0 ports (2) 14 Service connector 15 Unit ID (UID) light and button 16 SAS connector 17 Ethernet cables (4) * 18 Power cables (2 US, 2 UK, 2 EU)* 19 Inner slide rails (2) 20 Outer slide rails (4) 21 Rack mount screws 22 Quick Start Guide and User CD * The Snap Server...
Quick Start Guide
Page 4
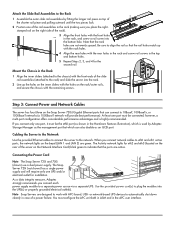
... for eth2 and eth3 (located on the rear of the server on the rack/outer rails, and secure the chassis with the front holes in the APC user interface. The Activity network lights for installation. Note that the ports are not evenly spaced. Attach the Slide Rail Assemblies to the Rack 1 Assemble the outer slide rail assemblies by Adaptec Storage Manager as an iSCSI port.
... for eth2 and eth3 (located on the rear of the server on the rack/outer rails, and secure the chassis with the front holes in the APC user interface. The Activity network lights for installation. Note that the ports are not evenly spaced. Attach the Slide Rail Assemblies to the Rack 1 Assemble the outer slide rail assemblies by Adaptec Storage Manager as an iSCSI port.
Quick Start Guide
Page 5
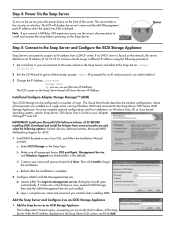
... the Snap Server. Power Step 5: Connect to the Snap Server and Configure the iSCSI Storage Appliance Snap Servers are preset to the Snap Server 700i Series iSCSI Storage Appliance. This Quick Start Guide describes the simplest configuration, where all component boxes (GUI and Agent, Management Service, and Windows Support) are installed on your Microsoft iSCSI Software Initiator v2.05 BEFORE installing ASM. d. Enter the IP address displayed on the front of the server. Install your Adaptec OnTarget™ User CD. If no DHCP server...
... the Snap Server. Power Step 5: Connect to the Snap Server and Configure the iSCSI Storage Appliance Snap Servers are preset to the Snap Server 700i Series iSCSI Storage Appliance. This Quick Start Guide describes the simplest configuration, where all component boxes (GUI and Agent, Management Service, and Windows Support) are installed on your Microsoft iSCSI Software Initiator v2.05 BEFORE installing ASM. d. Enter the IP address displayed on the front of the server. Install your Adaptec OnTarget™ User CD. If no DHCP server...

Quick Start Guide
Page 6
..., default gateway, up to wait until the build/verify process finishes. You now have provisioned storage, click Apply to finish your active Ethernet ports, then click Next. • ETH0 can double as both a management and an iSCSI port. • Verify that the Use current date and time box is checked), then click Next. e A Registration dialog box opens. See the Snap Server 700i Series User's Guide...
..., default gateway, up to wait until the build/verify process finishes. You now have provisioned storage, click Apply to finish your active Ethernet ports, then click Next. • ETH0 can double as both a management and an iSCSI port. • Verify that the Use current date and time box is checked), then click Next. e A Registration dialog box opens. See the Snap Server 700i Series User's Guide...
