User Guide
Page 1
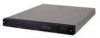
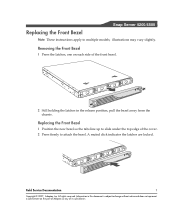
Field Service Documentation 1 Copyright © 2007, Adaptec, Inc. illustrations may vary slightly. All rights reserved. Removing the Front Bezel 1 Press the latches, one on the part of Adaptec or any of its subsidiaries. Snap Server 4200/4500 Replacing the Front Bezel Note These instructions apply to attach the bezel. A muted click indicates the latches are locked. Replacing the Front Bezel 1 Position the new bezel...
Field Service Documentation 1 Copyright © 2007, Adaptec, Inc. illustrations may vary slightly. All rights reserved. Removing the Front Bezel 1 Press the latches, one on the part of Adaptec or any of its subsidiaries. Snap Server 4200/4500 Replacing the Front Bezel Note These instructions apply to attach the bezel. A muted click indicates the latches are locked. Replacing the Front Bezel 1 Position the new bezel...

User Guide
Page 2
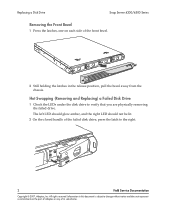
...; Replace the front bezel. • Configure the replacement disk drive. Snap Server 4200/4500 Replacing a Disk Drive Two LEDs-indicating disk drive status and disk drive activity-appear on the part of Adaptec or any of its bay in this document is subject to change without notice and does not represent a commitment on the front of the enclosure below each disk drive. 1 2 3 4 Status light Activity light 5 6 7 8 If a disk drive fails, the status light below the failed drive glows amber. All rights reserved. Status Light Green Green Amber Not lit Activity Light Amber, flashing...
...; Replace the front bezel. • Configure the replacement disk drive. Snap Server 4200/4500 Replacing a Disk Drive Two LEDs-indicating disk drive status and disk drive activity-appear on the part of Adaptec or any of its bay in this document is subject to change without notice and does not represent a commitment on the front of the enclosure below each disk drive. 1 2 3 4 Status light Activity light 5 6 7 8 If a disk drive fails, the status light below the failed drive glows amber. All rights reserved. Status Light Green Green Amber Not lit Activity Light Amber, flashing...
User Guide
Page 3
.... Replacing a Disk Drive Snap Server 4200/4500 Series Removing the Front Bezel 1 Press the latches, one on each side of the front bezel. 2 Still holding the latches in this document is subject to change without notice and does not represent a commitment on the part of Adaptec or any of the failed disk drive, press the latch to verify that you are physically removing the failed drive. Hot...
.... Replacing a Disk Drive Snap Server 4200/4500 Series Removing the Front Bezel 1 Press the latches, one on each side of the front bezel. 2 Still holding the latches in this document is subject to change without notice and does not represent a commitment on the part of Adaptec or any of the failed disk drive, press the latch to verify that you are physically removing the failed drive. Hot...
User Guide
Page 4
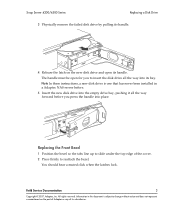
... the disk drive all the way forward before . 5 Insert the new disk drive into the empty drive bay, pushing it all the way into place. Snap Server 4200/4500 Series Replacing a Disk Drive 3 Physically remove the failed disk drive by pulling its handle. 4 Release the latch on the part of Adaptec or any of the cover. 2 Press firmly to reattach the bezel. Note In these instructions, a new disk drive is subject to change without...
... the disk drive all the way forward before . 5 Insert the new disk drive into the empty drive bay, pushing it all the way into place. Snap Server 4200/4500 Series Replacing a Disk Drive 3 Physically remove the failed disk drive by pulling its handle. 4 Release the latch on the part of Adaptec or any of the cover. 2 Press firmly to reattach the bezel. Note In these instructions, a new disk drive is subject to change without...
User Guide
Page 5
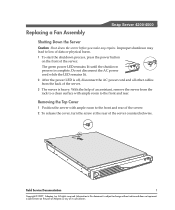
... the front and rear. Removing the Top Cover 1 Position the server with ample room to loss of data or physical harm. 1 To start the shutdown process, press the power button on the part of Adaptec or any repairs. The green power LED remains lit until the shutdown process is heavy. Field Service Documentation 1 Copyright © 2007, Adaptec, Inc. Information in this document is subject to the front...
... the front and rear. Removing the Top Cover 1 Position the server with ample room to loss of data or physical harm. 1 To start the shutdown process, press the power button on the part of Adaptec or any repairs. The green power LED remains lit until the shutdown process is heavy. Field Service Documentation 1 Copyright © 2007, Adaptec, Inc. Information in this document is subject to the front...
User Guide
Page 6
... the part of Adaptec or any of its subsidiaries. Replacing a Fan Assembly Snap Server 4200/4500 Series 3 The cover is seated tightly on the fan assembly to ensure that it is subject to align it with a short, forceful thrust. 4 Slide the cover off the rear of the server, press down on the chassis. Standing in this document is seated securely. 2 Field Service Documentation...
... the part of Adaptec or any of its subsidiaries. Replacing a Fan Assembly Snap Server 4200/4500 Series 3 The cover is seated tightly on the fan assembly to ensure that it is subject to align it with a short, forceful thrust. 4 Slide the cover off the rear of the server, press down on the chassis. Standing in this document is seated securely. 2 Field Service Documentation...
User Guide
Page 7
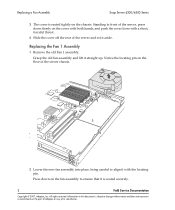
... locating pins on the part of Adaptec or any of the server chassis. Information in this document is seated securely. Grasp the old fan assembly and lift it is subject to ensure that it straight up. All rights reserved. Snap Server 4200/4500 Series Replacing a Fan Assembly Replacing the Fan 2 Assembly 1 Remove the old Fan 2 assembly. Fan assembly locating pins 2 Lower the new fan assembly into place, being...
... locating pins on the part of Adaptec or any of the server chassis. Information in this document is seated securely. Grasp the old fan assembly and lift it is subject to ensure that it straight up. All rights reserved. Snap Server 4200/4500 Series Replacing a Fan Assembly Replacing the Fan 2 Assembly 1 Remove the old Fan 2 assembly. Fan assembly locating pins 2 Lower the new fan assembly into place, being...
User Guide
Page 8
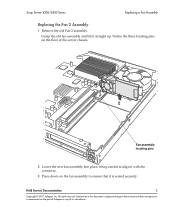
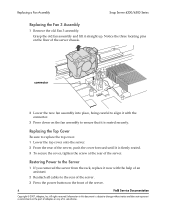
... the part of Adaptec or any of the server chassis. Restoring Power to the Server 1 If you removed the server from the rack, replace it is subject to ensure that it straight up. Replacing a Fan Assembly Snap Server 4200/4500 Series Replacing the Fan 3 Assembly 1 Remove the old Fan 3 assembly. Grasp the old fan assembly and lift it is seated securely. Notice the three locating pins on the fan assembly to change...
... the part of Adaptec or any of the server chassis. Restoring Power to the Server 1 If you removed the server from the rack, replace it is subject to ensure that it straight up. Replacing a Fan Assembly Snap Server 4200/4500 Series Replacing the Fan 3 Assembly 1 Remove the old Fan 3 assembly. Grasp the old fan assembly and lift it is seated securely. Notice the three locating pins on the fan assembly to change...
User Guide
Page 9
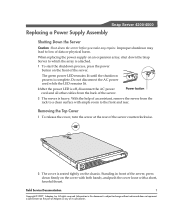
... document is attached. 1 To start the shutdown process, press the power button on the chassis. With the help of an assistant, remove the server from the back of the server. Do not disconnect the AC power cord while the LED remains lit. 2After the power LED is seated tightly on the front of the server. When replacing the power supply on the part of Adaptec or any repairs. Improper shutdown...
... document is attached. 1 To start the shutdown process, press the power button on the chassis. With the help of an assistant, remove the server from the back of the server. Do not disconnect the AC power cord while the LED remains lit. 2After the power LED is seated tightly on the front of the server. When replacing the power supply on the part of Adaptec or any repairs. Improper shutdown...
User Guide
Page 10
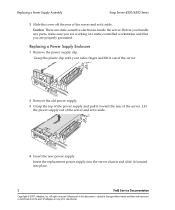
Before you are static-sensitive electronics inside the server. All rights reserved. Replacing a Power Supply Assembly Snap Server 4200/4500 Series 3 Slide the cover off the rear of the server and set it aside. 4 Insert the new power supply Insert the replacement power supply into place. 2 Field Service Documentation Copyright © 2007, Adaptec, Inc. Replacing a Power Supply Enclosure 1 Remove the power supply clip. Lift the power supply out of the server and set it forward into the server chassis and slide it...
Before you are static-sensitive electronics inside the server. All rights reserved. Replacing a Power Supply Assembly Snap Server 4200/4500 Series 3 Slide the cover off the rear of the server and set it aside. 4 Insert the new power supply Insert the replacement power supply into place. 2 Field Service Documentation Copyright © 2007, Adaptec, Inc. Replacing a Power Supply Enclosure 1 Remove the power supply clip. Lift the power supply out of the server and set it forward into the server chassis and slide it...
User Guide
Page 11
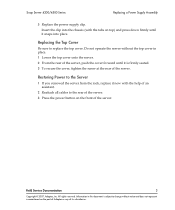
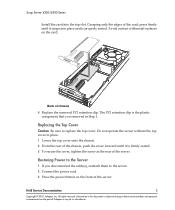
... Service Documentation 3 Copyright © 2007, Adaptec, Inc. Replacing the Top Cover Be sure to the rear of the server. 3 Press the power button on the part of Adaptec or any of the server. Do not operate the server without notice and does not represent a commitment on the front of an assistant. 2 Reattach all cables to replace the top cover. All rights reserved. Snap Server 4200/4500...
... Service Documentation 3 Copyright © 2007, Adaptec, Inc. Replacing the Top Cover Be sure to the rear of the server. 3 Press the power button on the part of Adaptec or any of the server. Do not operate the server without notice and does not represent a commitment on the front of an assistant. 2 Reattach all cables to replace the top cover. All rights reserved. Snap Server 4200/4500...
User Guide
Page 12
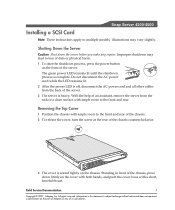
... AC power cord while the LED remains lit. 2 After the power LED is complete. Improper shutdown may vary slightly. All rights reserved. With the help of the server. Snap Server 4200/4500 Installing a SCSI Card Note These instructions apply to the front and rear. Field Service Documentation 1 Copyright © 2007, Adaptec, Inc. Shutting Down the Server Caution Shut down firmly on the part of Adaptec or any repairs.
... AC power cord while the LED remains lit. 2 After the power LED is complete. Improper shutdown may vary slightly. All rights reserved. With the help of the server. Snap Server 4200/4500 Installing a SCSI Card Note These instructions apply to the front and rear. Field Service Documentation 1 Copyright © 2007, Adaptec, Inc. Shutting Down the Server Caution Shut down firmly on the part of Adaptec or any repairs.
User Guide
Page 13
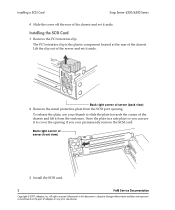
... rear of the chassis and set it from the SCSI port opening if you can use your thumb to change without notice and does not represent a commitment on the part of Adaptec or any of its subsidiaries. Back right corner of server (front view) 3 Install the SCSI card. 2 Field Service Documentation Copyright © 2007, Adaptec, Inc. Installing the SCSI Card 1 Remove the PCI retention clip.
... rear of the chassis and set it from the SCSI port opening if you can use your thumb to change without notice and does not represent a commitment on the part of Adaptec or any of its subsidiaries. Back right corner of server (front view) 3 Install the SCSI card. 2 Field Service Documentation Copyright © 2007, Adaptec, Inc. Installing the SCSI Card 1 Remove the PCI retention clip.
User Guide
Page 14
... chassis, push the cover forward until it snaps into the top slot. The PCI retention clip is properly seated. Replacing the Top Cover Caution Be sure to the server. 2 Connect the power cord. 3 Press the power button on the part of Adaptec or any of the server. Restoring Power to the Server 1 If you removed in this document is firmly seated. 3 To secure the cover, tighten the...
... chassis, push the cover forward until it snaps into the top slot. The PCI retention clip is properly seated. Replacing the Top Cover Caution Be sure to the server. 2 Connect the power cord. 3 Press the power button on the part of Adaptec or any of the server. Restoring Power to the Server 1 If you removed in this document is firmly seated. 3 To secure the cover, tighten the...
User Guide
Page 15
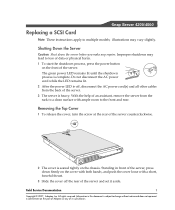
.... Snap Server 4200/4500 Replacing a SCSI Card Note These instructions apply to loss of the server and set it aside. The green power LED remains lit until the shutdown process is seated tightly on the part of the server. 3 The server is subject to the front and rear. With the help of an assistant, remove the server from the back of Adaptec or any repairs. Improper shutdown may...
.... Snap Server 4200/4500 Replacing a SCSI Card Note These instructions apply to loss of the server and set it aside. The green power LED remains lit until the shutdown process is seated tightly on the part of the server. 3 The server is subject to the front and rear. With the help of an assistant, remove the server from the back of Adaptec or any repairs. Improper shutdown may...
User Guide
Page 16
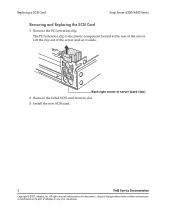
... the rear of the server and set it aside. Replacing a SCSI Card Snap Server 4200/4500 Series Removing and Replacing the SCSI Card 1 Remove the PCI retention clip. Lift the clip out of the server. The PCI retention clip is subject to change without notice and does not represent a commitment on the part of Adaptec or any of server (back view) 2 Remove the failed SCSI card from...
... the rear of the server and set it aside. Replacing a SCSI Card Snap Server 4200/4500 Series Removing and Replacing the SCSI Card 1 Remove the PCI retention clip. Lift the clip out of the server. The PCI retention clip is subject to change without notice and does not represent a commitment on the part of Adaptec or any of server (back view) 2 Remove the failed SCSI card from...
User Guide
Page 17
... a commitment on the part of Adaptec or any of its slot. Information in this document is seated properly in Step 1. Grasp or press the edges only. 4 Replace the removed PCI retention clip. Replacing the Top Cover Be sure to the server. 2 Connect the power cord. 3 Press the power button on the front of the server. All rights reserved. Snap Server 4200/4500 Series Press firmly...
... a commitment on the part of Adaptec or any of its slot. Information in this document is seated properly in Step 1. Grasp or press the edges only. 4 Replace the removed PCI retention clip. Replacing the Top Cover Be sure to the server. 2 Connect the power cord. 3 Press the power button on the front of the server. All rights reserved. Snap Server 4200/4500 Series Press firmly...
User Guide
Page 18
... start the shutdown process, press the power button on the Snap Server 4500. Do not disconnect the AC power cord while the LED remains lit. 2 After the power LED is subject to change without notice and does not represent a commitment on the part of Adaptec or any repairs. Snap Server 4200/4500 Installing a Serial ATA Card These instructions explain how to install a serial ATA card on the front of the server. Field Service Documentation 1 Copyright...
... start the shutdown process, press the power button on the Snap Server 4500. Do not disconnect the AC power cord while the LED remains lit. 2 After the power LED is subject to change without notice and does not represent a commitment on the part of Adaptec or any repairs. Snap Server 4200/4500 Installing a Serial ATA Card These instructions explain how to install a serial ATA card on the front of the server. Field Service Documentation 1 Copyright...
User Guide
Page 19
...server (back view) 3 If a SCSI card is subject to slide the plate towards the corner of the server and lifting it from the chassis. 2 Remove the Serial ATA card from the right rear corner of the server by using your thumb to change...snap' sound. 1 Remove the metal protective plate from the bottom PCI port opening by lifting it out of the chassis. Information in front of the server, press down firmly on the part of Adaptec or any of its protective packaging. Installing a Serial ATA Card Snap Server 4200/4500 Series 2 Standing in this document is installed, remove the card and set...
...server (back view) 3 If a SCSI card is subject to slide the plate towards the corner of the server and lifting it from the chassis. 2 Remove the Serial ATA card from the right rear corner of the server by using your thumb to change...snap' sound. 1 Remove the metal protective plate from the bottom PCI port opening by lifting it out of the chassis. Information in front of the server, press down firmly on the part of Adaptec or any of its protective packaging. Installing a Serial ATA Card Snap Server 4200/4500 Series 2 Standing in this document is installed, remove the card and set...
User Guide
Page 41
.... Snap Server 4200/4500 Rack Mount Bracket Kit These instructions explain how to loss of data or physical harm. 1 To start the shutdown process, press the power button on the front of the server. The green power LED remains lit until the shutdown process is subject to change without notice and does not represent a commitment on a rack with ample room to the rack • Connect the cables...
.... Snap Server 4200/4500 Rack Mount Bracket Kit These instructions explain how to loss of data or physical harm. 1 To start the shutdown process, press the power button on the front of the server. The green power LED remains lit until the shutdown process is subject to change without notice and does not represent a commitment on a rack with ample room to the rack • Connect the cables...
