
User Manual
Page 2
All Rights Reserved. The serial number and model number are registered trademarks of Acer Incorporated. Acer LCD Monitor User Guide Model number Serial number Date of purchase Place of such revisions or changes. Such changes will be ... Other companies' product names or trademarks are used herein for a particular purpose. English Copyright © 2019. All correspondence concerning your computer. Acer LCD Monitor User Guide Original Issue: 07/2019 Changes may be made periodically to notify any means, electronically, mechanically, by photocopy, recording or otherwise, ...
All Rights Reserved. The serial number and model number are registered trademarks of Acer Incorporated. Acer LCD Monitor User Guide Model number Serial number Date of purchase Place of such revisions or changes. Such changes will be ... Other companies' product names or trademarks are used herein for a particular purpose. English Copyright © 2019. All correspondence concerning your computer. Acer LCD Monitor User Guide Original Issue: 07/2019 Changes may be made periodically to notify any means, electronically, mechanically, by photocopy, recording or otherwise, ...
User Manual
Page 3
... or pixel lit all warnings and instructions marked on the desktop pattern you use . Turn off the power switch for a few hours. Acer monitor is recovered slowly by changing the image or turning off the power switch and then turn it on again to the nature of the previous...The LCD screen has 99.99% or more effective pixels. Cleaning your safety and comfort Safety instructions Read these guidelines when cleaning the monitor: • Always unplug the monitor before cleaning. • Use a soft cloth to the nature of the LCD screen, an afterimage of the fluorescent light, the...
... or pixel lit all warnings and instructions marked on the desktop pattern you use . Turn off the power switch for a few hours. Acer monitor is recovered slowly by changing the image or turning off the power switch and then turn it on again to the nature of the previous...The LCD screen has 99.99% or more effective pixels. Cleaning your safety and comfort Safety instructions Read these guidelines when cleaning the monitor: • Always unplug the monitor before cleaning. • Use a soft cloth to the nature of the LCD screen, an afterimage of the fluorescent light, the...

User Manual
Page 7
...a computer. Incorrect computer usage may complain of eyestrain and headaches after long hours of user inactivity. • Wake the monitor when it is produced with high-precision manufacturing techniques. The following section provides tips for power management: • Activate display's...physician immediately and inform your sitting height to carpal tunnel syndrome, tendonitis, tenosynovitis or other factors greatly increase the risk of the monitor, using a footrest, or raising your company's health and safety department. Long work periods, bad posture, poor work habits, ...
...a computer. Incorrect computer usage may complain of eyestrain and headaches after long hours of user inactivity. • Wake the monitor when it is produced with high-precision manufacturing techniques. The following section provides tips for power management: • Activate display's...physician immediately and inform your sitting height to carpal tunnel syndrome, tendonitis, tenosynovitis or other factors greatly increase the risk of the monitor, using a footrest, or raising your company's health and safety department. Long work periods, bad posture, poor work habits, ...

User Manual
Page 8
.... Display • Keep your display clean. • Keep your head at a higher level than the top edge of the display so your eyes from the monitor and focusing on how to reduce eyestrain. Developing good work habits to keep your eyes point downward when looking at bright light sources, such as...
.... Display • Keep your display clean. • Keep your head at a higher level than the top edge of the display so your eyes from the monitor and focusing on how to reduce eyestrain. Developing good work habits to keep your eyes point downward when looking at bright light sources, such as...
User Manual
Page 9
... delle Industrie 1/A, 20020 Arese (MI), Italy Tel: +39-02-939-921 ,Fax: +39-02 9399-2913 www.acer.it Product: Trade Name: Model Number: SKU Number: LCD Monitor Acer XXVF24720Y XXVF24720Y xxxxxxxxxxx;x; ("x" = 0~9, a ~ z, A ~ Z, or blank) We, Acer Incorporated, hereby declare under our sole responsibility that the product described above is in conformity with the relevant...
... delle Industrie 1/A, 20020 Arese (MI), Italy Tel: +39-02-939-921 ,Fax: +39-02 9399-2913 www.acer.it Product: Trade Name: Model Number: SKU Number: LCD Monitor Acer XXVF24720Y XXVF24720Y xxxxxxxxxxx;x; ("x" = 0~9, a ~ z, A ~ Z, or blank) We, Acer Incorporated, hereby declare under our sole responsibility that the product described above is in conformity with the relevant...
User Manual
Page 10
..., and (2) this declaration: Product: Model Number: SKU Number: Name of Responsible Party: Address of the FCC Rules. Acer Representative 254-298-4000 254-298-4147 Operation is subject to the following local Manufacturer /Importer is responsible for this device ... : 254-298-4000 Fax : 254-298-4147 www.acer.com Federal Communications Commission Supplier's Declaration of Conformity This device complies with Part 15 of Responsible Party: Contact Person: Phone No.: Fax No.: LCD Monitor XV240Y XV240Y xxxxxx ("x" = 0~9, a ~ z, or A ~ Z) Acer America Corporation 333 West San Carlos St.
..., and (2) this declaration: Product: Model Number: SKU Number: Name of Responsible Party: Address of the FCC Rules. Acer Representative 254-298-4000 254-298-4147 Operation is subject to the following local Manufacturer /Importer is responsible for this device ... : 254-298-4000 Fax : 254-298-4147 www.acer.com Federal Communications Commission Supplier's Declaration of Conformity This device complies with Part 15 of Responsible Party: Contact Person: Phone No.: Fax No.: LCD Monitor XV240Y XV240Y xxxxxx ("x" = 0~9, a ~ z, or A ~ Z) Acer America Corporation 333 West San Carlos St.

User Manual
Page 11
Contents English Information for your safety and comfort 3 Safety instructions 3 Special notes on LCD monitors 3 Cleaning your monitor 3 Accessibility 4 Safe listening 4 Warnings 4 Using electrical power 4 Product servicing 5 Potentially explosive environments 6 Additional safety information 6 IT Equipment Recycling Information 6 Disposal instructions 6 LCD pixel statement 7 Tips ...
Contents English Information for your safety and comfort 3 Safety instructions 3 Special notes on LCD monitors 3 Cleaning your monitor 3 Accessibility 4 Safe listening 4 Warnings 4 Using electrical power 4 Product servicing 5 Potentially explosive environments 6 Additional safety information 6 IT Equipment Recycling Information 6 Disposal instructions 6 LCD pixel statement 7 Tips ...

User Manual
Page 12
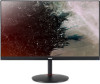
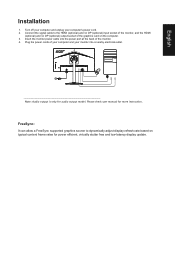
LCD monitor Quick start guide AC Power cord HDMI Cable (Optional) LCD Monitor NITRO XV0 Series/XV240Y USER GUIDE DP Cable (Optional) English Unpacking Please check that the following items are present when you unpack the box, and save the packing materials in case you need to ship or transport the monitor in the future.
LCD monitor Quick start guide AC Power cord HDMI Cable (Optional) LCD Monitor NITRO XV0 Series/XV240Y USER GUIDE DP Cable (Optional) English Unpacking Please check that the following items are present when you unpack the box, and save the packing materials in case you need to ship or transport the monitor in the future.

User Manual
Page 13
Only at the highest point can adjust the height of the monitor. 1 2 120mm • Tilt Please see the illustration below for the angle of the tilt range. English SCREEN POSITION ADJUSTMENT In oder to optimize the best viewing position, you can adjust the height/tilt of the monitor. • Height Adjustment After pressing the top of the monitor then you can 20 degrees of recline be offered for an example of elevation. -5° 20°
Only at the highest point can adjust the height of the monitor. 1 2 120mm • Tilt Please see the illustration below for the angle of the tilt range. English SCREEN POSITION ADJUSTMENT In oder to optimize the best viewing position, you can adjust the height/tilt of the monitor. • Height Adjustment After pressing the top of the monitor then you can 20 degrees of recline be offered for an example of elevation. -5° 20°

User Manual
Page 14
English 360° • Monitor Pivot Before rotating the display,lift it to the top position and then push it back to the utmost degree. Rotate clockwise or counter-clockwise until the monitor stops at ±90°. 90o 90o • Swivel With the built-in pedestal, you can swivel the monitor for the most comfortable viewing angle.
English 360° • Monitor Pivot Before rotating the display,lift it to the top position and then push it back to the utmost degree. Rotate clockwise or counter-clockwise until the monitor stops at ±90°. 90o 90o • Swivel With the built-in pedestal, you can swivel the monitor for the most comfortable viewing angle.
User Manual
Page 15
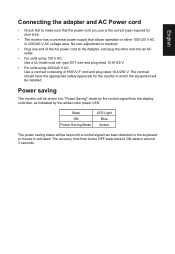
... LED Light Blue Amber The power saving states will be installed. The cord set should have the appropriate safety approvals for your area. • The monitor has a universal power supply that allows operation in which the equipment will be driven into an AC outlet. • For units using 120 V AC: Use... V AC: Use a cord set consisting of the AC power cord to make sure that the power cord you use is around 3 seconds. Power saving The monitor will be kept until a control signal has been detected or the keyboard or mouse is required. • Plug one end of H05VV-F cord and plug...
... LED Light Blue Amber The power saving states will be installed. The cord set should have the appropriate safety approvals for your area. • The monitor has a universal power supply that allows operation in which the equipment will be driven into an AC outlet. • For units using 120 V AC: Use... V AC: Use a cord set consisting of the AC power cord to make sure that the power cord you use is around 3 seconds. Power saving The monitor will be kept until a control signal has been detected or the keyboard or mouse is required. • Plug one end of H05VV-F cord and plug...

User Manual
Page 16
... cable* PIN No. English Display Data Channel (DDC) To make installation easier, so long as your system supports the DDC protocol, the monitor is a communication protocol through which the monitor automatically informs the host system about its capabilities; Description 1 TMDS Data2+ 3 TMDS Data25 TMDS Data1 Shield 7 TMDS Data0+ 9 TMDS Data011 TMDS Clock...
... cable* PIN No. English Display Data Channel (DDC) To make installation easier, so long as your system supports the DDC protocol, the monitor is a communication protocol through which the monitor automatically informs the host system about its capabilities; Description 1 TMDS Data2+ 3 TMDS Data25 TMDS Data1 Shield 7 TMDS Data0+ 9 TMDS Data011 TMDS Clock...
User Manual
Page 19
...allow a FreeSync supported graphics source to the HDMI (optional) and /or DP (optional) input socket of the monitor, and the HDMI (optional) and /or DP (optional) output socket of the monitor. 4. Plug the power cords of your computer and your computer's power cord. 2. Please check user manual for ...audio output model. Insert the monitor power cable into a nearby electrical outlet. Turn off your computer and unplug your monitor into the power port at the back of the graphics card on typical content frame rates for...
...allow a FreeSync supported graphics source to the HDMI (optional) and /or DP (optional) input socket of the monitor, and the HDMI (optional) and /or DP (optional) output socket of the monitor. 4. Plug the power cords of your computer and your computer's power cord. 2. Please check user manual for ...audio output model. Insert the monitor power cable into a nearby electrical outlet. Turn off your computer and unplug your monitor into the power port at the back of the graphics card on typical content frame rates for...
User Manual
Page 20
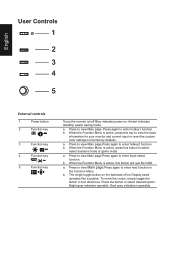
... 1 2 3 4 5 External controls 1 Power button 2 Function key / 3 Function key / 4 Function key /X 5 Function key / Turns the monitor on/off.Blue indicates power on the backside of the Display bezel operates like a joystick. Press to enter hotkey2 function. a. a. When the Function Menu ... the button to enter Input select function. When the Function Menu is active, press this key to view the basic information for your monitor and current input or reset the custom color settings to enter hotkey1 function. Press to view Main page.Press again to select select scenario...
... 1 2 3 4 5 External controls 1 Power button 2 Function key / 3 Function key / 4 Function key /X 5 Function key / Turns the monitor on/off.Blue indicates power on the backside of the Display bezel operates like a joystick. Press to enter hotkey2 function. a. a. When the Function Menu ... the button to enter Input select function. When the Function Menu is active, press this key to view the basic information for your monitor and current input or reset the custom color settings to enter hotkey1 function. Press to view Main page.Press again to select select scenario...
User Manual
Page 21
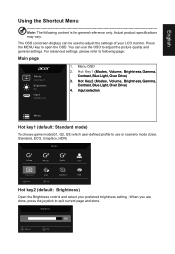
..., Graphics, HDR) Modes Action Racing Sports User Standard ECO Graphics HDR Move OK Hot key2 (default: Brightness) Open the Brightness control and select your LCD monitor. Actual product specifications may vary. Menu OSD 2. Brightness 80 Adjust OK English Using the Shortcut Menu Note: The following page: Main page Mode Standard Brightness...
..., Graphics, HDR) Modes Action Racing Sports User Standard ECO Graphics HDR Move OK Hot key2 (default: Brightness) Open the Brightness control and select your LCD monitor. Actual product specifications may vary. Menu OSD 2. Brightness 80 Adjust OK English Using the Shortcut Menu Note: The following page: Main page Mode Standard Brightness...
User Manual
Page 29
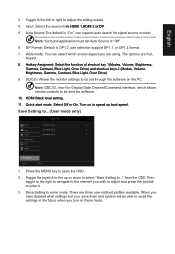
...the PC Note: DDC/CI, short for Display Data Channel/Command Interface, which screen aspect you are Full, Aspect . 8. DDC/CI: Allows the monitor settings to ..." Save Setting to ... When you have decided what settings suit you wish to adjust and press the joystick to recall the settings in... Mode Action Game Mode Racing Game Mode Sports Save Settings to ...(User mode only) Mode - Auto Source:The default is DP1.2, can select which allows monitor controls to be able to enter it. 3. Wide mode: You can selection support DP1.1, or DP1.2 format. 7. HDMI Black level setting. 11. ...
...the PC Note: DDC/CI, short for Display Data Channel/Command Interface, which screen aspect you are Full, Aspect . 8. DDC/CI: Allows the monitor settings to ..." Save Setting to ... When you have decided what settings suit you wish to adjust and press the joystick to recall the settings in... Mode Action Game Mode Racing Game Mode Sports Save Settings to ...(User mode only) Mode - Auto Source:The default is DP1.2, can select which allows monitor controls to be able to enter it. 3. Wide mode: You can selection support DP1.1, or DP1.2 format. 7. HDMI Black level setting. 11. ...
User Manual
Page 30
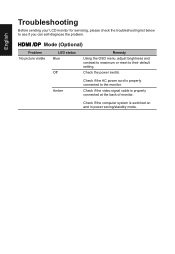
Amber Check if the AC power cord is properly connected at the back of monitor. Check if the video signal cable is properly connected to the monitor. English HDMI /DP Mode (Optional) Problem No picture visible LED status Blue Off Remedy Using the OSD menu, adjust brightness and contrast to maximum or ... the problem. Check the power switch. Check if the computer system is switched on and in power saving/standby mode. Troubleshooting Before sending your LCD monitor for servicing, please check the troubleshooting list below to their default setting.
Amber Check if the AC power cord is properly connected at the back of monitor. Check if the video signal cable is properly connected to the monitor. English HDMI /DP Mode (Optional) Problem No picture visible LED status Blue Off Remedy Using the OSD menu, adjust brightness and contrast to maximum or ... the problem. Check the power switch. Check if the computer system is switched on and in power saving/standby mode. Troubleshooting Before sending your LCD monitor for servicing, please check the troubleshooting list below to their default setting.


