

XD1150 Service Guide
Page 6
... 2-1 Equipment Needed 2-1 General Information 2-1 Mechanical Disassembly Procedure 2-2 Mechanical Reassembly Procedure 2-15 Chapter 3 Troubleshooting 3-1 Equipment Needed 3-1 LED Lighting Message 3-1 Main Procedure 3-2 Chapter 4 Function Test and Alignment Procedure 4-1 Product / Test Equipment / Test Condition 4-1 Inspection Procecdure 4-2 Guide to Entering Service Mode and Factory Reset (PD100) 4-5 Chapter 5 Firware Upgrade 5-1 Equipment Needed 5-1 Installation Procedure 5-2 USB Driver Upgrade Procedure...
... 2-1 Equipment Needed 2-1 General Information 2-1 Mechanical Disassembly Procedure 2-2 Mechanical Reassembly Procedure 2-15 Chapter 3 Troubleshooting 3-1 Equipment Needed 3-1 LED Lighting Message 3-1 Main Procedure 3-2 Chapter 4 Function Test and Alignment Procedure 4-1 Product / Test Equipment / Test Condition 4-1 Inspection Procecdure 4-2 Guide to Entering Service Mode and Factory Reset (PD100) 4-5 Chapter 5 Firware Upgrade 5-1 Equipment Needed 5-1 Installation Procedure 5-2 USB Driver Upgrade Procedure...

XD1150 Service Guide
Page 43
...the information below ). After repairing, the unit should be burn-in Time 2 Hours 4 Hours 6 Hours Test Signal Table Models PD100(D)/XD1170D/XD1150 PD120(D)/XD1270D/XD1250 Test Signal 800 x 600@75Hz 1024 x 768@60Hz Confidential 4 DVD player with XGA resolution (Color Video ...Circumstance Brightness : Dark room less than 2.5 lux. - PD100 / PD100D / PD120D / PD120 / XD1170D / XD1270D / XD1150 / XD1250 Test Equipment - Chapter 4 Function Test & Alignment Procedure Product - IBM PC with Multi-system (NTSC/PAL/SECAM), equipped "Component""S-Video"and "Composite" - Minolta ...
...the information below ). After repairing, the unit should be burn-in Time 2 Hours 4 Hours 6 Hours Test Signal Table Models PD100(D)/XD1170D/XD1150 PD120(D)/XD1270D/XD1250 Test Signal 800 x 600@75Hz 1024 x 768@60Hz Confidential 4 DVD player with XGA resolution (Color Video ...Circumstance Brightness : Dark room less than 2.5 lux. - PD100 / PD100D / PD120D / PD120 / XD1170D / XD1270D / XD1150 / XD1250 Test Equipment - Chapter 4 Function Test & Alignment Procedure Product - IBM PC with Multi-system (NTSC/PAL/SECAM), equipped "Component""S-Video"and "Composite" - Minolta ...

XD1150 Service Guide
Page 44
... clear after adjust the focus ring. - If not, please return the unit to the repair center. (by Rsync, Frequency or Tracking selection. - Test Signal : please refer to enter Service Mode. No video noise is under the spec. - No light leakage *Please refer to page 4~7 to... : please refer to repair area. Confidential 5 then, 4:3 screen and 1080i signal. If not, please return the unit to Test Signal Table - Test Pattern : General 1 - Test Pattern : Master - position of dead pixels should be adjustable to repair area. *Please check and see if it's in the corner should ...
... clear after adjust the focus ring. - If not, please return the unit to the repair center. (by Rsync, Frequency or Tracking selection. - Test Signal : please refer to enter Service Mode. No video noise is under the spec. - No light leakage *Please refer to page 4~7 to... : please refer to repair area. Confidential 5 then, 4:3 screen and 1080i signal. If not, please return the unit to Test Signal Table - Test Pattern : General 1 - Test Pattern : Master - position of dead pixels should be adjustable to repair area. *Please check and see if it's in the corner should ...

XD1150 Service Guide
Page 45
...and see if the light leaks. - Please refer to Bottom) - Choose and access Video Calibration & PC Calibration for entering Service Mode. 3. Test Pattern: R, G, B and White Color Confidential 6 Follow up TI DMD Chip Spec. 8 Calibration 9 Contrast / Brightness Calibration Pattern should be done... - Video Calibration - Gray level should be in Full Screen Mode. 2. Test Signal : please refer to Entering Service Mode and Facotry Reset for correction in full screen mode - Test Pattern : Master - Test Pattern : White (Top) Black (Bottom) Note: 1. Calibration Pattern should ...
...and see if the light leaks. - Please refer to Bottom) - Choose and access Video Calibration & PC Calibration for entering Service Mode. 3. Test Pattern: R, G, B and White Color Confidential 6 Follow up TI DMD Chip Spec. 8 Calibration 9 Contrast / Brightness Calibration Pattern should be done... - Video Calibration - Gray level should be in Full Screen Mode. 2. Test Signal : please refer to Entering Service Mode and Facotry Reset for correction in full screen mode - Test Pattern : Master - Test Pattern : White (Top) Black (Bottom) Note: 1. Calibration Pattern should ...

XD1150 Service Guide
Page 46
Test Pattern : Full white / Blue 60 cannot be accepted if the problem appear with Blue 60 pattern. Test Pattern : Full White 12 Blemish (Bright) The bright blemish cannot be accepted if the problem appear with Gary 30 pattern - Test Pattern : Full Black (Bright pixel) any bright pixel Dead Pixel (Dark pixel) The numbers of dead pixel should be smaller or amount to 6 pixel. - Photo Confidential 7 No Step Specification Procedure 11 Dead Pixel Cannot accept - Test Pattern : Full Black / Gray 30 13 Blemish (Dark) The dark blemish -
Test Pattern : Full white / Blue 60 cannot be accepted if the problem appear with Blue 60 pattern. Test Pattern : Full White 12 Blemish (Bright) The bright blemish cannot be accepted if the problem appear with Gary 30 pattern - Test Pattern : Full Black (Bright pixel) any bright pixel Dead Pixel (Dark pixel) The numbers of dead pixel should be smaller or amount to 6 pixel. - Photo Confidential 7 No Step Specification Procedure 11 Dead Pixel Cannot accept - Test Pattern : Full Black / Gray 30 13 Blemish (Dark) The dark blemish -
XD1150 Service Guide
Page 55
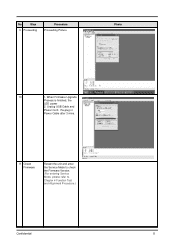
Re-plug in Power Cable after 3 mins. 11 Check Firmware Restart the unit and enter the Service Mode to check the Firmware Version. (For entering Service Mode, please refer to Chapter 4 Function Test and Alignment Procedure.) Confidential 8 No Step 9 Proceeding Procedure Proceeding Picture Photo 10 1. When Firmware Upgrade Process is finished, the LED power 2. Unplug USB Cable and Power Cord.
Re-plug in Power Cable after 3 mins. 11 Check Firmware Restart the unit and enter the Service Mode to check the Firmware Version. (For entering Service Mode, please refer to Chapter 4 Function Test and Alignment Procedure.) Confidential 8 No Step 9 Proceeding Procedure Proceeding Picture Photo 10 1. When Firmware Upgrade Process is finished, the LED power 2. Unplug USB Cable and Power Cord.
XD1150 User's Guide EN
Page 43
... different from that interference will not occur in a particular installation. These limits are designed to Part 15 of your Acer Projector. If this computer. 41 ... FCC notice This device has been tested and found to comply with the limits for help. However, there is granted by the Federal Communications Commission, to operate...
... different from that interference will not occur in a particular installation. These limits are designed to Part 15 of your Acer Projector. If this computer. 41 ... FCC notice This device has been tested and found to comply with the limits for help. However, there is granted by the Federal Communications Commission, to operate...