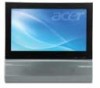
User Manual
Page 9
... interface 7 PS/2 interface 7 Connecting a monitor 7 Connecting the power cable 8 Turning on your computer 8 Turning off your computer 8 3 Upgrading your computer 9 Installation precautions 10 ESD precautions 10 Preinstallation instructions 10 Post-installation instructions 10 Opening your computer 11 To remove the computer cover 11 To replace the computer cover 11 Upgrading your computer...
... interface 7 PS/2 interface 7 Connecting a monitor 7 Connecting the power cable 8 Turning on your computer 8 Turning off your computer 8 3 Upgrading your computer 9 Installation precautions 10 ESD precautions 10 Preinstallation instructions 10 Post-installation instructions 10 Opening your computer 11 To remove the computer cover 11 To replace the computer cover 11 Upgrading your computer...
User Manual
Page 21
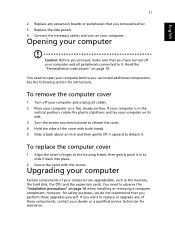
See the following section for instructions. However, for safety purposes, we do not recommend that you can install additional components. You need to open your computer and all cables. 2 Place your computer. If you want to replace or upgrade any expansion ...release the cover. 4 Hold the sides of your computer are upgradeable, such as the memory, the hard disk, the CPU and the expansion cards. If your computer is in to observe the "Installation precautions" on page 10 when installing or removing a computer component. Read the "Preinstallation instructions" on page 10. then ...
See the following section for instructions. However, for safety purposes, we do not recommend that you can install additional components. You need to open your computer and all cables. 2 Place your computer. If you want to replace or upgrade any expansion ...release the cover. 4 Hold the sides of your computer are upgradeable, such as the memory, the hard disk, the CPU and the expansion cards. If your computer is in to observe the "Installation precautions" on page 10 when installing or removing a computer component. Read the "Preinstallation instructions" on page 10. then ...

User Manual
Page 22
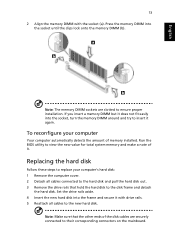
To install a memory DIMM 1 Locate the memory DIMM socket on both sides of the socket (b). Gently pull the memory DIMM out of the memory DIMM socket outward to release the memory DIMM (a). English 12 3 Upgrading your computer To remove a memory DIMM Note: The memory DIMM has only one notch located toward the center of the module. 1 Remove the side panel. 2 Locate the memory DIMM socket on the mainboard. 3 Press the holding clips on the mainboard.
To install a memory DIMM 1 Locate the memory DIMM socket on both sides of the socket (b). Gently pull the memory DIMM out of the memory DIMM socket outward to release the memory DIMM (a). English 12 3 Upgrading your computer To remove a memory DIMM Note: The memory DIMM has only one notch located toward the center of the module. 1 Remove the side panel. 2 Locate the memory DIMM socket on the mainboard. 3 Press the holding clips on the mainboard.
User Manual
Page 23
... it . To reconfigure your computer's hard disk: 1 Remove the computer cover. 2 Detach all cables to the new hard disk. Note: The memory DIMM sockets are securely connected to their corresponding connectors on the mainboard. Note: Make sure that hold the hard disk to the disk frame and... (b). Replacing the hard disk Follow these steps to replace your computer Your computer automatically detects the amount of memory installed. English 13 2 Align the memory DIMM with drive rails. 5 Reattach all cables connected to the hard disk and pull the hard disk out. 3 Remove the drive rails...
... it . To reconfigure your computer's hard disk: 1 Remove the computer cover. 2 Detach all cables to the new hard disk. Note: The memory DIMM sockets are securely connected to their corresponding connectors on the mainboard. Note: Make sure that hold the hard disk to the disk frame and... (b). Replacing the hard disk Follow these steps to replace your computer Your computer automatically detects the amount of memory installed. English 13 2 Align the memory DIMM with drive rails. 5 Reattach all cables connected to the hard disk and pull the hard disk out. 3 Remove the drive rails...


