
Service Guide
Page 2
Date Chapter Updates ii Veriton Z290G AIO Computer Service Guide Revision History Refer to the table below for changes made on this version of the Veriton Z290G All-In-One Computer Service Guide.
Date Chapter Updates ii Veriton Z290G AIO Computer Service Guide Revision History Refer to the table below for changes made on this version of the Veriton Z290G All-In-One Computer Service Guide.
Service Guide
Page 3
...Copyright Copyright © 2010 by any means, electronic, mechanical, magnetic, optical, chemical, manual or otherwise, without notice. Acer Incorporated makes no representations or warranties, either expressed or implied, with respect to the contents hereof and specifically disclaims any ..., stored in a retrieval system, or translated into any particular purpose. Any Acer Incorporated software described in the software. Should the programs prove defective following their respective holders. Veriton Z290G AIO Computer Service Guide iii Disclaimer The information in any form or by...
...Copyright Copyright © 2010 by any means, electronic, mechanical, magnetic, optical, chemical, manual or otherwise, without notice. Acer Incorporated makes no representations or warranties, either expressed or implied, with respect to the contents hereof and specifically disclaims any ..., stored in a retrieval system, or translated into any particular purpose. Any Acer Incorporated software described in the software. Should the programs prove defective following their respective holders. Veriton Z290G AIO Computer Service Guide iii Disclaimer The information in any form or by...
Service Guide
Page 4
Gives additional information related to any physical risk or system damage that appear on screen. SCREEN MESSAGES NOTE WARNING CAUTION IMPORTANT Denotes actual messages that might result from doing or not doing specific actions. iv Veriton Z290G AIO Computer Service Guide Alerts you to do specific actions relevant to the accomplishment of procedures. Gives precautionary measures to avoid possible hardware or software problems. Reminds you to the current topic. Conventions The following textual conventions are used in this service guide.
Gives additional information related to any physical risk or system damage that appear on screen. SCREEN MESSAGES NOTE WARNING CAUTION IMPORTANT Denotes actual messages that might result from doing or not doing specific actions. iv Veriton Z290G AIO Computer Service Guide Alerts you to do specific actions relevant to the accomplishment of procedures. Gives precautionary measures to avoid possible hardware or software problems. Reminds you to the current topic. Conventions The following textual conventions are used in this service guide.
Service Guide
Page 5
For AUTHORIZED SERVICE PROVIDERS, your regional Acer office to order FRU parts for repair and service of customer machines. If, for our "global" product offering. You MUST use the list provided by .... In such cases, please contact your regional office MAY have a DIFFERENT part number code to -date information available on card, modem, or extra memory capability). Veriton Z290G AIO Computer Service Guide v add-on your regional web or channel. Service Guide Coverage This Service Guide provides you with further technical details. FRU Information Please...
For AUTHORIZED SERVICE PROVIDERS, your regional Acer office to order FRU parts for repair and service of customer machines. If, for our "global" product offering. You MUST use the list provided by .... In such cases, please contact your regional office MAY have a DIFFERENT part number code to -date information available on card, modem, or extra memory capability). Veriton Z290G AIO Computer Service Guide v add-on your regional web or channel. Service Guide Coverage This Service Guide provides you with further technical details. FRU Information Please...
Service Guide
Page 7
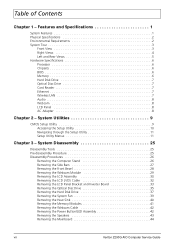
... the Memory Modules 41 Removing the Webcam Cable 42 Removing the Power Button/LED Assembly 42 Removing the Speakers 43 Removing the Mainboard 44 vii Veriton Z290G AIO Computer Service Guide System Utilities 9 CMOS Setup Utility 9 Accessing the Setup Utility 10 Navigating through the Setup Utility 11 Setup Utility Menus 11 Chapter...
... the Memory Modules 41 Removing the Webcam Cable 42 Removing the Power Button/LED Assembly 42 Removing the Speakers 43 Removing the Mainboard 44 vii Veriton Z290G AIO Computer Service Guide System Utilities 9 CMOS Setup Utility 9 Accessing the Setup Utility 10 Navigating through the Setup Utility 11 Setup Utility Menus 11 Chapter...
Service Guide
Page 8
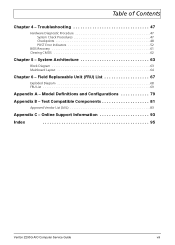
Table of Contents Chapter 4 - Troubleshooting 47 Hardware Diagnostic Procedure 47 System Check Procedures 47 Checkpoints 48 POST Error Indicators 52 BIOS Recovery 61 Clearing CMOS 62 Chapter 5 - System Architecture 63 Block Diagram 63 Mainboard Layout 64 Chapter 6 - Online Support Information 93 Index 95 Veriton Z290G AIO Computer Service Guide viii Model Definitions and Configurations 79 Appendix B - Field Replaceable Unit (FRU) List 67 Exploded Diagram 68 FRU List 69 Appendix A - Test Compatible Components 81 Approved Vendor List (AVL 83 Appendix C -
Table of Contents Chapter 4 - Troubleshooting 47 Hardware Diagnostic Procedure 47 System Check Procedures 47 Checkpoints 48 POST Error Indicators 52 BIOS Recovery 61 Clearing CMOS 62 Chapter 5 - System Architecture 63 Block Diagram 63 Mainboard Layout 64 Chapter 6 - Online Support Information 93 Index 95 Veriton Z290G AIO Computer Service Guide viii Model Definitions and Configurations 79 Appendix B - Field Replaceable Unit (FRU) List 67 Exploded Diagram 68 FRU List 69 Appendix A - Test Compatible Components 81 Approved Vendor List (AVL 83 Appendix C -
Service Guide
Page 9
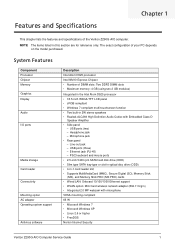
The exact configuration of the Veriton Z290G AIO computer. USB ports (two) - USB ports (three) - Features and Specifications Chapter 1 This chapter lists the features and specifications of your PC depends... with microphone VESA mounting compliant 65 W • Microsoft Windows 7 • Microsoft Windows XP • Linux 2.6 or higher • FreeDOS Norton Internet Security Veriton Z290G AIO Computer Service Guide 1 Ethernet jack (RJ-45) - System Features Component Processor Chipset Memory Graphics Display Audio I/O ports Media storage Card reader Connectivity Mounting option AC...
The exact configuration of the Veriton Z290G AIO computer. USB ports (two) - USB ports (three) - Features and Specifications Chapter 1 This chapter lists the features and specifications of your PC depends... with microphone VESA mounting compliant 65 W • Microsoft Windows 7 • Microsoft Windows XP • Linux 2.6 or higher • FreeDOS Norton Internet Security Veriton Z290G AIO Computer Service Guide 1 Ethernet jack (RJ-45) - System Features Component Processor Chipset Memory Graphics Display Audio I/O ports Media storage Card reader Connectivity Mounting option AC...
Service Guide
Page 10
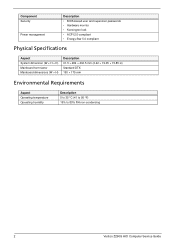
... 190 × 175 mm Environmental Requirements Aspect Operating temperature Operating humidity Description 5 to 35 °C (41 to 95 °F) 15% to 80% RH non-condensing 2 Veriton Z290G AIO Computer Service Guide
... 190 × 175 mm Environmental Requirements Aspect Operating temperature Operating humidity Description 5 to 35 °C (41 to 95 °F) 15% to 80% RH non-condensing 2 Veriton Z290G AIO Computer Service Guide
Service Guide
Page 11
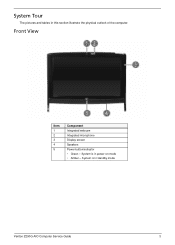
System Tour The pictures and tables in standby mode Veriton Z290G AIO Computer Service Guide 3 System is in power-on mode • Amber - Front View Item 1 2 3 4 5 Component Integrated webcam Integrated microphone Display screen Speakers Power button/indicator • Green - System is in this section illustrate the physical outlook of the computer.
System Tour The pictures and tables in standby mode Veriton Z290G AIO Computer Service Guide 3 System is in power-on mode • Amber - Front View Item 1 2 3 4 5 Component Integrated webcam Integrated microphone Display screen Speakers Power button/indicator • Green - System is in this section illustrate the physical outlook of the computer.
Service Guide
Page 13
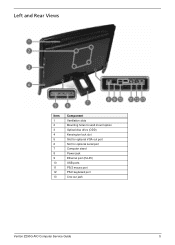
Left and Rear Views Item 1 2 3 4 5 6 7 8 9 10 11 12 13 Component Ventilation slots Mounting holes for wall mount option Optical disc drive (ODD) Kensington lock slot Slot for optional VGA out port Slot for optional serial port Computer stand Power jack Ethernet port (RJ-45) USB ports PS/2 mouse port PS/2 keyboard port Line-out jack Veriton Z290G AIO Computer Service Guide 5
Left and Rear Views Item 1 2 3 4 5 6 7 8 9 10 11 12 13 Component Ventilation slots Mounting holes for wall mount option Optical disc drive (ODD) Kensington lock slot Slot for optional VGA out port Slot for optional serial port Computer stand Power jack Ethernet port (RJ-45) USB ports PS/2 mouse port PS/2 keyboard port Line-out jack Veriton Z290G AIO Computer Service Guide 5

Service Guide
Page 14
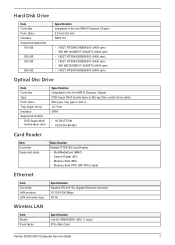
...-pin DDR3 SO-DIMM Hynix, Kingston, Micron, Unifosa, Samsung You can install memory modules in any combination as long as they match the above specifications. 6 Veriton Z290G AIO Computer Service Guide
...-pin DDR3 SO-DIMM Hynix, Kingston, Micron, Unifosa, Samsung You can install memory modules in any combination as long as they match the above specifications. 6 Veriton Z290G AIO Computer Service Guide
Service Guide
Page 15
... RTL8111DL Gigabit Ethernet controller 10/100/1000 Mbps RJ-45 Wireless LAN Item Model Form factor Specification Lite-On WN6602RH (802.11 b/g/n) PCIe Mini Card Veriton Z290G AIO Computer Service Guide 7
... RTL8111DL Gigabit Ethernet controller 10/100/1000 Mbps RJ-45 Wireless LAN Item Model Form factor Specification Lite-On WN6602RH (802.11 b/g/n) PCIe Mini Card Veriton Z290G AIO Computer Service Guide 7

Service Guide
Page 16
... (65 W) • 90V to 240V and 50Hz to 60Hz AC • 19V DC Output • 3 prong ICE-320-C13 or IEC-320-C5 AC connector 8 Veriton Z290G AIO Computer Service Guide
... (65 W) • 90V to 240V and 50Hz to 60Hz AC • 19V DC Output • 3 prong ICE-320-C13 or IEC-320-C5 AC connector 8 Veriton Z290G AIO Computer Service Guide
Service Guide
Page 33
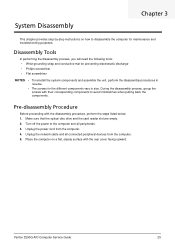
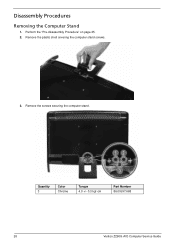
Turn off the power to disassemble the computer for the different components vary in size. Veriton Z290G AIO Computer Service Guide 25 Unplug the network cable and all peripherals. 3. Place the computer on how to the computer and all connected peripheral devices from ...
Turn off the power to disassemble the computer for the different components vary in size. Veriton Z290G AIO Computer Service Guide 25 Unplug the network cable and all peripherals. 3. Place the computer on how to the computer and all connected peripheral devices from ...
Service Guide
Page 34
Quantity 3 Color Chrome Torque 4.0 +/- 0.3 kgf-cm Part Number 86.00J97.668 26 Veriton Z290G AIO Computer Service Guide Disassembly Procedures Removing the Computer Stand 1. Remove the screws securing the computer stand. Perform the "Pre-disassembly Procedure" on page 25. 2. Remove the plastic shell covering the computer stand screws. 3.
Quantity 3 Color Chrome Torque 4.0 +/- 0.3 kgf-cm Part Number 86.00J97.668 26 Veriton Z290G AIO Computer Service Guide Disassembly Procedures Removing the Computer Stand 1. Remove the screws securing the computer stand. Perform the "Pre-disassembly Procedure" on page 25. 2. Remove the plastic shell covering the computer stand screws. 3.

Service Guide
Page 35
Removing the Side Bars 1. Quantity 2 Color Black Torque 4.0 +/- 0.3 kgf-cm Part Number 86.ZA324.8R0 Veriton Z290G AIO Computer Service Guide 27 Perform the "Pre-disassembly Procedure" on page 25. 2. Remove the computer stand. 4. Remove the screws securing the side bars.
Removing the Side Bars 1. Quantity 2 Color Black Torque 4.0 +/- 0.3 kgf-cm Part Number 86.ZA324.8R0 Veriton Z290G AIO Computer Service Guide 27 Perform the "Pre-disassembly Procedure" on page 25. 2. Remove the computer stand. 4. Remove the screws securing the side bars.
Service Guide
Page 36
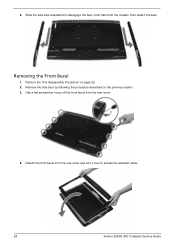
Use a flat screwdriver to access the webcam cable. 28 Veriton Z290G AIO Computer Service Guide Detach the front bezel from the rear cover and turn it over to pry off the front bezel from the chassis, then detach the bars. Slide the side bars downward to disengage the bars' inner tabs from the rear cover. 4. Removing the Front Bezel 1. Remove the side bars by following the procedure described on page 25. 2. Perform the "Pre-disassembly Procedure" on the previous section. 3. 3.
Use a flat screwdriver to access the webcam cable. 28 Veriton Z290G AIO Computer Service Guide Detach the front bezel from the rear cover and turn it over to pry off the front bezel from the chassis, then detach the bars. Slide the side bars downward to disengage the bars' inner tabs from the rear cover. 4. Removing the Front Bezel 1. Remove the side bars by following the procedure described on page 25. 2. Perform the "Pre-disassembly Procedure" on the previous section. 3. 3.
Service Guide
Page 37
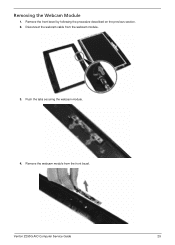
Remove the webcam module from the webcam module. 3. Push the tabs securing the webcam module. 4. Disconnect the webcam cable from the front bezel. Veriton Z290G AIO Computer Service Guide 29 Removing the Webcam Module 1. Remove the front bezel by following the procedure described on the previous section. 2.
Remove the webcam module from the webcam module. 3. Push the tabs securing the webcam module. 4. Disconnect the webcam cable from the front bezel. Veriton Z290G AIO Computer Service Guide 29 Removing the Webcam Module 1. Remove the front bezel by following the procedure described on the previous section. 2.
Service Guide
Page 38
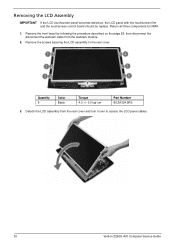
... the rear cover and turn it over to the rear cover. Remove the screws securing the LCD assembly to access the LCD panel cables. 30 Veriton Z290G AIO Computer Service Guide Quantity 6 Color Black Torque 4.0 +/- 0.3 kgf.cm Part Number 86.ZA324.8R0 3. Return all three components for RMA. 1. Removing the LCD Assembly IMPORTANT...
... the rear cover and turn it over to the rear cover. Remove the screws securing the LCD assembly to access the LCD panel cables. 30 Veriton Z290G AIO Computer Service Guide Quantity 6 Color Black Torque 4.0 +/- 0.3 kgf.cm Part Number 86.ZA324.8R0 3. Return all three components for RMA. 1. Removing the LCD Assembly IMPORTANT...
Service Guide
Page 39
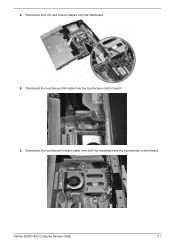
Disconnect the touchscreen function cable from the mainboard. 5. Veriton Z290G AIO Computer Service Guide 31 Disconnect the LCD and inverter cables from both the mainboard and the touchscreen control board. Disconnect the touchscreen film cable from the touchscreen control board. 6. 4.
Disconnect the touchscreen function cable from the mainboard. 5. Veriton Z290G AIO Computer Service Guide 31 Disconnect the LCD and inverter cables from both the mainboard and the touchscreen control board. Disconnect the touchscreen film cable from the touchscreen control board. 6. 4.