Veriton 3500G/5500G/7500G Service Guide
Page 1
for more information, please refer to http://csd.acer.com.tw PART NO.: 49.31V01.301 49.31V01.201 49.31V01.101 PRINTED IN TAIWAN Veriton 3500/5500/7500 3500G/5500G/7500G Service Guide Service guide files and updates are available on the AIPG/CSD web;
for more information, please refer to http://csd.acer.com.tw PART NO.: 49.31V01.301 49.31V01.201 49.31V01.101 PRINTED IN TAIWAN Veriton 3500/5500/7500 3500G/5500G/7500G Service Guide Service guide files and updates are available on the AIPG/CSD web;

Veriton 3500G/5500G/7500G Service Guide
Page 2
Revision History Please refer to the table below for the updates made on Veriton 3500/5500/7500 service guide. 04/22/2002 05//06/2002 Date Chapter Chapter 1 Chapter 1 and 5 Updates Modify Block diagram Modify Board Layout graphic and add "Mouse" for CN 2 II
Revision History Please refer to the table below for the updates made on Veriton 3500/5500/7500 service guide. 04/22/2002 05//06/2002 Date Chapter Chapter 1 Chapter 1 and 5 Updates Modify Block diagram Modify Board Layout graphic and add "Mouse" for CN 2 II

Veriton 3500G/5500G/7500G Service Guide
Page 4
Gives precautionary measures to avoid possible hardware or software problems. Reminds you to the current topic. Gives bits and pieces of procedures. 4 Veriton 3500/5500/7500 Conventions The following conventions are used in this manual: Screen messages NOTE WARNING CAUTION IMPORTANT Denotes actual messages that might result from doing or not doing specific actions. Alerts you to do specific actions relevant to the accomplishment of additional information related to any damage that appear on screen.
Gives precautionary measures to avoid possible hardware or software problems. Reminds you to the current topic. Gives bits and pieces of procedures. 4 Veriton 3500/5500/7500 Conventions The following conventions are used in this manual: Screen messages NOTE WARNING CAUTION IMPORTANT Denotes actual messages that might result from doing or not doing specific actions. Alerts you to do specific actions relevant to the accomplishment of additional information related to any damage that appear on screen.
Veriton 3500G/5500G/7500G Service Guide
Page 7
... 5500/5500G 8 Rear Panel-Veriton 5500/5500G 10 Front Panel-Veriton 7500/7500G 12 Rear Panel-Veriton 7500/7500G 14 System Block Diagram (Veriton 3500/ 5500/ 7500 16 System Block Diagram (Veriton 3500G/ 5500G/ 7500G 17 Main Board Layout (Veriton 3500/ 5500/ 7500) (S88M/ GL 18 Main Board Layout (Veriton 3500G/5500G/7500G) (S88M/ G 19 Keyboard (3500/ 3500G, 5500/ 5500G, 7500/ 7500G 21 Hardware Specifications and Configurations...
... 5500/5500G 8 Rear Panel-Veriton 5500/5500G 10 Front Panel-Veriton 7500/7500G 12 Rear Panel-Veriton 7500/7500G 14 System Block Diagram (Veriton 3500/ 5500/ 7500 16 System Block Diagram (Veriton 3500G/ 5500G/ 7500G 17 Main Board Layout (Veriton 3500/ 5500/ 7500) (S88M/ GL 18 Main Board Layout (Veriton 3500G/5500G/7500G) (S88M/ G 19 Keyboard (3500/ 3500G, 5500/ 5500G, 7500/ 7500G 21 Hardware Specifications and Configurations...
Veriton 3500G/5500G/7500G Service Guide
Page 8
...Removing and Installing the Processor 82 Removing the System Main board 83 Removing the I/O Port Bracket 83 Veriton 5500/ 5500G Disassembly Procedure Flowchart 84 Disassembling the Veriton 5500/ 5500G 85 Open the Housing Cover 85 Removing the Front Panel 85 Removing the Empty Cover 86... 94 Removing Power Switch Cable 95 Removing the System Main Board 96 Removing the I/O Port Bracket 96 Veriton 7500/ 7500G Disassembly Procedure Flowchart 97 Disassembling the Veriton 7500/ 7500G 98 Opening the Housing 98 Removing the Front Panel 98 Removing the Modem Card 99 Removing the AGP ...
...Removing and Installing the Processor 82 Removing the System Main board 83 Removing the I/O Port Bracket 83 Veriton 5500/ 5500G Disassembly Procedure Flowchart 84 Disassembling the Veriton 5500/ 5500G 85 Open the Housing Cover 85 Removing the Front Panel 85 Removing the Empty Cover 86... 94 Removing Power Switch Cable 95 Removing the System Main Board 96 Removing the I/O Port Bracket 96 Veriton 7500/ 7500G Disassembly Procedure Flowchart 97 Disassembling the Veriton 7500/ 7500G 98 Opening the Housing 98 Removing the Front Panel 98 Removing the Modem Card 99 Removing the AGP ...
Veriton 3500G/5500G/7500G Service Guide
Page 11
Chapter 1 System Specifications Overview The Veriton 3500, 5500, 7500 supports Intel® Pentium IV (Willamette 478/Northwood) Flip Chip-Pin Grid Array 2 processor (FC-PGA2) based Micro ATX, IBM PC/AT compatible system with PCI/ AGPbus. Chapter 1 1 The Veriton 3500G, 5500G, 7500G supports Intel® Pentium IV (Willamette 478/Northwood) Flip Chip-Pin Grid Array 2 processor (FC-PGA2) based Micro ATX, IBM PC/AT compatible system with PCI bus.
Chapter 1 System Specifications Overview The Veriton 3500, 5500, 7500 supports Intel® Pentium IV (Willamette 478/Northwood) Flip Chip-Pin Grid Array 2 processor (FC-PGA2) based Micro ATX, IBM PC/AT compatible system with PCI/ AGPbus. Chapter 1 1 The Veriton 3500G, 5500G, 7500G supports Intel® Pentium IV (Willamette 478/Northwood) Flip Chip-Pin Grid Array 2 processor (FC-PGA2) based Micro ATX, IBM PC/AT compatible system with PCI bus.
Veriton 3500G/5500G/7500G Service Guide
Page 12
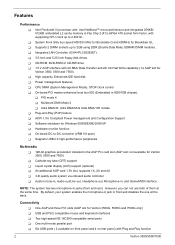
...multi-mode parallel port ! On-board PCI master enhanced local bus IDE (Embedded in the AGP Pro card slot (AGP slot: not available for Veriton 3500, 5500 and 7500) ! Ultra DMA/33, Ultra DMA/66 & Ultra DMA/100 modes ! On-board DC-to 2GB using DDR (Double Data Rate) SDRAM ...DIMM modules. ! Liquid crystal display (LCD) support (optional) ! Two high-speed NS 16C550-compatible serial ports ! PIO mode 4 ! Software shutdown for Veriton 3500G, 5500G and 7500G only) !...
...multi-mode parallel port ! On-board PCI master enhanced local bus IDE (Embedded in the AGP Pro card slot (AGP slot: not available for Veriton 3500, 5500 and 7500) ! Ultra DMA/33, Ultra DMA/66 & Ultra DMA/100 modes ! On-board DC-to 2GB using DDR (Double Data Rate) SDRAM ...DIMM modules. ! Liquid crystal display (LCD) support (optional) ! Two high-speed NS 16C550-compatible serial ports ! PIO mode 4 ! Software shutdown for Veriton 3500G, 5500G and 7500G only) !...

Veriton 3500G/5500G/7500G Service Guide
Page 13
... 2.0 Complaint) Expansion ! 3 PCI slots + 2 DIMM slots+ 1 AGP slot (no AGP slot for quick and easy positioning ! Separate computer stand and rubber stands for Veriton 3500, 5500 and 7500) ! Accessible I/O ports ! Low emission and low radiation Chapter 1 3 Upgradeable memory and hard disk Human-centric design and ergonomics ! Smooth and stylish design ! ! Mini-tower...
... 2.0 Complaint) Expansion ! 3 PCI slots + 2 DIMM slots+ 1 AGP slot (no AGP slot for quick and easy positioning ! Separate computer stand and rubber stands for Veriton 3500, 5500 and 7500) ! Accessible I/O ports ! Low emission and low radiation Chapter 1 3 Upgradeable memory and hard disk Human-centric design and ergonomics ! Smooth and stylish design ! ! Mini-tower...

Veriton 3500G/5500G/7500G Service Guide
Page 14
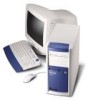
Front Panel-Veriton 3500/3500G The computer's front panel consists of the following: Label 1 2 3 4 5 6 7 8 9 Icon Description Floppy drive light-emitting diode (LED) 3.5-inch floppy drive Floppy drive eject button CD-ROM/DVD-ROM/CD-RW Headphone/Earphone port Volume control tuner CD-ROM/DVD-ROM/CD-RW LED CD-ROM/DVD-ROM/CD-RW tray CD-ROM/DVD-ROM/CD-RW emergency eject hole Stop/Eject button 10 USB ports 11 Microphone-in port (front)* 12 Headphone-out port 13 Hard disk drive activity LED 4 Veriton 3500/5500/7500
Front Panel-Veriton 3500/3500G The computer's front panel consists of the following: Label 1 2 3 4 5 6 7 8 9 Icon Description Floppy drive light-emitting diode (LED) 3.5-inch floppy drive Floppy drive eject button CD-ROM/DVD-ROM/CD-RW Headphone/Earphone port Volume control tuner CD-ROM/DVD-ROM/CD-RW LED CD-ROM/DVD-ROM/CD-RW tray CD-ROM/DVD-ROM/CD-RW emergency eject hole Stop/Eject button 10 USB ports 11 Microphone-in port (front)* 12 Headphone-out port 13 Hard disk drive activity LED 4 Veriton 3500/5500/7500
Veriton 3500G/5500G/7500G Service Guide
Page 22
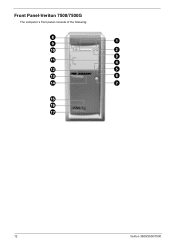
Front Panel-Veriton 7500/7500G The computer's front panel consists of the following: 12 Veriton 3500/5500/7500
Front Panel-Veriton 7500/7500G The computer's front panel consists of the following: 12 Veriton 3500/5500/7500
Veriton 3500G/5500G/7500G Service Guide
Page 24
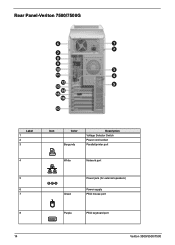
Rear Panel-Veriton 7500/7500G Label 1 2 3 4 5 6 7 Icon Color Burgundy Description Voltage Selector Switch Power cord socket Parallel/printer port White Network port Green Power jack (for external speakers) Power supply PS/2 mouse port 8 Purple PS/2 keyboard port 14 Veriton 3500/5500/7500
Rear Panel-Veriton 7500/7500G Label 1 2 3 4 5 6 7 Icon Color Burgundy Description Voltage Selector Switch Power cord socket Parallel/printer port White Network port Green Power jack (for external speakers) Power supply PS/2 mouse port 8 Purple PS/2 keyboard port 14 Veriton 3500/5500/7500
Veriton 3500G/5500G/7500G Service Guide
Page 107
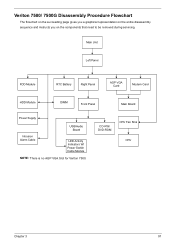
CD-RW/ DVD-ROM CPU Fan Sink CPU Chapter 3 97 Main Unit Left Panel FDD Module RTC Battery Right Panel AGP VGA Card Modem Card HDD Module DIMM Front Panel Main Board Power Supply USB/Audio Board Intrusion Alarm Cable LED Activity Indicators W/ Power Swtich Cable Module NOTE: There is no AGP VGA Slot for Veriton 7500. Veriton 7500/ 7500G Disassembly Procedure Flowchart The flowchart on the succeeding page gives you a graphical representation on the entire disassembly sequence and instructs you on the components that need to be removed during servicing.
CD-RW/ DVD-ROM CPU Fan Sink CPU Chapter 3 97 Main Unit Left Panel FDD Module RTC Battery Right Panel AGP VGA Card Modem Card HDD Module DIMM Front Panel Main Board Power Supply USB/Audio Board Intrusion Alarm Cable LED Activity Indicators W/ Power Swtich Cable Module NOTE: There is no AGP VGA Slot for Veriton 7500. Veriton 7500/ 7500G Disassembly Procedure Flowchart The flowchart on the succeeding page gives you a graphical representation on the entire disassembly sequence and instructs you on the components that need to be removed during servicing.
Veriton 3500G/5500G/7500G Service Guide
Page 108
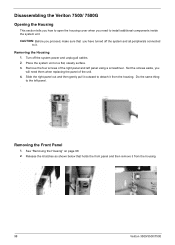
... aside, you will need to install additional components inside the system unit. Removing the Front Panel 1. Turn off the system and all cables. 2. Disassembling the Veriton 7500/ 7500G Opening the Housing This section tells you how to open the housing cover when you need them when replacing the panel of the right panel... unit. 4. Release the 6 latches as shown below that you proceed, make sure that holds the front panel and then remove it from the housing . 98 Veriton 3500/5500/7500
... aside, you will need to install additional components inside the system unit. Removing the Front Panel 1. Turn off the system and all cables. 2. Disassembling the Veriton 7500/ 7500G Opening the Housing This section tells you how to open the housing cover when you need them when replacing the panel of the right panel... unit. 4. Release the 6 latches as shown below that you proceed, make sure that holds the front panel and then remove it from the housing . 98 Veriton 3500/5500/7500

Veriton 3500G/5500G/7500G Service Guide
Page 109
Gently pull out the AGP card to remove it from the PCI slot. NOTE: There is no AGP VGA slot for Veriton 7500. Removing the Modem Card 1. See "Removing the Housing" on page 98. (Remove the left panel only) 2. Gently pull out the modem card to remove it ...
Gently pull out the AGP card to remove it from the PCI slot. NOTE: There is no AGP VGA slot for Veriton 7500. Removing the Modem Card 1. See "Removing the Housing" on page 98. (Remove the left panel only) 2. Gently pull out the modem card to remove it ...

Veriton 3500G/5500G/7500G Service Guide
Page 157
... that supports the latest INTEL Chipset Brookdale-GL technology with DDR DIMM module. Project Name/ Code: S88M / 91.31V01.301(Veriton 3500) S88M/ 91.31V01.201(Veriton 5500) S88M/ 91.31V01.101(Veriton 7500) 3. INTEL Brookdale-GL is positioned to market product for the INTEL Pentium 4 processor and INTEL Northwood processor. It supports double.... Description S88M/GL is optimized for all customers' demand to win the market entrance advantage. Brand No: S88M/ GL MB 2. Appendix A Model Definition and Configuration Veriton 3500/5500/7500 1.
... that supports the latest INTEL Chipset Brookdale-GL technology with DDR DIMM module. Project Name/ Code: S88M / 91.31V01.301(Veriton 3500) S88M/ 91.31V01.201(Veriton 5500) S88M/ 91.31V01.101(Veriton 7500) 3. INTEL Brookdale-GL is positioned to market product for the INTEL Pentium 4 processor and INTEL Northwood processor. It supports double.... Description S88M/GL is optimized for all customers' demand to win the market entrance advantage. Brand No: S88M/ GL MB 2. Appendix A Model Definition and Configuration Veriton 3500/5500/7500 1.
Veriton 7500G
Page 2
... or fitness for identification purposes only and belong to the contents hereof and specifically disclaims the implied warranties of Acer Incorporated. No part of this publication may be made periodically to the information in this manual or supplementary documents...© 2002 Acer Incorporated All Rights Reserved. Other company's product names or trademarks are registered trademarks of such revision or changes. Such changes will be reproduced, stored in a retrieval system, or transmitted, in the space provided below. Veriton 7500 series (Veriton 7500/Veriton 7500G) User's guide...
... or fitness for identification purposes only and belong to the contents hereof and specifically disclaims the implied warranties of Acer Incorporated. No part of this publication may be made periodically to the information in this manual or supplementary documents...© 2002 Acer Incorporated All Rights Reserved. Other company's product names or trademarks are registered trademarks of such revision or changes. Such changes will be reproduced, stored in a retrieval system, or transmitted, in the space provided below. Veriton 7500 series (Veriton 7500/Veriton 7500G) User's guide...

Veriton 7500G
Page 13
3 Package contents Before you unpack your computer, make sure that you have enough space to set up your dealer immediately: • Veriton 7500 series • Items contained in the accessory box • USB or PS/2 keyboard • USB or PS/2 mouse • User's guide and installation poster • Other user documentation and third-party software If any of the following items are missing or damaged, contact your computer. Carefully unpack the carton and remove the contents.
3 Package contents Before you unpack your computer, make sure that you have enough space to set up your dealer immediately: • Veriton 7500 series • Items contained in the accessory box • USB or PS/2 keyboard • USB or PS/2 mouse • User's guide and installation poster • Other user documentation and third-party software If any of the following items are missing or damaged, contact your computer. Carefully unpack the carton and remove the contents.

Veriton 7500G
Page 16
6 1 First things first Accessing the user's guide This user's guide is also available on your computer as an Adobe Acrobat PDF file. To access the user's guide (for Windows XP) 1 On the Windows XP taskbar, click on the Start button then select Help and Support Center. 2 On the Help and Support Center home page, double-click the Veriton 7500 series Online icon. To access the user's guide (for Windows 2000) 1 Double-click on the Veriton 7500 series Online icon on your Windows desktop.
6 1 First things first Accessing the user's guide This user's guide is also available on your computer as an Adobe Acrobat PDF file. To access the user's guide (for Windows XP) 1 On the Windows XP taskbar, click on the Start button then select Help and Support Center. 2 On the Help and Support Center home page, double-click the Veriton 7500 series Online icon. To access the user's guide (for Windows 2000) 1 Double-click on the Veriton 7500 series Online icon on your Windows desktop.

Veriton 7500G
Page 63
53 System boards Mainboard layout The mainboard becomes accessible once you open your Veriton 7500 series computer model. Refer to the section below for the corresponding mainboard layout of your computer.
53 System boards Mainboard layout The mainboard becomes accessible once you open your Veriton 7500 series computer model. Refer to the section below for the corresponding mainboard layout of your computer.
Veriton 7500G
Page 93
... lock key 15 volume control/mute knob 15 Windows logo key 15 L lock keys Caps Lock 16 Num Lock 16 Scroll Lock 16 M mainboard Veriton 7500 54 Veriton 7500G 55 mouse 20 buttons 20 clicking 20 double-click 20 ratchet wheel 20 multimedia key forward 18 play/pause 18 stop 18 R rear panel 13...
... lock key 15 volume control/mute knob 15 Windows logo key 15 L lock keys Caps Lock 16 Num Lock 16 Scroll Lock 16 M mainboard Veriton 7500 54 Veriton 7500G 55 mouse 20 buttons 20 clicking 20 double-click 20 ratchet wheel 20 multimedia key forward 18 play/pause 18 stop 18 R rear panel 13...


