Veriton 3600G/5600G/7600G Service Guide
Page 26
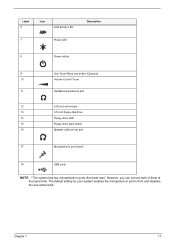
Label 6 Icon LAN activity LED 7 Power LED Description 8 Power button 9 One Touch Recovery button (Optional) 10 Volume Control Tuner 11 Headphone/earphone port 12 5.25-inch drive bays 13 3.5-inch floppy disk drive 14 Floppy drive LED 15 Floppy drive eject button 16 Speaker-out/Line-out port 17 Microphone-in port (front...
Label 6 Icon LAN activity LED 7 Power LED Description 8 Power button 9 One Touch Recovery button (Optional) 10 Volume Control Tuner 11 Headphone/earphone port 12 5.25-inch drive bays 13 3.5-inch floppy disk drive 14 Floppy drive LED 15 Floppy drive eject button 16 Speaker-out/Line-out port 17 Microphone-in port (front...
Veriton 3600G/5600G/7600G Service Guide
Page 42
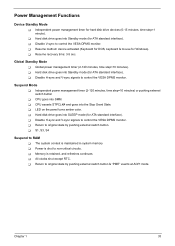
... H-sync and V-sync signals to original state by pushing external switch button. T Return to control the VESA DPMS monitor. T Resume recovery time: 3-5 sec. Power Management Functions Device Standby Mode T Independent power management timer for Windows). Global Standby Mode T Global power management...state by pushing external switch button & "PME" events at ACPI mode. T All clocks shut except RTC. T Hard disk drive goes into SMM. T Hard disk drive goes into Standby mode (for ATA standard interface). T Resume method: device activated (Keyboard for DOS, keyboard & mouse...
... H-sync and V-sync signals to original state by pushing external switch button. T Return to control the VESA DPMS monitor. T Resume recovery time: 3-5 sec. Power Management Functions Device Standby Mode T Independent power management timer for Windows). Global Standby Mode T Global power management...state by pushing external switch button & "PME" events at ACPI mode. T All clocks shut except RTC. T Hard disk drive goes into SMM. T Hard disk drive goes into Standby mode (for ATA standard interface). T Resume method: device activated (Keyboard for DOS, keyboard & mouse...

Veriton 3600G/5600G/7600G Service Guide
Page 120
... in the DIMM sockets properly, then reboot the system. 2. Diskette drive power 3. Main board. Main board. Diskette/IDE disk drives 3. Reload software from Recovery CD. Diskette/IDE drive connection/cables 2. Diskette drive 5. If directed to None in power saving mode. If no check... procedure is the most likely cause. Insert the memory modules in the Disk Drives of processor fan connector. Memory module. 3. Blinking cursor only; Ensure the diskette drive is correctly formatted. 3. Main board. 111 Veriton 3600(D/G)/5600(D/G)/7600(D/G)
... in the DIMM sockets properly, then reboot the system. 2. Diskette drive power 3. Main board. Main board. Diskette/IDE disk drives 3. Reload software from Recovery CD. Diskette/IDE drive connection/cables 2. Diskette drive 5. If directed to None in power saving mode. If no check... procedure is the most likely cause. Insert the memory modules in the Disk Drives of processor fan connector. Memory module. 3. Blinking cursor only; Ensure the diskette drive is correctly formatted. 3. Main board. 111 Veriton 3600(D/G)/5600(D/G)/7600(D/G)

Veriton 5600G
Page 86
... of the following: • Acrobat® Reader™ • Acer LANScope Client Manager (optional) • Norton AntiVirus • NTI CD-Maker • PowerDVD • BIOS utility • Acer One-Touch Recovery (System restore utility) If your computer is configured with Microsoft Windows XP... the following utilities can be used to monitor and maintain system health. • Backup • Disk Defragmenter All of the applications that came ...
... of the following: • Acrobat® Reader™ • Acer LANScope Client Manager (optional) • Norton AntiVirus • NTI CD-Maker • PowerDVD • BIOS utility • Acer One-Touch Recovery (System restore utility) If your computer is configured with Microsoft Windows XP... the following utilities can be used to monitor and maintain system health. • Backup • Disk Defragmenter All of the applications that came ...

Veriton 5600G
Page 106
... a nonbootable (nonsystem) diskette in and turned on the rear panel of the following: • Check if the voltage selector switch located on . Insert the startup disk you created during the use of your computer and each is followed by easy answers and solutions to the situation. Do any of the computer... situations that it with a system diskette and press Ctrl + Alt + Del to restart your computer. • The operating system files may have to perform the recovery process to restore your computer.
... a nonbootable (nonsystem) diskette in and turned on the rear panel of the following: • Check if the voltage selector switch located on . Insert the startup disk you created during the use of your computer and each is followed by easy answers and solutions to the situation. Do any of the computer... situations that it with a system diskette and press Ctrl + Alt + Del to restart your computer. • The operating system files may have to perform the recovery process to restore your computer.


