Veriton 3600G
Page 4
... remove the computer cover To replace the computer cover Internal components System boards Mainboard layout Audio board Upgrading your computer Installing additional memory Replacing the hard disk Installing an expansion card 5 System utilities Acrobat Reader Acer LANScope (optional) Norton AntiVirus NTI CD-Maker (for models with CD-RW) PowerDVD (for models with DVD...
... remove the computer cover To replace the computer cover Internal components System boards Mainboard layout Audio board Upgrading your computer Installing additional memory Replacing the hard disk Installing an expansion card 5 System utilities Acrobat Reader Acer LANScope (optional) Norton AntiVirus NTI CD-Maker (for models with CD-RW) PowerDVD (for models with DVD...

Veriton 3600G
Page 76
...components of these upgrades yourself. If you want to replace or upgrade any of your computer. Each DDR DIMM socket is independent from the other. You need to observe the "Installation precautions" on the mainboard support Double Data Rate (DDR) Synchronous Dynamic Random Access Memory (SDRAM)-type ... the center of 4 GB. To remove a DDR DIMM Note: The DDR DIMM has only one found in your computer are upgradeable such as the memory, the hard disk, the CPU and the expansion cards. This independence allows you perform these components, contact your dealer for safety ...
...components of these upgrades yourself. If you want to replace or upgrade any of your computer. Each DDR DIMM socket is independent from the other. You need to observe the "Installation precautions" on the mainboard support Double Data Rate (DDR) Synchronous Dynamic Random Access Memory (SDRAM)-type ... the center of 4 GB. To remove a DDR DIMM Note: The DDR DIMM has only one found in your computer are upgradeable such as the memory, the hard disk, the CPU and the expansion cards. This independence allows you perform these components, contact your dealer for safety ...

Veriton 3600G
Page 78
...: 1 Remove the computer cover (see page 62). 2 Detach all cables connected to replace your computer Your computer automatically detects the amount of it again. 72 4 Upgrading your computer 2 Align the DDR DIMM with the socket (1). Note: The DDR DIMM sockets are slotted to view the new value for total system...
...: 1 Remove the computer cover (see page 62). 2 Detach all cables connected to replace your computer Your computer automatically detects the amount of it again. 72 4 Upgrading your computer 2 Align the DDR DIMM with the socket (1). Note: The DDR DIMM sockets are slotted to view the new value for total system...

Veriton 3600G
Page 122
... 87, 89 PowerDVD 89 reinstalling programs 91 T turning off computer 48 software shutdown 48 suspend mode 48 turning on computer 47 power button 47 U upgrade add memory 70 install DDR DIMM 71 reconfigure computer 72 remove DDR DIMM 70 computer 65, 70 installation precautions 60 ESD 60 post-installation 61 preinstallation 60...
... 87, 89 PowerDVD 89 reinstalling programs 91 T turning off computer 48 software shutdown 48 suspend mode 48 turning on computer 47 power button 47 U upgrade add memory 70 install DDR DIMM 71 reconfigure computer 72 remove DDR DIMM 70 computer 65, 70 installation precautions 60 ESD 60 post-installation 61 preinstallation 60...
Veriton 3600G/5600G/7600G Service Guide
Page 12
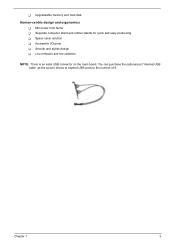
Chapter 1 3 You can purchase the optional part "internal USB cable" as the picture shows to expend USB ports to the number of 8. T Upgradeable memory and hard disk Human-centric design and ergonomics T Mini-tower form factor T Separate computer stand and rubber stands for quick and easy positioning T Space-saver solution T Accessible I/O ports T Smooth and stylish design T Low emission and low radiation NOTE: There is an extra USB connector on the main board.
Chapter 1 3 You can purchase the optional part "internal USB cable" as the picture shows to expend USB ports to the number of 8. T Upgradeable memory and hard disk Human-centric design and ergonomics T Mini-tower form factor T Separate computer stand and rubber stands for quick and easy positioning T Space-saver solution T Accessible I/O ports T Smooth and stylish design T Low emission and low radiation NOTE: There is an extra USB connector on the main board.

Veriton 3600G/5600G/7600G Service Guide
Page 32
...from CD-ROM feature Yes Support to LS-120 drive No Support to BIOS boot block feature Yes NOTE: The BIOS can be overwritten/upgraded using the FLASH utility (AWDFLASH.EXE). Press in Sleep State the BIOS Setup is booting to Enabled.) Processor voltage can be detected ...by the system without setting any jumper. The items on the Advanced Options menu are: Memory/Cache Options PnP/PCI Options Chips Options Chapter 1 23 Intel® Pentium 4 Prescott 3.4GHz-4.4GHz; BIOS Hotkey List Hotkey c a+ o Function ...
...from CD-ROM feature Yes Support to LS-120 drive No Support to BIOS boot block feature Yes NOTE: The BIOS can be overwritten/upgraded using the FLASH utility (AWDFLASH.EXE). Press in Sleep State the BIOS Setup is booting to Enabled.) Processor voltage can be detected ...by the system without setting any jumper. The items on the Advanced Options menu are: Memory/Cache Options PnP/PCI Options Chips Options Chapter 1 23 Intel® Pentium 4 Prescott 3.4GHz-4.4GHz; BIOS Hotkey List Hotkey c a+ o Function ...
Veriton 3600G/5600G/7600G Service Guide
Page 153
... controller 25 Audio Interface 25 Audio-in/Line-in port 13, 15, 19 Audio-out/Line-out port 13, 15, 19 B Block Diagram 20 C Cache Memory 24 size 24 speed 24 Chipsets 31 Compatibility Test 134 Connectors 116 Description 117 description 117 controllers 31 audio 25 serial port 28 CPU removing... 79, 81, 97 CPU upgrade removing 79, 81, 97 Current 32 D Device Standby Mode 33 disassembly CD-ROM Drive 83 Power Supply 85 Diskette Drive removing 93 Drive 94 DRQ...
... controller 25 Audio Interface 25 Audio-in/Line-in port 13, 15, 19 Audio-out/Line-out port 13, 15, 19 B Block Diagram 20 C Cache Memory 24 size 24 speed 24 Chipsets 31 Compatibility Test 134 Connectors 116 Description 117 description 117 controllers 31 audio 25 serial port 28 CPU removing... 79, 81, 97 CPU upgrade removing 79, 81, 97 Current 32 D Device Standby Mode 33 disassembly CD-ROM Drive 83 Power Supply 85 Diskette Drive removing 93 Drive 94 DRQ...


