User Manual
Page 2
...disclaims the implied warranties of such revisions or changes. Acer Incorporated. This company makes no representations or warranties, either expressed or implied, with respect to their respective companies. Acer LCD Monitor User's Guide Original Issue: 08/2008 Changes may ... of this publication without the prior written permission of Acer Incorporated. Acer LCD Monitor User's Guide Model number Serial number Date of purchase Place of purchase Acer and the Acer logo are registered trademarks of Acer Incorporated. Copyright © 2008. All correspondence concerning ...
...disclaims the implied warranties of such revisions or changes. Acer Incorporated. This company makes no representations or warranties, either expressed or implied, with respect to their respective companies. Acer LCD Monitor User's Guide Original Issue: 08/2008 Changes may ... of this publication without the prior written permission of Acer Incorporated. Acer LCD Monitor User's Guide Model number Serial number Date of purchase Place of purchase Acer and the Acer logo are registered trademarks of Acer Incorporated. Copyright © 2008. All correspondence concerning ...
User Manual
Page 3
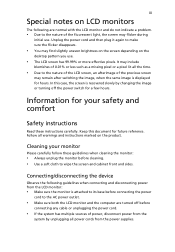
... when connecting and disconnecting power from the LCD monitor: • Make sure the monitor is recovered slowly by unplugging all the time. • Due to wipe the screen and cabinet front and sides. Information for your monitor Please carefully follow these instructions carefully. Follow...comfort Safety instructions Read these guidelines when cleaning the monitor: • Always unplug the monitor before connecting the power cord to the AC power outlet. • Make sure both the LCD monitor and the computer are normal with the LCD monitor and do not indicate a problem. •...
... when connecting and disconnecting power from the LCD monitor: • Make sure the monitor is recovered slowly by unplugging all the time. • Due to wipe the screen and cabinet front and sides. Information for your monitor Please carefully follow these instructions carefully. Follow...comfort Safety instructions Read these guidelines when cleaning the monitor: • Always unplug the monitor before connecting the power cord to the AC power outlet. • Make sure both the LCD monitor and the computer are normal with the LCD monitor and do not indicate a problem. •...
User Manual
Page 4
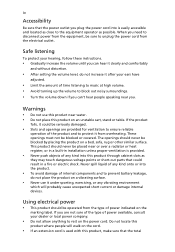
Warnings • Do not use it under sporting, exercising, or any vibrating environment which will walk on the cord. • If an extension cord is used with this product on the marking label. Never spill liquid of any kind into this product through cabinet slots as possible. These openings must not be blocked by placing the product on a bed, sofa, rug or other similar surface. Using electrical power • This product should be sure to unplug the power cord from the type of power available, consult your hearing, follow these instructions. • Gradually increase ...
Warnings • Do not use it under sporting, exercising, or any vibrating environment which will walk on the cord. • If an extension cord is used with this product on the marking label. Never spill liquid of any kind into this product through cabinet slots as possible. These openings must not be blocked by placing the product on a bed, sofa, rug or other similar surface. Using electrical power • This product should be sure to unplug the power cord from the type of power available, consult your hearing, follow these instructions. • Gradually increase ...
User Manual
Page 5
v ampere rating of the power strip's input rating. • This product's power cord is equipped with a three-wire grounded plug. If power strips are used, the load should not exceed 80% of the equipment plugged into the product • the product was spilled into the extension cord does not exceed the extension cord ampere rating. Contact your electrician for service • the product does not operate normally after following requirements: detachable type, UL listed/CSA certified, type SPT-2, rated 7 A 125 V minimum, VDE approved or its equivalent, 4.6 meters (15 feet) maximum ...
v ampere rating of the power strip's input rating. • This product's power cord is equipped with a three-wire grounded plug. If power strips are used, the load should not exceed 80% of the equipment plugged into the product • the product was spilled into the extension cord does not exceed the extension cord ampere rating. Contact your electrician for service • the product does not operate normally after following requirements: detachable type, UL listed/CSA certified, type SPT-2, rated 7 A 125 V minimum, VDE approved or its equivalent, 4.6 meters (15 feet) maximum ...

User Manual
Page 6
Switch off the device near gas pumps at Acer are covered by the operating instructions, since improper adjustment of other products. Keep them out of the reach of radio equipment in minimizing the burden ... benefits of our other controls may contain small parts. IT Equipment Recycling Information Acer is strongly committed to this website: http://www.acer-group.com/public/Sustainability/sustainability01.htm http://www.acer-group.com/public/Sustainability/sustainability04.htm Visit www.global.acer.com for further information on the use of small children. Potentially explosive...
Switch off the device near gas pumps at Acer are covered by the operating instructions, since improper adjustment of other products. Keep them out of the reach of radio equipment in minimizing the burden ... benefits of our other controls may contain small parts. IT Equipment Recycling Information Acer is strongly committed to this website: http://www.acer-group.com/public/Sustainability/sustainability01.htm http://www.acer-group.com/public/Sustainability/sustainability04.htm Visit www.global.acer.com for further information on the use of small children. Potentially explosive...
User Manual
Page 7
... from Electrical and Electronics Equipment (WEEE) regulations, visit http://global.acer.com/about/sustainability.htm Mercury advisory For projectors or electronic products containing an LCD/CRT monitor or display: lamp(s) inside this electronic device into the trash when discarding. LCD pixel statement The LCD unit is produced with high-precision manufacturing techniques. For more information...
... from Electrical and Electronics Equipment (WEEE) regulations, visit http://global.acer.com/about/sustainability.htm Mercury advisory For projectors or electronic products containing an LCD/CRT monitor or display: lamp(s) inside this electronic device into the trash when discarding. LCD pixel statement The LCD unit is produced with high-precision manufacturing techniques. For more information...

User Manual
Page 8
.../or leaning backward • stand up and walk around regularly to remove the strain on your leg muscles Incorrect computer usage may complain of the monitor, using a footrest, or raising your company's health and safety department. Finding your comfort zone Find your comfort zone by pushing the power button. The following...
.../or leaning backward • stand up and walk around regularly to remove the strain on your leg muscles Incorrect computer usage may complain of the monitor, using a footrest, or raising your company's health and safety department. Finding your comfort zone Find your comfort zone by pushing the power button. The following...
User Manual
Page 9
..., glare, excessive room lighting, poorly focused screens, very small typefaces and low-contrast displays could stress your eyes regular breaks by looking away from the monitor and focusing on how to reduce eyestrain.
..., glare, excessive room lighting, poorly focused screens, very small typefaces and low-contrast displays could stress your eyes regular breaks by looking away from the monitor and focusing on how to reduce eyestrain.
User Manual
Page 10
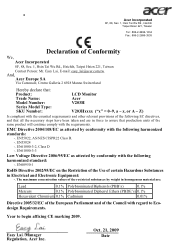
... 2005/32/EC of the European Parliament and of the Council with regard to Ecodesign Requirements. Easy Lai /Manager Regulation, Acer Inc. Year to assure that production units of the same product will continue comply with the requirements. EN60950-1 RoHS Directive 2002... Hsien 221, Taiwan Contact Person: Mr. Easy Lai, E-mail: easy_lai@acer.com.tw And, Acer Europe SA Via Cantonale, Centro Galleria 2 6928 Manno Switzerland Hereby declare that: Product: Trade Name: Model Number: Series Model Type: SKU Number: LCD Monitor Acer V203H V203Hxxxx ("x" = 0~9, a ~ z, or A ~ Z) Is compliant...
... 2005/32/EC of the European Parliament and of the Council with regard to Ecodesign Requirements. Easy Lai /Manager Regulation, Acer Inc. Year to assure that production units of the same product will continue comply with the requirements. EN60950-1 RoHS Directive 2002... Hsien 221, Taiwan Contact Person: Mr. Easy Lai, E-mail: easy_lai@acer.com.tw And, Acer Europe SA Via Cantonale, Centro Galleria 2 6928 Manno Switzerland Hereby declare that: Product: Trade Name: Model Number: Series Model Type: SKU Number: LCD Monitor Acer V203H V203Hxxxx ("x" = 0~9, a ~ z, or A ~ Z) Is compliant...
User Manual
Page 11
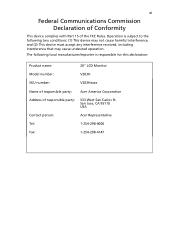
... any interference received, including interference that may cause undesired operation. San Jose, CA 95110 USA Contact person: Acer Representative Tel: 1-254-298-4000 Fax: 1-254-298-4147 Operation is responsible for this declaration: Product name: 20" LCD Monitor Model number: V203H SKU number: V203Hxxxx Name of responsible party: Acer America Corporation Address of the FCC Rules.
... any interference received, including interference that may cause undesired operation. San Jose, CA 95110 USA Contact person: Acer Representative Tel: 1-254-298-4000 Fax: 1-254-298-4147 Operation is responsible for this declaration: Product name: 20" LCD Monitor Model number: V203H SKU number: V203Hxxxx Name of responsible party: Acer America Corporation Address of the FCC Rules.
User Manual
Page 13
Special notes on LCD monitors Information for your safety and comfort Safety instructions Cleaning your monitor Connecting/disconnecting the device Accessibility Safe listening Warnings Using electrical power Product servicing Additional safety information IT equipment recycling information Disposal instructions LCD pixel statement Tips and information for comfortable use Federal Communications Commission Declaration of Conformity Unpacking Attaching...
Special notes on LCD monitors Information for your safety and comfort Safety instructions Cleaning your monitor Connecting/disconnecting the device Accessibility Safe listening Warnings Using electrical power Product servicing Additional safety information IT equipment recycling information Disposal instructions LCD pixel statement Tips and information for comfortable use Federal Communications Commission Declaration of Conformity Unpacking Attaching...
User Manual
Page 15
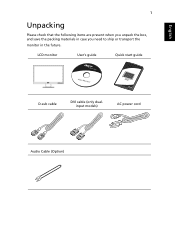
LCD monitor User's guide Quick start guide D-sub cable DVI cable (only dualinput models) AC power cord Audio Cable (Option) English 1 Unpacking Please check that the following items are present when you unpack the box, and save the packing materials in case you need to ship or transport the monitor in the future.
LCD monitor User's guide Quick start guide D-sub cable DVI cable (only dualinput models) AC power cord Audio Cable (Option) English 1 Unpacking Please check that the following items are present when you unpack the box, and save the packing materials in case you need to ship or transport the monitor in the future.
User Manual
Page 16
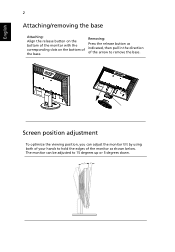
Removing: Press the release button as shown below. The monitor can adjust the monitor tilt by using both of your hands to hold the edges of the monitor as indicated, then pull in the direction of the base. English 2 Attaching/removing the base Attaching: Align the release button on the bottom of the monitor with the corresponding slots on the bottom of the arrow to remove the base. Screen position adjustment To optimize the viewing position, you can be adjusted to 15 degrees up or 5 degrees down.
Removing: Press the release button as shown below. The monitor can adjust the monitor tilt by using both of your hands to hold the edges of the monitor as indicated, then pull in the direction of the base. English 2 Attaching/removing the base Attaching: Align the release button on the bottom of the monitor with the corresponding slots on the bottom of the arrow to remove the base. Screen position adjustment To optimize the viewing position, you can be adjusted to 15 degrees up or 5 degrees down.
User Manual
Page 17
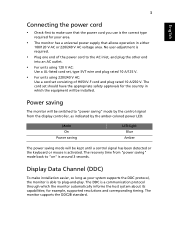
...universal power supply that the power cord you use is the correct type required for your system supports the DDC protocol, the monitor is activated. Power saving The monitor will be installed. Mode On Power saving LED light Blue Amber The power saving mode will be switched to "power saving..." mode by the amber-colored power LED. Display Data Channel (DDC) To make sure that allows operation in which the monitor automatically informs the host system about its capabilities; No user-adjustment is required. • Plug one end of H05VV-F cord and plug rated 10...
...universal power supply that the power cord you use is the correct type required for your system supports the DDC protocol, the monitor is activated. Power saving The monitor will be installed. Mode On Power saving LED light Blue Amber The power saving mode will be switched to "power saving..." mode by the amber-colored power LED. Display Data Channel (DDC) To make sure that allows operation in which the monitor automatically informs the host system about its capabilities; No user-adjustment is required. • Plug one end of H05VV-F cord and plug rated 10...
User Manual
Page 19
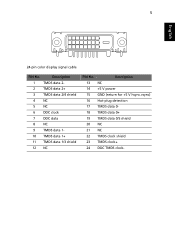
5 English 24-pin color display signal cable PIN No. Description 13 NC 14 +5 V power 15 GND (return for +5 V hsync.vsync) 16 Hot-plug detection 17 TMDS data 0- 18 TMDS data 0+ 19 TMDS data 0/5 shield 20 NC 21 NC 22 TMDS clock shield 23 TMDS clock+ 24 DDC TMDS clock- Description 1 TMDS data 2- 2 TMDS data 2+ 3 TMDS data 2/4 shield 4 NC 5 NC 6 DDC clock 7 DDC data 8 NC 9 TMDS data 1- 10 TMDS data 1+ 11 TMDS data 1/3 shield 12 NC PIN No.
5 English 24-pin color display signal cable PIN No. Description 13 NC 14 +5 V power 15 GND (return for +5 V hsync.vsync) 16 Hot-plug detection 17 TMDS data 0- 18 TMDS data 0+ 19 TMDS data 0/5 shield 20 NC 21 NC 22 TMDS clock shield 23 TMDS clock+ 24 DDC TMDS clock- Description 1 TMDS data 2- 2 TMDS data 2+ 3 TMDS data 2/4 shield 4 NC 5 NC 6 DDC clock 7 DDC data 8 NC 9 TMDS data 1- 10 TMDS data 1+ 11 TMDS data 1/3 shield 12 NC PIN No.
User Manual
Page 20
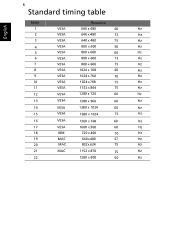
... Hz 16 VESA 1360 x 768 60 Hz 17 VESA 1600 x 900 60 Hz 18 IBM 720 x 400 70 Hz 19 MAC 640 x 480 67 Hz 20 MAC 832 x 624 75 Hz 21 MAC 1152 x 870 75 Hz 22 1280 x 800 60 Hz
... Hz 16 VESA 1360 x 768 60 Hz 17 VESA 1600 x 900 60 Hz 18 IBM 720 x 400 70 Hz 19 MAC 640 x 480 67 Hz 20 MAC 832 x 624 75 Hz 21 MAC 1152 x 870 75 Hz 22 1280 x 800 60 Hz
User Manual
Page 21
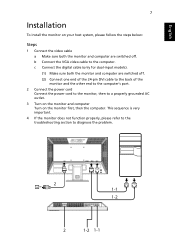
... please refer to the troubleshooting section to the computer. English 7 Installation To install the monitor on your host system, please follow the steps below: Steps 1 Connect the video cable a Make sure both the monitor and computer are switched off . (2) Connect one end of the 24-pin DVI cable...the other end to the computer's port. 2 Connect the power cord Connect the power cord to the monitor, then to a properly grounded AC outlet. 3 Turn on the monitor and computer Turn on the monitor first, then the computer. b Connect the VGA video cable to diagnose the problem. c Connect the ...
... please refer to the troubleshooting section to the computer. English 7 Installation To install the monitor on your host system, please follow the steps below: Steps 1 Connect the video cable a Make sure both the monitor and computer are switched off . (2) Connect one end of the 24-pin DVI cable...the other end to the computer's port. 2 Connect the power cord Connect the power cord to the monitor, then to a properly grounded AC outlet. 3 Turn on the monitor and computer Turn on the monitor first, then the computer. b Connect the VGA video cable to diagnose the problem. c Connect the ...

User Manual
Page 22
b. When the OSD menu is inactive, press this button will act as the exit key (exit OSD menu). When the OSD menu is active, this button to set the HPos, VPos, Clock and Focus. 7 /Exit: a. When the OSD menu is used to select scenario mode. b. The Auto Adjustment function is inactive, press this button will act as the exit key (exit OSD menu). When the OSD menu is on or off or activate / deactivate the adjustment function when the OSD is active, this button for two seconds to select the function. Press < or > to change the settings of the current function. 5 ...
b. When the OSD menu is inactive, press this button will act as the exit key (exit OSD menu). When the OSD menu is active, this button to set the HPos, VPos, Clock and Focus. 7 /Exit: a. When the OSD menu is used to select scenario mode. b. The Auto Adjustment function is inactive, press this button will act as the exit key (exit OSD menu). When the OSD menu is on or off or activate / deactivate the adjustment function when the OSD is active, this button for two seconds to select the function. Press < or > to change the settings of the current function. 5 ...

User Manual
Page 23
... function, repeat steps 2 to change the settings of the current function. 5 To exit and save, select the exit function. A. I. User: If "User" is selected, the Acer eColor Management OSD will appear. English 9 How to adjust a setting 1 Press the Menu button to activate the OSD window. 2 Press < or > to select the desired...
... function, repeat steps 2 to change the settings of the current function. 5 To exit and save, select the exit function. A. I. User: If "User" is selected, the Acer eColor Management OSD will appear. English 9 How to adjust a setting 1 Press the Menu button to activate the OSD window. 2 Press < or > to select the desired...
User Manual
Page 24
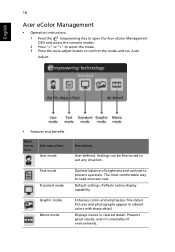
... menu item User mode Text mode Standard mode Graphic mode Movie mode Description User-defined. Default settings. English 10 Acer eColor Management • Operation instructions 1 Press the Empowering Key to open the Acer eColor Management OSD and access the scenario modes. 2 Press "" to select the mode. 3 Press the Auto-adjust button to...
... menu item User mode Text mode Standard mode Graphic mode Movie mode Description User-defined. Default settings. English 10 Acer eColor Management • Operation instructions 1 Press the Empowering Key to open the Acer eColor Management OSD and access the scenario modes. 2 Press "" to select the mode. 3 Press the Auto-adjust button to...
