

3D manual
Page 2
Acer Projector Series Operation Guide Original Issue: 09/2010 Model number Serial number Date of purchase Place of purchase © 2010 All Rights Reserved.
Acer Projector Series Operation Guide Original Issue: 09/2010 Model number Serial number Date of purchase Place of purchase © 2010 All Rights Reserved.
3D manual
Page 3
... need to view 3D content, you should also download a suitable 3D player such as the one available from www.3dtv.at full brightness. English 3 The Acer projector you have the NVIDIA 3D glasses and IR-transmitter. If you do the following. 1 Ensure your computer. Please visit www.nvidia.com/object/ 3D_Vision_Requirements.html...
... need to view 3D content, you should also download a suitable 3D player such as the one available from www.3dtv.at full brightness. English 3 The Acer projector you have the NVIDIA 3D glasses and IR-transmitter. If you do the following. 1 Ensure your computer. Please visit www.nvidia.com/object/ 3D_Vision_Requirements.html...
3D manual
Page 4
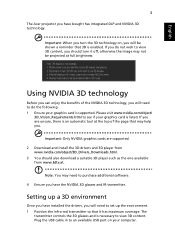
Select the second menu option on the projector remote control to Nvidia 3D Vision. This will open the setup Wizard if you haven't previously set up the 3D environment. 3 Follow the onscreen instructions to set up the 3D environment. 4 Check the Enable Stereoscopic option and select the correct display device. 5 Set the refresh rate to 120Hz from the appropriate drop-down menu. 6 Press the menu button on the left-hand side of the window. 7 Set 3D to open the OSD. English 4 2 Right-click anywhere on the desktop and select NVIDIA Control Panel.
Select the second menu option on the projector remote control to Nvidia 3D Vision. This will open the setup Wizard if you haven't previously set up the 3D environment. 3 Follow the onscreen instructions to set up the 3D environment. 4 Check the Enable Stereoscopic option and select the correct display device. 5 Set the refresh rate to 120Hz from the appropriate drop-down menu. 6 Press the menu button on the left-hand side of the window. 7 Set 3D to open the OSD. English 4 2 Right-click anywhere on the desktop and select NVIDIA Control Panel.
3D manual
Page 5
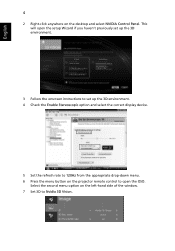
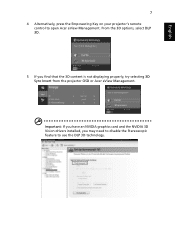
... fullscreen resolution in order to view content at . Other players may have a stereoscopic player in the player. English 5 8 Alternatively, press the Empowering Key on your projector's remote control to view 3D content. Using the stereoscopic player You need to get the 3D effects. From the 3D options, select Nvidia 3D Vision... the stereoscopic player and set the viewing method by going to View > Viewing Method > NVIDIA 3D Vision. 2 Open the 3D content in order to open Acer eView Management.
... fullscreen resolution in order to view content at . Other players may have a stereoscopic player in the player. English 5 8 Alternatively, press the Empowering Key on your projector's remote control to view 3D content. Using the stereoscopic player You need to get the 3D effects. From the 3D options, select Nvidia 3D Vision... the stereoscopic player and set the viewing method by going to View > Viewing Method > NVIDIA 3D Vision. 2 Open the 3D content in order to open Acer eView Management.
3D manual
Page 6
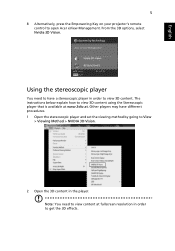
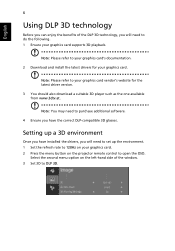
Setting up the environment. 1 Set the refresh rate to 120Hz on your graphics card. 2 Press the menu button on the projector remote control to open the OSD. Note: Please refer to your graphics card. Select the second menu option on the left-hand side of the ...
Setting up the environment. 1 Set the refresh rate to 120Hz on your graphics card. 2 Press the menu button on the projector remote control to open the OSD. Note: Please refer to your graphics card. Select the second menu option on the left-hand side of the ...
3D manual
Page 7
Important: If you have an NVIDIA graphics card and the NVIDIA 3D Vision drivers installed, you find that the 3D content is not displaying properly, try selecting 3D Sync Invert from the projector OSD or Acer eView Management. English 7 4 Alternatively, press the Empowering Key on your projector's remote control to use the DLP 3D technology. From the 3D options, select DLP 3D. 5 If you may need to disable the Stereoscopic feature to open Acer eView Management.
Important: If you have an NVIDIA graphics card and the NVIDIA 3D Vision drivers installed, you find that the 3D content is not displaying properly, try selecting 3D Sync Invert from the projector OSD or Acer eView Management. English 7 4 Alternatively, press the Empowering Key on your projector's remote control to use the DLP 3D technology. From the 3D options, select DLP 3D. 5 If you may need to disable the Stereoscopic feature to open Acer eView Management.

3D manual
Page 9
... a DVD player that supports 3D playback, you find that the 3D content is not displaying properly, try selecting 3D Sync Invert from the projector OSD or Acer eView Management. From the 3D options, select DLP 3D. 4 If you can watch 3D DVD contant using any of the window. 2..., press the Empowering Key on the projector remote control to open the OSD. Select the second menu option on the left-hand side of the available input formats. 1 Press the menu button on your DVD player to the projector using your Acer 3D-enabled projector. Connect your projector's remote control to open...
... a DVD player that supports 3D playback, you find that the 3D content is not displaying properly, try selecting 3D Sync Invert from the projector OSD or Acer eView Management. From the 3D options, select DLP 3D. 4 If you can watch 3D DVD contant using any of the window. 2..., press the Empowering Key on the projector remote control to open the OSD. Select the second menu option on the left-hand side of the available input formats. 1 Press the menu button on your DVD player to the projector using your Acer 3D-enabled projector. Connect your projector's remote control to open...

User Manual
Page 2
... to the contents hereof and specifically disclaims the implied warranties of this manual or supplementary documents and publications. Acer Projector P5206/N216/PN-X14/S5201/T111/PS-X11/S5201B/T111E/PS-X11K/S5301WB/T121E/ PS-W11K Series User's Guide Original Issue: 12/2010 Changes may be reproduced... made periodically to their respective companies. Record the model number, serial number, purchase date and place of Acer Incorporated. Acer Projector P5206/N216/PN-X14/S5201/T111/PS-X11/S5201B/T111E/PS-X11K/S5301WB/T121E/ PS-W11K Series Model number Serial number Date of purchase Place of...
... to the contents hereof and specifically disclaims the implied warranties of this manual or supplementary documents and publications. Acer Projector P5206/N216/PN-X14/S5201/T111/PS-X11/S5201B/T111E/PS-X11K/S5301WB/T121E/ PS-W11K Series User's Guide Original Issue: 12/2010 Changes may be reproduced... made periodically to their respective companies. Record the model number, serial number, purchase date and place of Acer Incorporated. Acer Projector P5206/N216/PN-X14/S5201/T111/PS-X11/S5201B/T111E/PS-X11K/S5301WB/T121E/ PS-W11K Series Model number Serial number Date of purchase Place of...

User Manual
Page 3
... cord to the equipment operator as close to the AC power outlet. • Unplug the power cord before removing the power supply unit from the projector. • If the system has multiple sources of any kind into this product on the product.
... cord to the equipment operator as close to the AC power outlet. • Unplug the power cord before removing the power supply unit from the projector. • If the system has multiple sources of any kind into this product on the product.

User Manual
Page 5
...environments: • Space that are covered by a qualified technician to restore the product to normal condition. Consult your projector. The bright light may hurt your projector. At least 50cm clearance from the wall outlet and refer servicing to qualified service personnel when: • the power...• Turn on . v Product servicing Do not attempt to service this product from walls and free flow of air around the projector are necessary. • Locations where temperatures may become excessively high, such as opening or removing covers may expose you to dangerous voltage ...
...environments: • Space that are covered by a qualified technician to restore the product to normal condition. Consult your projector. The bright light may hurt your projector. At least 50cm clearance from the wall outlet and refer servicing to qualified service personnel when: • the power...• Turn on . v Product servicing Do not attempt to service this product from walls and free flow of air around the projector are necessary. • Locations where temperatures may become excessively high, such as opening or removing covers may expose you to dangerous voltage ...

User Manual
Page 6
... when the filter/ventilation slots are clogged with any electronic components unless the projector is capable of the lamp itself. vi might cause fire or electric shock. Allow the projector to cool for mounting the projector and ensure it . Only use acer ceiling mount kit for approximately 45 minutes prior to break or drop...
... when the filter/ventilation slots are clogged with any electronic components unless the projector is capable of the lamp itself. vi might cause fire or electric shock. Allow the projector to cool for mounting the projector and ensure it . Only use acer ceiling mount kit for approximately 45 minutes prior to break or drop...

User Manual
Page 7
... the volume gradually until you . For more information on the Waste from Electrical and Electronics Equipment (WEEE) regulations, visit http://www.acer-group.com/public/ Sustainability/sustainability01.htm Mercury advisory For projectors or electronic products containing an LCD/CRT monitor or display: "Lamp(s) contain Mercury, Dispose Properly." For lamp-specific disposal information...
... the volume gradually until you . For more information on the Waste from Electrical and Electronics Equipment (WEEE) regulations, visit http://www.acer-group.com/public/ Sustainability/sustainability01.htm Mercury advisory For projectors or electronic products containing an LCD/CRT monitor or display: "Lamp(s) contain Mercury, Dispose Properly." For lamp-specific disposal information...

User Manual
Page 8
...operation. • When the lamp reaches the end of time. viii First Thing First Usage Notes Do: • Turn off , please ensure the projector completes its cooling cycle before cleaning. • Use a soft cloth moistened with mild detergent to clean the display housing. • Disconnect the power... openings on until the lamp module has been replaced. Precautions Follow all changing instructions. • This product will not turn back on the projector provided for a long period of its life, it shows warning messages. • Reset the "Lamp Hour Reset" function from AC outlet ...
...operation. • When the lamp reaches the end of time. viii First Thing First Usage Notes Do: • Turn off , please ensure the projector completes its cooling cycle before cleaning. • Use a soft cloth moistened with mild detergent to clean the display housing. • Disconnect the power... openings on until the lamp module has been replaced. Precautions Follow all changing instructions. • This product will not turn back on the projector provided for a long period of its life, it shows warning messages. • Reset the "Lamp Hour Reset" function from AC outlet ...

User Manual
Page 9
...Overview 2 Projector Overview 3 Projector Outlook 3 Control Panel 4 Remote Control Layout 5 Getting Started 7 Connecting the Projector 7 Turning the Projector On/Off 9 Turning On the Projector 9 Turning Off the Projector 10 ...Adjusting the Projected Image 11 Adjusting the Height of the Projected Image 11 How to Optimize Image Size and Distance 12 How to Get a Preferred Image Size by Adjusting Distance and Zoom 15 User Controls 18 Installation Menu 18 Acer...
...Overview 2 Projector Overview 3 Projector Outlook 3 Control Panel 4 Remote Control Layout 5 Getting Started 7 Connecting the Projector 7 Turning the Projector On/Off 9 Turning On the Projector 9 Turning Off the Projector 10 ...Adjusting the Projected Image 11 Adjusting the Height of the Projected Image 11 How to Optimize Image Size and Distance 12 How to Get a Preferred Image Size by Adjusting Distance and Zoom 15 User Controls 18 Installation Menu 18 Acer...
User Manual
Page 11
English 1 Introduction Product Features This product is a single-chip DLP® projector, including the following outstanding features: • DLP® technology • P5206/N216/PN-X14/S5201/T111/PS-X11/S5201B/T111E/PS-X11K: Native 1024 x 768 XGA resolution Auto / 4:3 / 16:9 aspect ...2000, XP, 7, Vista® OS compliant • LAN settings enable remote management of projectors via a web browser • Enables projecting 3D content via DLP Link technology • Acer Color Safe technology ensures consistent color rendition over time • Smart detection delivers quick, intelligent...
English 1 Introduction Product Features This product is a single-chip DLP® projector, including the following outstanding features: • DLP® technology • P5206/N216/PN-X14/S5201/T111/PS-X11/S5201B/T111E/PS-X11K: Native 1024 x 768 XGA resolution Auto / 4:3 / 16:9 aspect ...2000, XP, 7, Vista® OS compliant • LAN settings enable remote management of projectors via a web browser • Enables projecting 3D content via DLP Link technology • Acer Color Safe technology ensures consistent color rendition over time • Smart detection delivers quick, intelligent...

User Manual
Page 12
English 2 Package Overview This projector comes with lens cap Power cord VGA cable Composite video cable Security card Acer Projector User's guide (CD-ROM) Remote control Quick Start Guide Quick start guide (for S5201B/T111E/PS- Check to make sure you have ...below. Contact your dealer immediately if any thing is missing. Projector with all . X11K/S5301WB/T121E/PSW11K) Acer Projector Gateway quick start guide Battery x 2 Acer Projector Gateway Carrying case Quick Start Guide Acer Projector Gateway (CDROM) (for S5201B/T111E/PS-X11K/ S5301WB/T121E/PS-W11K) Dust filter ...
English 2 Package Overview This projector comes with lens cap Power cord VGA cable Composite video cable Security card Acer Projector User's guide (CD-ROM) Remote control Quick Start Guide Quick start guide (for S5201B/T111E/PS- Check to make sure you have ...below. Contact your dealer immediately if any thing is missing. Projector with all . X11K/S5301WB/T121E/PSW11K) Acer Projector Gateway quick start guide Battery x 2 Acer Projector Gateway Carrying case Quick Start Guide Acer Projector Gateway (CDROM) (for S5201B/T111E/PS-X11K/ S5301WB/T121E/PS-W11K) Dust filter ...

User Manual
Page 13
English 3 Projector Overview Projector Outlook Front / upper side (P5206/N216/PN-X14) 1 5 (S5201/T111/PS-X11/S5201B/T111E/ PS-X11K/S5301WB/T121E/PS-W11K) 1 5 6 7 7 2 2 3 3 8 8 4 4 # Description 1 Power key and Power indicator LED 2 Projection lens 3 Elevator button 4 Lens cap Rear side (S5201B/T111E/PS-X11K/S5301WB/ T121E/PS-W11K) 1 23 4 5 6 7 8 9 10 11 # Description 5 Control panel 6 Zoom ring...
English 3 Projector Overview Projector Outlook Front / upper side (P5206/N216/PN-X14) 1 5 (S5201/T111/PS-X11/S5201B/T111E/ PS-X11K/S5301WB/T121E/PS-W11K) 1 5 6 7 7 2 2 3 3 8 8 4 4 # Description 1 Power key and Power indicator LED 2 Projection lens 3 Elevator button 4 Lens cap Rear side (S5201B/T111E/PS-X11K/S5301WB/ T121E/PS-W11K) 1 23 4 5 6 7 8 9 10 11 # Description 5 Control panel 6 Zoom ring...

User Manual
Page 14
Temp indicator LED Enables unique Acer functions: eView, eTimer, eOpening, ePower Management. Chooses RGB, component video, S-Video, composite video, HDMI™ or HDTV source. 4 Control Panel English 1 7 2 3 8 4 9 5 6 10 4 # Function 1 LAMP 2 POWER 3 ... OSD menu operation or exits the OSD menu. • Confirms your selection. Selects items or makes adjustments to your selection of items. Automatically synchronizes the projector to the "Turning the Projector On/ Off" section.
Temp indicator LED Enables unique Acer functions: eView, eTimer, eOpening, ePower Management. Chooses RGB, component video, S-Video, composite video, HDMI™ or HDTV source. 4 Control Panel English 1 7 2 3 8 4 9 5 6 10 4 # Function 1 LAMP 2 POWER 3 ... OSD menu operation or exits the OSD menu. • Confirms your selection. Selects items or makes adjustments to your selection of items. Automatically synchronizes the projector to the "Turning the Projector On/ Off" section.

User Manual
Page 15
Refer to the input source. Automatically synchronizes the projector to the "Turning the Projector On/Off" section. Adjusts image distortion caused by tilting projection (±40 degrees). Goes back to your selection. Enables unique Acer functions: eView, eTimer, eOpening, ePower Management. Selects items or makes adjustments to the previous selection. Selects the media files...
Refer to the input source. Automatically synchronizes the projector to the "Turning the Projector On/Off" section. Adjusts image distortion caused by tilting projection (±40 degrees). Goes back to your selection. Enables unique Acer functions: eView, eTimer, eOpening, ePower Management. Selects items or makes adjustments to the previous selection. Selects the media files...

User Manual
Page 16
.... This function is not available for the model with HDMI™/DVI connector). To change source to HDMI™/DVI (for the projectors sold in JPEG format. (for S5201B/T111E/PSX11K/S5301WB/T121E/PS-W11K) To change source to the previous step for LAN/wireless compatible models) Launches the Onscreen Display (OSD.... This connector supports analog RGB, YPbPr (480p/576p/720p/1080i/1080p), and YCbCr (480i/576i). This function is pressed. For computer mode only. Zooms the projector display in the "Setting > Security" OSD. To change source to display the image.
.... This function is not available for the model with HDMI™/DVI connector). To change source to HDMI™/DVI (for the projectors sold in JPEG format. (for S5201B/T111E/PSX11K/S5301WB/T121E/PS-W11K) To change source to the previous step for LAN/wireless compatible models) Launches the Onscreen Display (OSD.... This connector supports analog RGB, YPbPr (480p/576p/720p/1080i/1080p), and YCbCr (480i/576i). This function is pressed. For computer mode only. Zooms the projector display in the "Setting > Security" OSD. To change source to display the image.


