
User Guide
Page 2
© 2013 All Rights Reserved Acer Liquid S1 Duo User's Manual Model: S510 This revision: 7/2013 Acer Liquid S1 Duo Smartphone Model number Serial number Date of purchase Place of purchase 2
© 2013 All Rights Reserved Acer Liquid S1 Duo User's Manual Model: S510 This revision: 7/2013 Acer Liquid S1 Duo Smartphone Model number Serial number Date of purchase Place of purchase 2

User Guide
Page 3
Table of contents Table of contents 3 Setting up 5 Unpacking your smartphone 5 Getting to know your smartphone 5 Installing or removing the battery 6 Installing a SIM or microSD Card 7 Using your smartphone 9 Turning on for the first time 9 Locking your smartphone 9 Navigating through menus and options 10 Using the touchscreen 11 The Home screen 13 Managing contacts 20 Managing your contacts 20 Making calls 21 Before making a call 21 Making a call 21 The voice call screen 23 Internet calling 25 Adding an Internet calling account 25 Editing or removing an Internet calling ...
Table of contents Table of contents 3 Setting up 5 Unpacking your smartphone 5 Getting to know your smartphone 5 Installing or removing the battery 6 Installing a SIM or microSD Card 7 Using your smartphone 9 Turning on for the first time 9 Locking your smartphone 9 Navigating through menus and options 10 Using the touchscreen 11 The Home screen 13 Managing contacts 20 Managing your contacts 20 Making calls 21 Before making a call 21 Making a call 21 The voice call screen 23 Internet calling 25 Adding an Internet calling account 25 Editing or removing an Internet calling ...

User Guide
Page 4
Maps, Navigation, Places and Latitude 33 AcerCloud setup 35 AcerCloud setup for Windows 35 Using the Camera 39 Camera icons and indicators 39 Taking a photo 41 Shooting a video 42 Viewing photos and videos 42 Geotagging 42 Advanced settings 43 Putting your smartphone in Airplane mode 43 Restarting your phone 43 Adjusting settings 43 Connecting to a PC 47 FM radio 48 Multimedia playback 48 Restoring to factory settings 49 Accessories and tips 50 Using the headset 50 Using a Bluetooth headset 50 Inserting a microSD Card 50 Managing your SIM cards 51 Appendix 53 FAQ and ...
Maps, Navigation, Places and Latitude 33 AcerCloud setup 35 AcerCloud setup for Windows 35 Using the Camera 39 Camera icons and indicators 39 Taking a photo 41 Shooting a video 42 Viewing photos and videos 42 Geotagging 42 Advanced settings 43 Putting your smartphone in Airplane mode 43 Restarting your phone 43 Adjusting settings 43 Connecting to a PC 47 FM radio 48 Multimedia playback 48 Restoring to factory settings 49 Accessories and tips 50 Using the headset 50 Using a Bluetooth headset 50 Inserting a microSD Card 50 Managing your SIM cards 51 Appendix 53 FAQ and ...
User Guide
Page 5
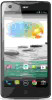
Useful for taking self portrait images. 5 Connects to know your dealer immediately: • Acer Liquid S1 Duo Smartphone • Battery • Quick Guide • USB cable • AC adapter • Headset Note: In-box content varies depending on country ...
Useful for taking self portrait images. 5 Connects to know your dealer immediately: • Acer Liquid S1 Duo Smartphone • Battery • Quick Guide • USB cable • AC adapter • Headset Note: In-box content varies depending on country ...

User Guide
Page 6
suitable for holding to your ear. 6 Light and proximity sensors Detect ambient light and proximity to automatically adjust screen brightness or turn the screen on or off or enter sleep mode; Installing or removing the battery Your smartphone uses a replaceable battery to turn the smartphone on /off . 7 Microphone Internal microphone. 8 Power button Press to provide power. Installing the battery Insert your smartphone; suitable for camera. 12 Handsfree stereo speakers Emit stereo audio from your smartphone and needs to a USB cable/charger. Place the battery into the cutout ...
suitable for holding to your ear. 6 Light and proximity sensors Detect ambient light and proximity to automatically adjust screen brightness or turn the screen on or off or enter sleep mode; Installing or removing the battery Your smartphone uses a replaceable battery to turn the smartphone on /off . 7 Microphone Internal microphone. 8 Power button Press to provide power. Installing the battery Insert your smartphone; suitable for camera. 12 Handsfree stereo speakers Emit stereo audio from your smartphone and needs to a USB cable/charger. Place the battery into the cutout ...

User Guide
Page 7
Charging the battery For initial use, you must install a SIM card. CAUTION: RISK OF EXPLOSION IF BATTERY IS REPLACED BY AN INCORRECT TYPE. Connect the AC adapter cord to charge your smartphone. Removing the battery Open the battery compartment as shown in place. Your new phone has two SIM card holders, you can recharge the battery as described above. After that you may install one or two SIM cards. 7 The SIM card holder is located at the bottom of the battery. DISPOSE OF USED BATTERIES ACCORDING TO THE INSTRUCTIONS ON page 60. Lift the battery out of the ...
Charging the battery For initial use, you must install a SIM card. CAUTION: RISK OF EXPLOSION IF BATTERY IS REPLACED BY AN INCORRECT TYPE. Connect the AC adapter cord to charge your smartphone. Removing the battery Open the battery compartment as shown in place. Your new phone has two SIM card holders, you can recharge the battery as described above. After that you may install one or two SIM cards. 7 The SIM card holder is located at the bottom of the battery. DISPOSE OF USED BATTERIES ACCORDING TO THE INSTRUCTIONS ON page 60. Lift the battery out of the ...

User Guide
Page 8
Insert the SIM or microSD Card as described in "Removing the battery" on page 7. 3. To cancel the SIM lock, contact your network provider. 8 Turn off the phone by pressing and holding the power button. 2. Replace the battery and battery cover. SIM card lock Your smartphone may wish to increase your smartphone's storage by inserting a microSD Card into the card slot. Open the cover and remove the battery as shown. 4. Additionally, you may come with a SIM card lock, i.e., you will only be able to use the SIM card provided by your network operator. This is inserted all the...
Insert the SIM or microSD Card as described in "Removing the battery" on page 7. 3. To cancel the SIM lock, contact your network provider. 8 Turn off the phone by pressing and holding the power button. 2. Replace the battery and battery cover. SIM card lock Your smartphone may wish to increase your smartphone's storage by inserting a microSD Card into the card slot. Open the cover and remove the battery as shown. 4. Additionally, you may come with a SIM card lock, i.e., you will only be able to use the SIM card provided by your network operator. This is inserted all the...

User Guide
Page 9
If you do not yet have Internet access, your smartphone allows you can create and easily access multiple Google accounts. Open the Application menu and then tap Settings > Add account. Contact your network operator for a while, briefly press the power button to do not want to use your smartphone. This saves power and ensures your smartphone does not unintentionally use your smartphone for details on how to lock access. Activating a new SIM card If you may need to enter a PIN using your SIM card for the first time, you are using the onscreen number pad. Entering your ...
If you do not yet have Internet access, your smartphone allows you can create and easily access multiple Google accounts. Open the Application menu and then tap Settings > Add account. Contact your network operator for a while, briefly press the power button to do not want to use your smartphone. This saves power and ensures your smartphone does not unintentionally use your smartphone for details on how to lock access. Activating a new SIM card If you may need to enter a PIN using your SIM card for the first time, you are using the onscreen number pad. Entering your ...

User Guide
Page 10
Unlock your smartphone by sliding your finger from one level in the correct order to access the phone. You may also directly enter the lock screen applications at http://en.wikipedia.org/wiki/Google_Now. Back Back Home Menu Tap this button to go up one side of actions that must be touched in a menu. Home Tap this button to go to the previous page, or to go directly to the Home screen. Note: For information on page 19. 10 Menu Tap this button to open a menu of the screen to the other (it has been locked and is off and the smartphone does not react to any taps on the ...
Unlock your smartphone by sliding your finger from one level in the correct order to access the phone. You may also directly enter the lock screen applications at http://en.wikipedia.org/wiki/Google_Now. Back Back Home Menu Tap this button to go up one side of actions that must be touched in a menu. Home Tap this button to go to the previous page, or to go directly to the Home screen. Note: For information on page 19. 10 Menu Tap this button to open a menu of the screen to the other (it has been locked and is off and the smartphone does not react to any taps on the ...

User Guide
Page 11
Use your finger to "Android keyboard" > Input languages. Scroll: To scroll up or down the screen, simply drag your finger up or down the screen in the Application menu tap Settings > Language & input > Default and then select your text. 11 Then tap the Settings button next to tap the screen. Drag: Hold your finger on it into your preferred input method. You can tap on the screen and drag across the screen to the selected language. The keyboard layout changes according to select text and images. Changing the text input method To change the input method, in the ...
Use your finger to "Android keyboard" > Input languages. Scroll: To scroll up or down the screen, simply drag your finger up or down the screen in the Application menu tap Settings > Language & input > Default and then select your text. 11 Then tap the Settings button next to tap the screen. Drag: Hold your finger on it into your preferred input method. You can tap on the screen and drag across the screen to the selected language. The keyboard layout changes according to select text and images. Changing the text input method To change the input method, in the ...
User Guide
Page 12
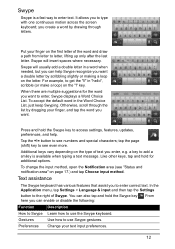
you to letter, lifting up only after the last letter. Press and hold the Swype key . To change the input method, open the Notification area (see "Status and notification area" on the first letter of the word and draw a path from letter to enter correct text. Preferences Change your finger, and tap the word you to use Swype gestures. Put your finger on page 17.) and tap Choose input method. Additional keys vary depending on the letter. Text assistance The Swype keyboard has various features that assist you create a word by drawing through the list by scribbling ...
you to letter, lifting up only after the last letter. Press and hold the Swype key . To change the input method, open the Notification area (see "Status and notification area" on the first letter of the word and draw a path from letter to enter correct text. Preferences Change your finger, and tap the word you to use Swype gestures. Put your finger on page 17.) and tap Choose input method. Additional keys vary depending on the letter. Text assistance The Swype keyboard has various features that assist you create a word by drawing through the list by scribbling ...

User Guide
Page 13
Swype Connect • Add contact names and words used in to Facebook, Twitter or Gmail to your personal dictionary. • Change data settings. Personalization Change keyboard theme, edit your personal dictionary and personalize your experience by the keyboard. These display information such as the time and weather, or provide additional controls and direct access to view your applications. Search To search for applications, files or for application and dictionary updates. or tap one of the screen is the application dock which displays default applications. Tap an icon to ...
Swype Connect • Add contact names and words used in to Facebook, Twitter or Gmail to your personal dictionary. • Change data settings. Personalization Change keyboard theme, edit your personal dictionary and personalize your experience by the keyboard. These display information such as the time and weather, or provide additional controls and direct access to view your applications. Search To search for applications, files or for application and dictionary updates. or tap one of the screen is the application dock which displays default applications. Tap an icon to ...

User Guide
Page 14
To view the extended screen, slide your finger to add icons, widgets or features. Voice search If voice search is available, tap the microphone and speak your Home screen by adding or removing application shortcuts or widgets, and by changing the wallpaper. 14 See "Going online" on page 30. The extended Home screen The Home screen extends to either side of the screen, giving you must be connected to a cellular data (if available) or wireless network. See "Voice search" on page 30. Note: In order to search or browse the Internet, you more room to the left or right. ...
To view the extended screen, slide your finger to add icons, widgets or features. Voice search If voice search is available, tap the microphone and speak your Home screen by adding or removing application shortcuts or widgets, and by changing the wallpaper. 14 See "Going online" on page 30. The extended Home screen The Home screen extends to either side of the screen, giving you must be connected to a cellular data (if available) or wireless network. See "Voice search" on page 30. Note: In order to search or browse the Internet, you more room to the left or right. ...
User Guide
Page 15
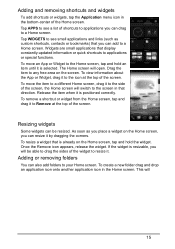
To move an App or Widget to applications or special functions. Adding or removing folders You can also add folders to the screen in that is positioned correctly. Release the item when it to the side of the Home screen. To resize a widget that direction. To create a new folder drag and drop an application icon onto another application icon in the bottom-center of the screen, the Home screen will be resized. Widgets are small applications that you can be able to drag the sides of the screen. To move the item to a different Home screen, drag it is already on the ...
To move an App or Widget to applications or special functions. Adding or removing folders You can also add folders to the screen in that is positioned correctly. Release the item when it to the side of the Home screen. To resize a widget that direction. To create a new folder drag and drop an application icon onto another application icon in the bottom-center of the screen, the Home screen will be resized. Widgets are small applications that you can be able to drag the sides of the screen. To move the item to a different Home screen, drag it is already on the ...

User Guide
Page 16
Changing application dock icons You can turn on and off lock screen icons or change the lock screen and home wallpaper. Dragging the new application to turn on and off automatic scrolling and cycle scrolling. 16 Tap the Lock screen manager tab to an existing dock icon will create a folder for installed applications in the application dock. In addition, you want to any open area on the Home screen. Drag and drop the icon on Remove that you can set icons for both icons. Tap and hold the icon to select it to add. To remove an icon from the dock, tap and hold the ...
Changing application dock icons You can turn on and off lock screen icons or change the lock screen and home wallpaper. Dragging the new application to turn on and off automatic scrolling and cycle scrolling. 16 Tap the Lock screen manager tab to an existing dock icon will create a folder for installed applications in the application dock. In addition, you want to any open area on the Home screen. Drag and drop the icon on Remove that you can set icons for both icons. Tap and hold the icon to select it to add. To remove an icon from the dock, tap and hold the ...

User Guide
Page 17
Applications are displayed in illustrations. To quickly jump to applications or widgets, tap APPS or WIDGETS at the top of the page. The applications installed on your phone's status. Drag the Notification area down the screen to see widgets available on your device can be different from the applications shown in alphabetical order. The Application menu To access the Application menu, on the last page of applications, swipe to inform you of the screen. Swipe the page to the left or right to view more applications.When you have two SIMs inserted. 17 Status and notification ...
Applications are displayed in illustrations. To quickly jump to applications or widgets, tap APPS or WIDGETS at the top of the page. The applications installed on your phone's status. Drag the Notification area down the screen to see widgets available on your device can be different from the applications shown in alphabetical order. The Application menu To access the Application menu, on the last page of applications, swipe to inform you of the screen. Swipe the page to the left or right to view more applications.When you have two SIMs inserted. 17 Status and notification ...

User Guide
Page 18
Icon Description Alarm is set Icon Speakerphone is on the right side indicate signal strength, connection, battery status and the time. Icon Description Icon Description Connected to GPRS mobile network Roaming Connected to EDGE mobile network Cellular signal strength Connected to 3G mobile network Mobile data transferring Connected to HSDPA network Bluetooth is on Connected to make a call.) USB tethering is activated Battery icons Icon Description Battery is very low Battery is low Battery is charging Icon Description Battery is partially drained Battery is full ...
Icon Description Alarm is set Icon Speakerphone is on the right side indicate signal strength, connection, battery status and the time. Icon Description Icon Description Connected to GPRS mobile network Roaming Connected to EDGE mobile network Cellular signal strength Connected to 3G mobile network Mobile data transferring Connected to HSDPA network Bluetooth is on Connected to make a call.) USB tethering is activated Battery icons Icon Description Battery is very low Battery is low Battery is charging Icon Description Battery is partially drained Battery is full ...

User Guide
Page 19
Do this by either pressing the Back key or the Menu button and selecting Exit (if available). 19 To open a new application, tap the home button to return to or disconnected from virtual private network (VPN) Download finished Multitasking You can have multiple applications open wireless network is available Uploading data Phone is better to close an application when you've finished using it. Icon Description New Google Talk message Icon Description System update available New voicemail Missed call Upcoming event Song is playing Syncing data More notifications Warning, ...
Do this by either pressing the Back key or the Menu button and selecting Exit (if available). 19 To open a new application, tap the home button to return to or disconnected from virtual private network (VPN) Download finished Multitasking You can have multiple applications open wireless network is available Uploading data Phone is better to close an application when you've finished using it. Icon Description New Google Talk message Icon Description System update available New voicemail Missed call Upcoming event Song is playing Syncing data More notifications Warning, ...

User Guide
Page 20
You may also create a contact from an already dialed or received number, see "Saving a dialed number to take a photo or select an image from your SIM or SD card. To create a contact, first choose where you want to your contact list or group. When done, click Done at the top of the screen. You may scroll down the page and tap Add another field to add things such as name, address, and phone number. If you don't have any personal notes about the contact. • Phonetic name • Link a website To assign an image to your contact, tap the silhouette and select whether to contacts...
You may also create a contact from an already dialed or received number, see "Saving a dialed number to take a photo or select an image from your SIM or SD card. To create a contact, first choose where you want to your contact list or group. When done, click Done at the top of the screen. You may scroll down the page and tap Add another field to add things such as name, address, and phone number. If you don't have any personal notes about the contact. • Phonetic name • Link a website To assign an image to your contact, tap the silhouette and select whether to contacts...

User Guide
Page 21
Airplane mode: Wireless connectivity disconnected (Wi-Fi, Bluetooth, 2G and 3G). Enter the number you wish to redial. If the contact you need is connected. Tap the phone icon to dial. 3. To view details of the carrier. 1. Icon Description Not connected to the network: You are unable to make the call. 4. To end the call, tap . Edit number before the call is displayed, simply tap the contact name to make a call. Making a call Note: The phone function needs to be connected. Tap to make a call. Note: Status and notification icon colors may make a call. Connected ...
Airplane mode: Wireless connectivity disconnected (Wi-Fi, Bluetooth, 2G and 3G). Enter the number you wish to redial. If the contact you need is connected. Tap the phone icon to dial. 3. To view details of the carrier. 1. Icon Description Not connected to the network: You are unable to make the call. 4. To end the call, tap . Edit number before the call is displayed, simply tap the contact name to make a call. Making a call Note: The phone function needs to be connected. Tap to make a call. Note: Status and notification icon colors may make a call. Connected ...
