
User Manual
Page 2
...or trademarks are recorded on the label affixed to their respective companies. Acer LCD Monitor User Guide Model number Serial number Date of purchase Place of purchase Acer and the Acer logo are registered trademarks of purchase information in new editions of this ..., model number and purchase information. Record the model number, serial number, purchase date and place of Acer Incorporated. All correspondence concerning your computer. Acer LCD Monitor User Guide Original Issue: 11/2014 Changes may be reproduced, stored in a retrieval system, or transmitted...
...or trademarks are recorded on the label affixed to their respective companies. Acer LCD Monitor User Guide Model number Serial number Date of purchase Place of purchase Acer and the Acer logo are registered trademarks of purchase information in new editions of this ..., model number and purchase information. Record the model number, serial number, purchase date and place of Acer Incorporated. All correspondence concerning your computer. Acer LCD Monitor User Guide Original Issue: 11/2014 Changes may be reproduced, stored in a retrieval system, or transmitted...

User Manual
Page 3
Turn off the power switch for future reference. Cleaning your safety and comfort Safety instructions Read these guidelines when cleaning the monitor: • Always unplug the monitor before cleaning. • Use a soft cloth to make sure the flicker disappears. • You may find slightly uneven brightness ...it on the desktop pattern you use . In this document for a few hours. Keep this case, the screen is displayed for your monitor Please carefully follow these instructions carefully. Special notes on the product. Follow all the time. • Due to the nature of the ...
Turn off the power switch for future reference. Cleaning your safety and comfort Safety instructions Read these guidelines when cleaning the monitor: • Always unplug the monitor before cleaning. • Use a soft cloth to make sure the flicker disappears. • You may find slightly uneven brightness ...it on the desktop pattern you use . In this document for a few hours. Keep this case, the screen is displayed for your monitor Please carefully follow these instructions carefully. Special notes on the product. Follow all the time. • Due to the nature of the ...

User Manual
Page 4
.... Do not locate this product where people will probably cause unexpected short current or damage internal devices. • The adapter is only used for this monitor ,do not be operated from the equipment, be blocked by placing the product on a bed, sofa, rug or other purposes. • Your device uses one...
.... Do not locate this product where people will probably cause unexpected short current or damage internal devices. • The adapter is only used for this monitor ,do not be operated from the equipment, be blocked by placing the product on a bed, sofa, rug or other purposes. • Your device uses one...
User Manual
Page 7
... tips for power management: • Activate display's Sleep mode within 15 minutes of user inactivity. • Activate computer's Sleep mode within 30 minutes of the monitor, using a footrest, or raising your company's health and safety department.
... tips for power management: • Activate display's Sleep mode within 15 minutes of user inactivity. • Activate computer's Sleep mode within 30 minutes of the monitor, using a footrest, or raising your company's health and safety department.
User Manual
Page 8
... incorrect glasses or contact lenses, glare, excessive room lighting, poorly focused screens, very small typefaces and low-contrast displays could stress your eyes from the monitor and focusing on how to a comfortable level for enhanced text readability and graphics clarity. • Eliminate glare and reflections by: • placing your computer use...
... incorrect glasses or contact lenses, glare, excessive room lighting, poorly focused screens, very small typefaces and low-contrast displays could stress your eyes from the monitor and focusing on how to a comfortable level for enhanced text readability and graphics clarity. • Eliminate glare and reflections by: • placing your computer use...
User Manual
Page 9
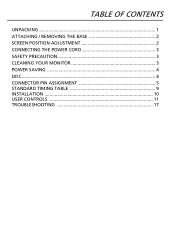
TABLE OF CONTENTS UNPACKING 1 ATTACHING / REMOVING THE BASE 2 SCREEN POSITION ADJUSTMENT 2 CONNECTING THE POWER CORD 3 SAFETY PRECAUTION 3 CLEANING YOUR MONITOR 3 POWER SAVING 4 DDC...4 CONNECTOR PIN ASSIGNMENT 5 STANDARD TIMING TABLE 9 INSTALLATION 10 USER CONTROLS 11 TROUBLESHOOTING 17
TABLE OF CONTENTS UNPACKING 1 ATTACHING / REMOVING THE BASE 2 SCREEN POSITION ADJUSTMENT 2 CONNECTING THE POWER CORD 3 SAFETY PRECAUTION 3 CLEANING YOUR MONITOR 3 POWER SAVING 4 DDC...4 CONNECTOR PIN ASSIGNMENT 5 STANDARD TIMING TABLE 9 INSTALLATION 10 USER CONTROLS 11 TROUBLESHOOTING 17

User Manual
Page 10
UNPACKING Please check the following items are present when you unpack the box, and save the packing materials in case you will need to ship or transport the monitor in future. LCD Monitor Quick Start Guide Audio Cable (Optional) AC Power Cord AC Adapter DP Cable (Optional) DVI Cable (Optional) HDMI Cable (Optional) Mini-DP-DP Cable (Optional) EN-1
UNPACKING Please check the following items are present when you unpack the box, and save the packing materials in case you will need to ship or transport the monitor in future. LCD Monitor Quick Start Guide Audio Cable (Optional) AC Power Cord AC Adapter DP Cable (Optional) DVI Cable (Optional) HDMI Cable (Optional) Mini-DP-DP Cable (Optional) EN-1
User Manual
Page 11
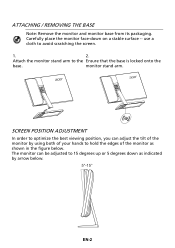
...you can be adjusted to hold the edges of the monitor as indicated by using both of your hands to 15 degrees up or 5 degrees down on a stable surface -- The monitor can adjust the tilt of the monitor by arrow below . monitor stand arm. use a cloth to the Ensure that ...the base is locked onto the base. ATTACHING / REMOVING THE BASE Note: Remove the monitor and monitor base from its packaging. Attach the monitor stand arm to avoid scratching the screen. 1. 2. Carefully place the monitor face-down as shown in the figure below . 5°-15° EN-2
...you can be adjusted to hold the edges of the monitor as indicated by using both of your hands to 15 degrees up or 5 degrees down on a stable surface -- The monitor can adjust the tilt of the monitor by arrow below . monitor stand arm. use a cloth to the Ensure that ...the base is locked onto the base. ATTACHING / REMOVING THE BASE Note: Remove the monitor and monitor base from its packaging. Attach the monitor stand arm to avoid scratching the screen. 1. 2. Carefully place the monitor face-down as shown in the figure below . 5°-15° EN-2
User Manual
Page 12
... unplug the monitor before cleaning. Use a soft cloth to wipe the screen and cabinet front and sides. NEVER SPRAY OR POUR ANY LIQUID DIRECTLY ONTO THE SCREEN OR CASE. PLEASE DO NOT USE ANY AMMONIA OR ALCOHOL-BASED CLEANERS ON THE LCD DISPLAY SCREEN OR CASE. Acer will... be liable for your area. This monitor has a universal power supply that the power cord you use of any other end into an AC outlet. For unit...
... unplug the monitor before cleaning. Use a soft cloth to wipe the screen and cabinet front and sides. NEVER SPRAY OR POUR ANY LIQUID DIRECTLY ONTO THE SCREEN OR CASE. PLEASE DO NOT USE ANY AMMONIA OR ALCOHOL-BASED CLEANERS ON THE LCD DISPLAY SCREEN OR CASE. Acer will... be liable for your area. This monitor has a universal power supply that the power cord you use of any other end into an AC outlet. For unit...
User Manual
Page 13
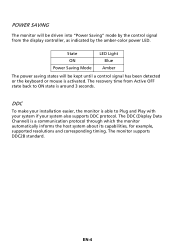
POWER SAVING The monitor will be driven into "Power Saving" mode by the control signal from Active OFF state back to Plug and Play with your system if your ... LED Light Blue Amber The power saving states will be kept until a control signal has been detected or the keyboard or mouse is activated. The monitor supports DDC2B standard. EN-4 The recovery time from the display controller, as indicated by the amber-color power LED. DDC To make your installation easier...
POWER SAVING The monitor will be driven into "Power Saving" mode by the control signal from Active OFF state back to Plug and Play with your system if your ... LED Light Blue Amber The power saving states will be kept until a control signal has been detected or the keyboard or mouse is activated. The monitor supports DDC2B standard. EN-4 The recovery time from the display controller, as indicated by the amber-color power LED. DDC To make your installation easier...
User Manual
Page 19
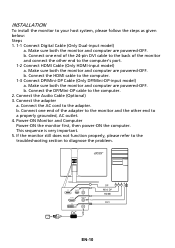
...(Only DP/Mini-DP-input model) a. Connect the AC cord to diagnose the problem. Connect one end of the monitor and connect the other end to a properly grounded, AC outlet. 4. b. If the monitor still does not function properly, please refer to the troubleshooting section to the adapter. b. b. This sequence is very .... DP Mini DP HDMI DVI DC EN-10 Connect one end of the 24-pin DVI cable to the back of the adapter to the monitor and the other end to your host system, please follow the steps as given below: Steps 1. 1-1 Connect Digital Cable (Only Dual-input model) a. INSTALLATION ...
...(Only DP/Mini-DP-input model) a. Connect the AC cord to diagnose the problem. Connect one end of the monitor and connect the other end to a properly grounded, AC outlet. 4. b. If the monitor still does not function properly, please refer to the troubleshooting section to the adapter. b. b. This sequence is very .... DP Mini DP HDMI DVI DC EN-10 Connect one end of the 24-pin DVI cable to the back of the adapter to the monitor and the other end to your host system, please follow the steps as given below: Steps 1. 1-1 Connect Digital Cable (Only Dual-input model) a. INSTALLATION ...
User Manual
Page 20
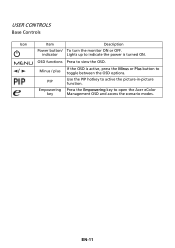
Minus / plus PIP Empowering key If the OSD is turned ON. Press the Empowering key to view the OSD. Lights up to indicate the power is active, press the Minus or Plus button to active the picture-in-picture function. OSD functions Press to open the Acer eColor Management OSD and access the scenario modes. EN-11 USER CONTROLS Base Controls Icon / Item Power button/ indicator Description To turn the monitor ON or OFF. Use the PIP hotkey to toggle between the OSD options.
Minus / plus PIP Empowering key If the OSD is turned ON. Press the Empowering key to view the OSD. Lights up to indicate the power is active, press the Minus or Plus button to active the picture-in-picture function. OSD functions Press to open the Acer eColor Management OSD and access the scenario modes. EN-11 USER CONTROLS Base Controls Icon / Item Power button/ indicator Description To turn the monitor ON or OFF. Use the PIP hotkey to toggle between the OSD options.
User Manual
Page 22
... element you wish to adjust Tone of red, green, blue, yellow, magenta and cyan. 7. 6-axis Hue: adjust hue for adjusting the settings of your LCD Monitor.
... element you wish to adjust Tone of red, green, blue, yellow, magenta and cyan. 7. 6-axis Hue: adjust hue for adjusting the settings of your LCD Monitor.
User Manual
Page 25
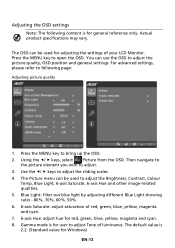
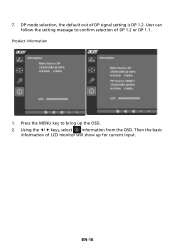
Product information 1. Then the basic information of LCD monitor will show up the OSD. 2. Press the MENU key to confirm selection of DP signal setting is DP 1.2. Using the / keys, select Information from the OSD. 7. User can follow the setting message to bring up for current input. DP mode selection, the default out of DP 1.2 or DP 1.1. EN-16
Product information 1. Then the basic information of LCD monitor will show up the OSD. 2. Press the MENU key to confirm selection of DP signal setting is DP 1.2. Using the / keys, select Information from the OSD. 7. User can follow the setting message to bring up for current input. DP mode selection, the default out of DP 1.2 or DP 1.1. EN-16
User Manual
Page 26
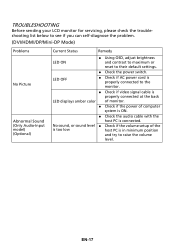
TROUBLESHOOTING Before sending your LCD monitor for servicing, please check the troubleshooting list below to see if you can self-diagnose the problem. (DVI/HDMI/DP/Mini-DP Mode) Problems No ... raise the volume level. LED OFF Check if AC power cord is properly connected to the monitor. Check if video signal cable is properly connected at the back LED displays amber color of monitor. Check if the power of the is too low host PC is connected. EN-17...
TROUBLESHOOTING Before sending your LCD monitor for servicing, please check the troubleshooting list below to see if you can self-diagnose the problem. (DVI/HDMI/DP/Mini-DP Mode) Problems No ... raise the volume level. LED OFF Check if AC power cord is properly connected to the monitor. Check if video signal cable is properly connected at the back LED displays amber color of monitor. Check if the power of the is too low host PC is connected. EN-17...
User Manual
Page 28
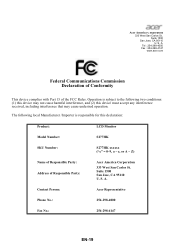
... two conditions: (1) this device may not cause harmful interference, and (2) this declaration: Product: LCD Monitor Model Number: S277HK SKU Number: S277HK xxxxxx ("x" = 0~9, a ~ z, or A ~ Z) Name of Responsible Party: Address of the FCC Rules. Suite 1500 San Jose, CA 95110 U. Acer America Corporation 333 West San Carlos St., Suite 1500 San Jose, CA 95110 U. S. Contact Person...
... two conditions: (1) this device may not cause harmful interference, and (2) this declaration: Product: LCD Monitor Model Number: S277HK SKU Number: S277HK xxxxxx ("x" = 0~9, a ~ z, or A ~ Z) Name of Responsible Party: Address of the FCC Rules. Suite 1500 San Jose, CA 95110 U. Acer America Corporation 333 West San Carlos St., Suite 1500 San Jose, CA 95110 U. S. Contact Person...

User Manual
Page 29
...More information refers to offer products and services worldwide that are registered U.S. Environmental Protection Agency. Acer is committed to http://www.energystar.gov or http:// www.energystar.gov/powermangement Acer ENERGY STAR qualified products: • Produce less heat and reduce cooling loads, and warmer climates...after 15 and 30 minute of our environment. marks EN-20 Acer is ENERGY STAR? Products that help customers save money, conserve energy and improve the quality of inactivity respectively. • Wake the monitor when it is in Active Off mode, move the mouse ...
...More information refers to offer products and services worldwide that are registered U.S. Environmental Protection Agency. Acer is committed to http://www.energystar.gov or http:// www.energystar.gov/powermangement Acer ENERGY STAR qualified products: • Produce less heat and reduce cooling loads, and warmer climates...after 15 and 30 minute of our environment. marks EN-20 Acer is ENERGY STAR? Products that help customers save money, conserve energy and improve the quality of inactivity respectively. • Wake the monitor when it is in Active Off mode, move the mouse ...


