

Quick Start Guide
Page 2
and Directive 2009/125/EC with regard to establishing a framework for the setting of ecodesign requirements for energy-related product.
and Directive 2009/125/EC with regard to establishing a framework for the setting of ecodesign requirements for energy-related product.
User Manual
Page 2
...without the prior written permission of merchantability or fitness for a particular purpose. Acer LCD Monitor User Guide Model number Serial number Date of purchase Place of purchase Acer and the Acer logo are registered trademarks of purchase information in new editions of such revisions ...companies' product names or trademarks are recorded on the label affixed to the contents hereof and specifically disclaims the implied warranties of Acer Incorporated. This company makes no representations or warranties, either expressed or implied, with respect to your unit should include the ...
...without the prior written permission of merchantability or fitness for a particular purpose. Acer LCD Monitor User Guide Model number Serial number Date of purchase Place of purchase Acer and the Acer logo are registered trademarks of purchase information in new editions of such revisions ...companies' product names or trademarks are recorded on the label affixed to the contents hereof and specifically disclaims the implied warranties of Acer Incorporated. This company makes no representations or warranties, either expressed or implied, with respect to your unit should include the ...
User Manual
Page 3
Special notes on LCD monitors The following are normal with the LCD monitor and do not indicate a problem. • Due to the nature of 0.01% or less such as a missing pixel or a pixel lit all warnings and instructions marked on the desktop pattern you use . Turn off the power switch for a few hours. It may find slightly uneven brightness on the screen depending on the product. Keep this case, the screen is displayed for hours. Follow all the time. • Due to the nature of the LCD screen, an afterimage of the previous screen may remain after switching the image, when the ...
Special notes on LCD monitors The following are normal with the LCD monitor and do not indicate a problem. • Due to the nature of 0.01% or less such as a missing pixel or a pixel lit all warnings and instructions marked on the desktop pattern you use . Turn off the power switch for a few hours. It may find slightly uneven brightness on the screen depending on the product. Keep this case, the screen is displayed for hours. Follow all the time. • Due to the nature of the LCD screen, an afterimage of the previous screen may remain after switching the image, when the ...
User Manual
Page 4
The openings should never be placed near or over a radiator or heat register, or in a built-in a fire or electric shock. Using electrical power • This product should never be blocked by placing the product on the marking label. Do not locate this product where people will probably cause unexpected short current or damage internal devices. • The adapter is only used for this monitor ,do not be used with this product, make sure that could be operated from the electrical outlet. iv Accessibility Be sure that the power outlet you plug the power cord into this product ...
The openings should never be placed near or over a radiator or heat register, or in a built-in a fire or electric shock. Using electrical power • This product should never be blocked by placing the product on the marking label. Do not locate this product where people will probably cause unexpected short current or damage internal devices. • The adapter is only used for this monitor ,do not be used with this product, make sure that could be operated from the electrical outlet. iv Accessibility Be sure that the power outlet you plug the power cord into this product ...
User Manual
Page 5
If power strips are used, the load should not exceed 80% of the power strip's input rating. • This product's power cord is properly grounded before inserting the power cord plug. The plug only fits in electric shock and/or injury. Make sure the power outlet is equipped with the supplied power supply cord set , make sure that is a safety feature. Do not insert the plug into the extension cord does not exceed the extension cord ampere rating. Note: The grounding pin also provides good protection from the wall outlet and refer servicing to qualified service personnel when: •...
If power strips are used, the load should not exceed 80% of the power strip's input rating. • This product's power cord is properly grounded before inserting the power cord plug. The plug only fits in electric shock and/or injury. Make sure the power outlet is equipped with the supplied power supply cord set , make sure that is a safety feature. Do not insert the plug into the extension cord does not exceed the extension cord ampere rating. Note: The grounding pin also provides good protection from the wall outlet and refer servicing to qualified service personnel when: •...

User Manual
Page 6
... may contain small parts. Keep them out of the reach of the global environment, please recycle. IT Equipment Recycling Information Acer is strongly committed to reduce the environmental impact of the company's top priorities in minimizing the burden placed on the Waste ...from Electrical and Electronics Equipment (WEEE) regulations, visit http://www.acer-group.com/public/Sustainability/sustainability01.htm Switch off your vehicle engine. They include below deck on boats, chemical transfer or storage facilities...
... may contain small parts. Keep them out of the reach of the global environment, please recycle. IT Equipment Recycling Information Acer is strongly committed to reduce the environmental impact of the company's top priorities in minimizing the burden placed on the Waste ...from Electrical and Electronics Equipment (WEEE) regulations, visit http://www.acer-group.com/public/Sustainability/sustainability01.htm Switch off your vehicle engine. They include below deck on boats, chemical transfer or storage facilities...
User Manual
Page 7
vii LCD pixel statement The LCD unit is produced with high-precision manufacturing techniques. Finding your comfort zone Find your sitting height to computer use Computer users may lead to remove the strain on the recorded image and does not constitute a malfunction. Tips and information for comfortable use , consult a physician immediately and inform your leg muscles Nevertheless, some pixels may appear in the hands, wrists, arms, shoulders, neck or back: • numbness, or a burning or tingling sensation • aching, soreness or tenderness • pain, swelling or ...
vii LCD pixel statement The LCD unit is produced with high-precision manufacturing techniques. Finding your comfort zone Find your sitting height to computer use Computer users may lead to remove the strain on the recorded image and does not constitute a malfunction. Tips and information for comfortable use , consult a physician immediately and inform your leg muscles Nevertheless, some pixels may appear in the hands, wrists, arms, shoulders, neck or back: • numbness, or a burning or tingling sensation • aching, soreness or tenderness • pain, swelling or ...
User Manual
Page 8
Display • Keep your display clean. • Keep your head at a higher level than the top edge of the display so your eyes point downward when looking at bright light sources, such as open windows, for enhanced text readability and graphics clarity. • Eliminate glare and reflections by: • placing your computer use more relaxing and productive: • Take short breaks regularly and often. • Perform some stretching exercises. • Breathe fresh air as often as a piece of cardboard extended from the display's top front edge • Avoid adjusting your display to...
Display • Keep your display clean. • Keep your head at a higher level than the top edge of the display so your eyes point downward when looking at bright light sources, such as open windows, for enhanced text readability and graphics clarity. • Eliminate glare and reflections by: • placing your computer use more relaxing and productive: • Take short breaks regularly and often. • Perform some stretching exercises. • Breathe fresh air as often as a piece of cardboard extended from the display's top front edge • Avoid adjusting your display to...
User Manual
Page 9
... accept any interference received, including interference that may not cause harmful interference, and (2) this declaration: Product: LCD Monitor Model Number: S273HL SKU Number: S273HL xxxx ("x" = 0~9, a ~ z, or A ~ Z or Blank) Name of Responsible Party: Acer America Corporation Address of the FCC Rules. A. Federal Communications Commission Declaration of Conformity This device complies with Part 15 of...
... accept any interference received, including interference that may not cause harmful interference, and (2) this declaration: Product: LCD Monitor Model Number: S273HL SKU Number: S273HL xxxx ("x" = 0~9, a ~ z, or A ~ Z or Blank) Name of Responsible Party: Acer America Corporation Address of the FCC Rules. A. Federal Communications Commission Declaration of Conformity This device complies with Part 15 of...
User Manual
Page 10
... EN60950-1 RoHS Directive 2002/95/EC on the Restriction of the Use of ecodesign requirements for energy-related product. Easy Lai /Manager Regulation, Acer Inc. May. 25, 2010 Date EN61000-3-2, Class D -. EN55022, AS/NZS CISPR22 Class B. -. EMC Directive 2004/108/EC as attested... SA Via Cantonale, Centro Galleria 2 6928 Manno Switzerland Hereby declare that: Product: Trade Name: Model Number: SKU Number: LCD Monitor Acer S273HL S273HLxxxxxx ("x" = 0~9, a ~ z, or A ~ Z or Blank) Is compliant with the essential requirements and other relevant provisions of the ...
... EN60950-1 RoHS Directive 2002/95/EC on the Restriction of the Use of ecodesign requirements for energy-related product. Easy Lai /Manager Regulation, Acer Inc. May. 25, 2010 Date EN61000-3-2, Class D -. EN55022, AS/NZS CISPR22 Class B. -. EMC Directive 2004/108/EC as attested... SA Via Cantonale, Centro Galleria 2 6928 Manno Switzerland Hereby declare that: Product: Trade Name: Model Number: SKU Number: LCD Monitor Acer S273HL S273HLxxxxxx ("x" = 0~9, a ~ z, or A ~ Z or Blank) Is compliant with the essential requirements and other relevant provisions of the ...
User Manual
Page 11
... (DDC) 5 Connector pin assignment 5 15-pin color display signal cable 5 19-pin color display signal cable* 6 6 Standard timing table 7 Installation 8 Users controls 9 Front panel controls 9 Acer eColor Management 10 Operation instructions 10 Features and benefits 10 Adjusting the OSD settings 11 Adjusting the picture quality 11 Adjusting the OSD position 12...
... (DDC) 5 Connector pin assignment 5 15-pin color display signal cable 5 19-pin color display signal cable* 6 6 Standard timing table 7 Installation 8 Users controls 9 Front panel controls 9 Acer eColor Management 10 Operation instructions 10 Features and benefits 10 Adjusting the OSD settings 11 Adjusting the picture quality 11 Adjusting the OSD position 12...
User Manual
Page 13
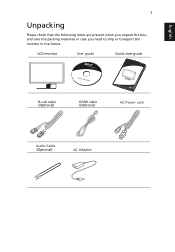
LCD monitor User guide Quick start guide D-sub cable (Optional) HDMI cable (Optional) AC Power cord Audio Cable (Optional) AC Adapter English 1 Unpacking Please check that the following items are present when you unpack the box, and save the packing materials in case you need to ship or transport the monitor in the future.
LCD monitor User guide Quick start guide D-sub cable (Optional) HDMI cable (Optional) AC Power cord Audio Cable (Optional) AC Adapter English 1 Unpacking Please check that the following items are present when you unpack the box, and save the packing materials in case you need to ship or transport the monitor in the future.
User Manual
Page 14
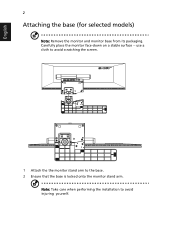
Carefully place the monitor face-down on a stable surface -- use a cloth to avoid scratching the screen. 1 Attach the the monitor stand arm to avoid injuring yourself. English 2 Attaching the base (for selected models) Note: Remove the monitor and monitor base from its packaging. Note: Take care when performing the installation to the base. 2 Ensure that the base is locked onto the monitor stand arm.
Carefully place the monitor face-down on a stable surface -- use a cloth to avoid scratching the screen. 1 Attach the the monitor stand arm to avoid injuring yourself. English 2 Attaching the base (for selected models) Note: Remove the monitor and monitor base from its packaging. Note: Take care when performing the installation to the base. 2 Ensure that the base is locked onto the monitor stand arm.
User Manual
Page 15
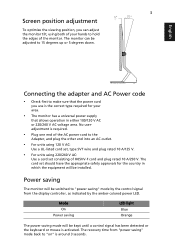
Connecting the adapter and AC Power code • Check first to "on" is required. • Plug one end of the AC power cord to the Adapter, and plug the other end into an AC outlet. • For units using 120 V AC: Use a UL-listed cord set, type SVT wire and plug rated 10 A/125 V. • For units using both of your area. • The monitor has a universal power supply that allows operation in which the equipment will be adjusted to "power saving" mode by the amber-colored power LED. No useradjustment is around 3 seconds. Power saving The monitor will be installed....
Connecting the adapter and AC Power code • Check first to "on" is required. • Plug one end of the AC power cord to the Adapter, and plug the other end into an AC outlet. • For units using 120 V AC: Use a UL-listed cord set, type SVT wire and plug rated 10 A/125 V. • For units using both of your area. • The monitor has a universal power supply that allows operation in which the equipment will be adjusted to "power saving" mode by the amber-colored power LED. No useradjustment is around 3 seconds. Power saving The monitor will be installed....
User Manual
Page 16
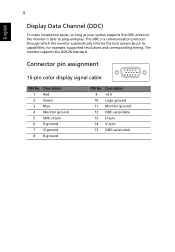
Connector pin assignment 15-pin color display signal cable 1 5 6 10 11 15 PIN No. Description 9 +5 V 10 Logic ground 11 Monitor ground 12 DDC-serial data 13 H-sync 14 V-sync 15 DDC-serial clock for example, supported resolutions and corresponding timing. Description 1 Red 2 Green 3 Blue 4 Monitor ground 5 DDC-return 6 R-ground 7 G-ground 8 B-ground PIN No. The DDC is able to plug-and-play. 4 English Display Data Channel (DDC) To make installation easier, so long as your system supports the DDC protocol, the monitor is a communication protocol through which the monitor ...
Connector pin assignment 15-pin color display signal cable 1 5 6 10 11 15 PIN No. Description 9 +5 V 10 Logic ground 11 Monitor ground 12 DDC-serial data 13 H-sync 14 V-sync 15 DDC-serial clock for example, supported resolutions and corresponding timing. Description 1 Red 2 Green 3 Blue 4 Monitor ground 5 DDC-return 6 R-ground 7 G-ground 8 B-ground PIN No. The DDC is able to plug-and-play. 4 English Display Data Channel (DDC) To make installation easier, so long as your system supports the DDC protocol, the monitor is a communication protocol through which the monitor ...
User Manual
Page 19
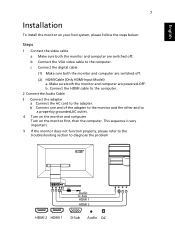
c Connect the digital cable (1) Make sure both the monitor and computer are powered-OFF. Make sure both the monitor and computer are switched off . (2) HDMI Cable (Only HDMI-Input Model) a. b. b Connect the VGA video cable to diagnose the problem DC 22 1 Audio 22 1 D-Sub HDMI 1 HDMI 2 HDMI 2 HDMI 1 D-Sub Audio DC This sequence is very important. 5 If the monitor does not function properly, please refer to the troubleshooting section to the computer. Connect the HDMI cable to the computer. 2 Connect the Audio Cable 3 Connect the adapter a Connect the AC cord to a ...
c Connect the digital cable (1) Make sure both the monitor and computer are powered-OFF. Make sure both the monitor and computer are switched off . (2) HDMI Cable (Only HDMI-Input Model) a. b. b Connect the VGA video cable to diagnose the problem DC 22 1 Audio 22 1 D-Sub HDMI 1 HDMI 2 HDMI 2 HDMI 1 D-Sub Audio DC This sequence is very important. 5 If the monitor does not function properly, please refer to the troubleshooting section to the computer. Connect the HDMI cable to the computer. 2 Connect the Audio Cable 3 Connect the adapter a Connect the AC cord to a ...
User Manual
Page 20
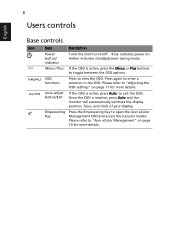
... the OSD options. Please refer to "Adjusting the OSD settings" on page 10 for more details. Once the OSD is active, press Auto to "Acer eColor Management" on page 11 for more details. Amber indicates standby/power saving mode. / Minus / Plus If the OSD is active, press the... Minus or Plus buttons to enter a selection in the OSD. Please refer to exit the OSD. OSD functions Press to open the Acer eColor Management OSD and access the scenario modes. Empowering Key Press the Empowering Key to view the OSD. 8 Users controls English Base controls Icon...
... the OSD options. Please refer to "Adjusting the OSD settings" on page 10 for more details. Once the OSD is active, press Auto to "Acer eColor Management" on page 11 for more details. Amber indicates standby/power saving mode. / Minus / Plus If the OSD is active, press the... Minus or Plus buttons to enter a selection in the OSD. Please refer to exit the OSD. OSD functions Press to open the Acer eColor Management OSD and access the scenario modes. Empowering Key Press the Empowering Key to view the OSD. 8 Users controls English Base controls Icon...
User Manual
Page 21
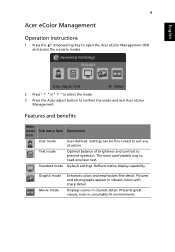
Text mode Optimal balance of brightness and contrast to confirm the mode and exit Acer eColor Management. Standard mode Default settings. Displays scenes in unsuitably-lit environments. Features and benefits Main menu Sub menu item Description... mode Enhances colors and emphasizes fine detail. Presents great visuals, even in clearest detail. Reflects native display capability. English 9 Acer eColor Management Operation instructions 1 Press the Empowering Key to open the Acer eColor Management OSD and access the scenario modes. 2 Press " " or " " to select the mode. 3 Press ...
Text mode Optimal balance of brightness and contrast to confirm the mode and exit Acer eColor Management. Standard mode Default settings. Displays scenes in unsuitably-lit environments. Features and benefits Main menu Sub menu item Description... mode Enhances colors and emphasizes fine detail. Presents great visuals, even in clearest detail. Reflects native display capability. English 9 Acer eColor Management Operation instructions 1 Press the Empowering Key to open the Acer eColor Management OSD and access the scenario modes. 2 Press " " or " " to select the mode. 3 Press ...
User Manual
Page 22
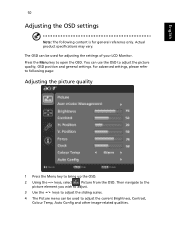
You can be used to adjust the current Brightness, Contrast, Colour Temp, Auto Config and other image-related qualities. Press the Menu key to adjust the picture quality, OSD position and general settings. For advanced settings, please refer to following content is for adjusting the settings of your LCD Monitor. English 10 Adjusting the OSD settings Note: The following page: Adjusting the picture quality 1 Press the Menu key to bring up the OSD. 2 Using the / keys, select Picture from the OSD. Then navigate to the picture element you wish to adjust. 3 Use the / keys to ...
You can be used to adjust the current Brightness, Contrast, Colour Temp, Auto Config and other image-related qualities. Press the Menu key to adjust the picture quality, OSD position and general settings. For advanced settings, please refer to following content is for adjusting the settings of your LCD Monitor. English 10 Adjusting the OSD settings Note: The following page: Adjusting the picture quality 1 Press the Menu key to bring up the OSD. 2 Using the / keys, select Picture from the OSD. Then navigate to the picture element you wish to adjust. 3 Use the / keys to ...

User Manual
Page 23
11 Adjusting the OSD position English 1 Press the Menu key to adjust. Then navigate to the feature you wish to bring up the OSD. 2 Using the directional keys, select OSD from the onscreen display.
11 Adjusting the OSD position English 1 Press the Menu key to adjust. Then navigate to the feature you wish to bring up the OSD. 2 Using the directional keys, select OSD from the onscreen display.
