

User Manual
Page 4
... easily accessible and located as possible. If you are provided for other similar surface. iv Accessibility Be sure that the power outlet you plug the power cord into this product through cabinet slots as they may touch dangerous voltage points or short-out parts that the total If the...from the electrical outlet. When you . Do not locate this product near you need to disconnect power from overheating. Never spill liquid of internal components and to unplug the power cord from the type of the product and to the equipment operator as close to protect it could result...
... easily accessible and located as possible. If you are provided for other similar surface. iv Accessibility Be sure that the power outlet you plug the power cord into this product through cabinet slots as they may touch dangerous voltage points or short-out parts that the total If the...from the electrical outlet. When you . Do not locate this product near you need to disconnect power from overheating. Never spill liquid of internal components and to unplug the power cord from the type of the product and to the equipment operator as close to protect it could result...

User Manual
Page 5
...Note: The grounding pin also provides good protection from the wall outlet and refer servicing to qualified service personnel when: • the power cord or plug is damaged, cut or frayed • liquid was exposed to dangerous voltage points or other nearby electrical devices that is ...equipped with the supplied power supply cord set , make sure that the new power cord meets the following the operating instructions The overall system load must not exceed 80% of all servicing to ...
...Note: The grounding pin also provides good protection from the wall outlet and refer servicing to qualified service personnel when: • the power cord or plug is damaged, cut or frayed • liquid was exposed to dangerous voltage points or other nearby electrical devices that is ...equipped with the supplied power supply cord set , make sure that the new power cord meets the following the operating instructions The overall system load must not exceed 80% of all servicing to ...

User Manual
Page 9
TABLE OF CONTENTS UNPACKING 1 ATTACHING / REMOVING THE BASE 2 SCREEN POSITION ADJUSTMENT 2 CONNECTING THE POWER CORD 3 SAFETY PRECAUTION 3 CLEANING YOUR MONITOR 3 POWER SAVING 4 DDC...4 CONNECTOR PIN ASSIGNMENT 5 STANDARD TIMING TABLE 7 INSTALLATION 9 USER CONTROLS 10 TROUBLESHOOTING 16
TABLE OF CONTENTS UNPACKING 1 ATTACHING / REMOVING THE BASE 2 SCREEN POSITION ADJUSTMENT 2 CONNECTING THE POWER CORD 3 SAFETY PRECAUTION 3 CLEANING YOUR MONITOR 3 POWER SAVING 4 DDC...4 CONNECTOR PIN ASSIGNMENT 5 STANDARD TIMING TABLE 7 INSTALLATION 9 USER CONTROLS 10 TROUBLESHOOTING 16

User Manual
Page 10
z LCD Monitor z AC Power Cord z D-Sub Cable (Optional) z DVI Cable (Optional) z AC Adapter z User Manual z Quick Start Guide LCD monitor EN-1 UNPACKING Please check the following items are present when you unpack the box, and save the packing materials in case you will need to ship or transport the monitor in future.
z LCD Monitor z AC Power Cord z D-Sub Cable (Optional) z DVI Cable (Optional) z AC Adapter z User Manual z Quick Start Guide LCD monitor EN-1 UNPACKING Please check the following items are present when you unpack the box, and save the packing materials in case you will need to ship or transport the monitor in future.

User Manual
Page 12
...z Always unplug the monitor before cleaning. z Avoid placing the monitor against a bright background or where sun-light or other light sources may reflect on the power cord to avoid damage to rain, excessive moisture, or dust. z Do not expose the monitor to the cable. Always put the monitor in a place where there... is required. SAFETY PRECAUTION z Avoid placing the monitor, or any other heavy object, on the face of the monitor. CONNECTING THE POWER CORD z Check first to the adapter, and plug the other end into an AC outlet. z Plug one end of H05VV...
...z Always unplug the monitor before cleaning. z Avoid placing the monitor against a bright background or where sun-light or other light sources may reflect on the power cord to avoid damage to rain, excessive moisture, or dust. z Do not expose the monitor to the cable. Always put the monitor in a place where there... is required. SAFETY PRECAUTION z Avoid placing the monitor, or any other heavy object, on the face of the monitor. CONNECTING THE POWER CORD z Check first to the adapter, and plug the other end into an AC outlet. z Plug one end of H05VV...
User Manual
Page 18
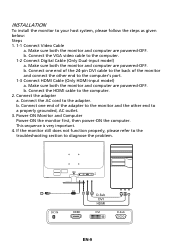
...follow the steps as given below: Steps 1. 1-1 Connect Video Cable a. b. Make sure both the monitor and computer are powered-OFF. This sequence is very important. 4. b. Connect the AC cord to the computer's port. 1-3 Connect HDMI Cable (Only HDMI-input model) a. DC IN HDMI DVI D-Sub DC DC... IN HDMI D-Sub DVI HDMI DVI 2 D-Sub EN-9 Make sure both the monitor and computer are powered-OFF. Power-ON Monitor and Computer Power-ON the monitor first...
...follow the steps as given below: Steps 1. 1-1 Connect Video Cable a. b. Make sure both the monitor and computer are powered-OFF. This sequence is very important. 4. b. Connect the AC cord to the computer's port. 1-3 Connect HDMI Cable (Only HDMI-input model) a. DC IN HDMI DVI D-Sub DC DC... IN HDMI D-Sub DVI HDMI DVI 2 D-Sub EN-9 Make sure both the monitor and computer are powered-OFF. Power-ON Monitor and Computer Power-ON the monitor first...

User Manual
Page 25
z Check if AC power cord is properly connected to their default settings. z Using OSD, adjust RESOLUTION, CLOCK, CLOCK-PHASE, H-POSITION and V-POSITION with non-standard signals. z Check if video signal cable is ON. z Check if the power of computer system is properly connected at the back of monitor...or too large in display size Remedy z Using OSD, adjust brightness and contrast to maximum or reset to the monitor. z Check the power switch. z Using OSD, in compliance which may be causing the input signal frequency mismatch. z Wait for servicing, please check the troubleshooting ...
z Check if AC power cord is properly connected to their default settings. z Using OSD, adjust RESOLUTION, CLOCK, CLOCK-PHASE, H-POSITION and V-POSITION with non-standard signals. z Check if video signal cable is ON. z Check if the power of computer system is properly connected at the back of monitor...or too large in display size Remedy z Using OSD, adjust brightness and contrast to maximum or reset to the monitor. z Check the power switch. z Using OSD, in compliance which may be causing the input signal frequency mismatch. z Wait for servicing, please check the troubleshooting ...

User Manual
Page 26
z Check if the power of monitor. EN-17 (DVI/HDMI Mode) Problems No Picture Current Status Remedy LED ON z Using OSD, adjust brightness and contrast to maximum or reset to the monitor. LED OFF z Check the power switch. z Check if AC power cord is ON. LED displays amber color z Check if video signal cable is properly connected at the back of computer system is properly connected to their default settings.
z Check if the power of monitor. EN-17 (DVI/HDMI Mode) Problems No Picture Current Status Remedy LED ON z Using OSD, adjust brightness and contrast to maximum or reset to the monitor. LED OFF z Check the power switch. z Check if AC power cord is ON. LED displays amber color z Check if video signal cable is properly connected at the back of computer system is properly connected to their default settings.


