
Quick Start Guide
Page 1
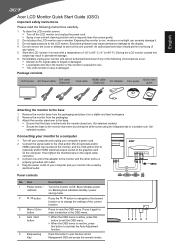
...to exit the OSD menu. • When the OSD menu is locked onto the monitor stand arm. (for selected models) • Secure the base to the monitor stand arm by turning the white screw using the integrated tab or a suitable coin. (for selected models) Connecting your monitor to...monitor and the other end to 60° C (-4° to140° F). Press this button to open the Acer eColor Management OSD and access the scenario modes. 543 2 1 English Acer LCD Monitor Quick Start Guide (QSG) Important safety instructions Please read the following circumstances occur: • Monitor-to-PC...
...to exit the OSD menu. • When the OSD menu is locked onto the monitor stand arm. (for selected models) • Secure the base to the monitor stand arm by turning the white screw using the integrated tab or a suitable coin. (for selected models) Connecting your monitor to...monitor and the other end to 60° C (-4° to140° F). Press this button to open the Acer eColor Management OSD and access the scenario modes. 543 2 1 English Acer LCD Monitor Quick Start Guide (QSG) Important safety instructions Please read the following circumstances occur: • Monitor-to-PC...
User Manual
Page 11
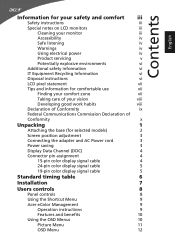
...of your vision viii Developing good work habits viii Declaration of Conformity ix Federal Communications Commission Declaration of Conformity x Unpacking 1 Attaching the base (for selected models) 2 Screen position adjustment 3 Connecting the adapter and AC Power cord 3 Power saving 3 Display Data Channel (DDC...display signal cable 5 Standard timing table 6 Installation 7 Users controls 8 Panel controls 8 Using the Shortcut Menu 9 Acer eColor Management 9 Operation instructions 9 Features and benefits 10 Using the OSD Menus 10 Picture Menu 11 OSD Menu 12
...of your vision viii Developing good work habits viii Declaration of Conformity ix Federal Communications Commission Declaration of Conformity x Unpacking 1 Attaching the base (for selected models) 2 Screen position adjustment 3 Connecting the adapter and AC Power cord 3 Power saving 3 Display Data Channel (DDC...display signal cable 5 Standard timing table 6 Installation 7 Users controls 8 Panel controls 8 Using the Shortcut Menu 9 Acer eColor Management 9 Operation instructions 9 Features and benefits 10 Using the OSD Menus 10 Picture Menu 11 OSD Menu 12
User Manual
Page 14
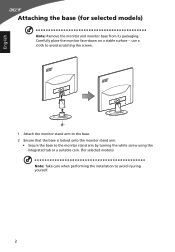
use a cloth to avoid scratching the screen. 1 Attach the monitor stand arm to the base. 2 Ensure that the base is locked onto the monitor stand arm. • Secure the base to avoid injuring yourself. 2 English Attaching the base (for selected models) Note: Take care when performing the installation to the monitor stand arm by turning the white screw using the integrated tab or a suitable coin. (for selected models) Note: Remove the monitor and monitor base from its packaging. Carefully place the monitor face-down on a stable surface --
use a cloth to avoid scratching the screen. 1 Attach the monitor stand arm to the base. 2 Ensure that the base is locked onto the monitor stand arm. • Secure the base to avoid injuring yourself. 2 English Attaching the base (for selected models) Note: Take care when performing the installation to the monitor stand arm by turning the white screw using the integrated tab or a suitable coin. (for selected models) Note: Remove the monitor and monitor base from its packaging. Carefully place the monitor face-down on a stable surface --


