User Guide
Page 13
... 16 Power on the system 17 Install the Windows Home Server Connector on the first computer 18 Install the Windows Home Server Connector on the client computers 31 Connect to the Home Server Console 34 3 Windows Home Server Console 37 Computers & Backup 38 User Accounts 39 Shared Folders 40 Server Storage 42 Lights Out 43 McAfee Total Protection 44...
... 16 Power on the system 17 Install the Windows Home Server Connector on the first computer 18 Install the Windows Home Server Connector on the client computers 31 Connect to the Home Server Console 34 3 Windows Home Server Console 37 Computers & Backup 38 User Accounts 39 Shared Folders 40 Server Storage 42 Lights Out 43 McAfee Total Protection 44...
User Guide
Page 14
...Using the one-touch USB backup feature Set up Wake On LAN on the home server Set the home server uptime and down time Monitor server health and performance Set up email alerts Explore the Windows Home Server icon 5 Configuring the hard disk drive Adding a hard disk drive Removing a... hard disk drive Replacing a failed hard disk drive 6 Troubleshooting First steps checklist Recovering or restoring the home server Restoring a home computer Restoring files from a backup Update your home server with RevoCenter Series Software Update Specific problems and corrective actions 60 61 61 63 64 69 71 72 ...
...Using the one-touch USB backup feature Set up Wake On LAN on the home server Set the home server uptime and down time Monitor server health and performance Set up email alerts Explore the Windows Home Server icon 5 Configuring the hard disk drive Adding a hard disk drive Removing a... hard disk drive Replacing a failed hard disk drive 6 Troubleshooting First steps checklist Recovering or restoring the home server Restoring a home computer Restoring files from a backup Update your home server with RevoCenter Series Software Update Specific problems and corrective actions 60 61 61 63 64 69 71 72 ...
User Guide
Page 16
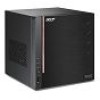
...Features • Powerful processor with excellent file sharing performance. • Fast network performance in the home is delivered through a Gigabit Ethernet connection. • Equipped with Microsoft's Windows Home Server operating system to the home server. See "Adding a hard disk drive" on page 107 for more information. • Easily ...backup of your digital assets. • Back up Wake On LAN on the home server" on page 71 for home computers" on page 93. See "Access the shared folders on the home server" on page 88 for more information. • Easily add storage space to...
...Features • Powerful processor with excellent file sharing performance. • Fast network performance in the home is delivered through a Gigabit Ethernet connection. • Equipped with Microsoft's Windows Home Server operating system to the home server. See "Adding a hard disk drive" on page 107 for more information. • Easily ...backup of your digital assets. • Back up Wake On LAN on the home server" on page 71 for home computers" on page 93. See "Access the shared folders on the home server" on page 88 for more information. • Easily add storage space to...

User Guide
Page 17
...) Gigabit Ethernet port I/O ports USB 2.0 ports (1 front and 4 rear), Gigabit Ethernet port, eSATA port, recovery/reset button Power 200 W, 100-240 V AC Server operating system (OS) support Windows Home Server Home computer OS Windows Vista 32-bit and 64-bit Edition support Windows XP 32-bit and 64-bit Edition Digital media player support...
...) Gigabit Ethernet port I/O ports USB 2.0 ports (1 front and 4 rear), Gigabit Ethernet port, eSATA port, recovery/reset button Power 200 W, 100-240 V AC Server operating system (OS) support Windows Home Server Home computer OS Windows Vista 32-bit and 64-bit Edition support Windows XP 32-bit and 64-bit Edition Digital media player support...
User Guide
Page 22
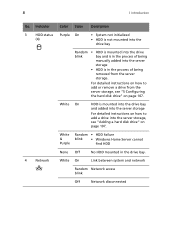
8 1 Introduction No. White & Purple Random • HDD failure blink • Windows Home Server cannot find HDD None Off No HDD mounted in the process of being manually added into the server storage, see "5 Configuring the hard disk drive" on page 107. White On Link between system and network Random Network access blink... the drive bay Random blink • HDD is mounted into the drive bay and is in the process of being removed from the server storage, see "Adding a hard disk drive" on page 107. For detailed instructions on how to add or remove a drive from the...
8 1 Introduction No. White & Purple Random • HDD failure blink • Windows Home Server cannot find HDD None Off No HDD mounted in the process of being manually added into the server storage, see "5 Configuring the hard disk drive" on page 107. White On Link between system and network Random Network access blink... the drive bay Random blink • HDD is mounted into the drive bay and is in the process of being removed from the server storage, see "Adding a hard disk drive" on page 107. For detailed instructions on how to add or remove a drive from the...

User Guide
Page 25
11 2 Setting up the system Follow these steps to set up RevoCenter Series to run in your home network. • Check package contents • Select a location for the home server • Recommended environment • Connect the power cord • Connect to the home network • Power on the system • Install the Windows Home Server Connector on the first computer • Install the Windows Home Server Connector on the client computers • Connect to the Home Server Console
11 2 Setting up the system Follow these steps to set up RevoCenter Series to run in your home network. • Check package contents • Select a location for the home server • Recommended environment • Connect the power cord • Connect to the home network • Power on the system • Install the Windows Home Server Connector on the first computer • Install the Windows Home Server Connector on the client computers • Connect to the Home Server Console

User Guide
Page 26
... Start Guide • Warranty card If any of the above items are damaged or missing, contact your home server after a system failure or restore the home server to "Recovering or restoring the home server" on page 118 for detailed instructions. - Refer to "Install the Windows Home Server Connector on the first computer" on page 93. - Refer to "Restoring...
... Start Guide • Warranty card If any of the above items are damaged or missing, contact your home server after a system failure or restore the home server to "Recovering or restoring the home server" on page 118 for detailed instructions. - Refer to "Install the Windows Home Server Connector on the first computer" on page 93. - Refer to "Restoring...

User Guide
Page 32
18 2 Setting up the system Install the Windows Home Server Connector on the first computer After setting up your RevoCenter Series, you have administrator privileges. The installation wizard starts. The Welcome window appears. Note: Prior ... on changing your computer. Refer to the Windows Help for more details on the Client Installation.exe file to installing the Windows Home Server Connector, make sure you must install the Windows Home Server Connector on your user account settings. 1 Place the RevoCenter Series Software Installation Disc in the optical drive of the first...
18 2 Setting up the system Install the Windows Home Server Connector on the first computer After setting up your RevoCenter Series, you have administrator privileges. The installation wizard starts. The Welcome window appears. Note: Prior ... on changing your computer. Refer to the Windows Help for more details on the Client Installation.exe file to installing the Windows Home Server Connector, make sure you must install the Windows Home Server Connector on your user account settings. 1 Place the RevoCenter Series Software Installation Disc in the optical drive of the first...

User Guide
Page 34
Once the server is found, the Welcome window appears. 20 2 Setting up the system After the components are installed, the Windows Home Server Connector installation starts to find and connect to your RevoCenter Series.
Once the server is found, the Welcome window appears. 20 2 Setting up the system After the components are installed, the Windows Home Server Connector installation starts to find and connect to your RevoCenter Series.

User Guide
Page 35
21 4 Click Next. 5 Click Next. 6 Select the "Download the updates from my home server and install them automatically" option button if you want to download the updates for the Connector.
21 4 Click Next. 5 Click Next. 6 Select the "Download the updates from my home server and install them automatically" option button if you want to download the updates for the Connector.
User Guide
Page 36
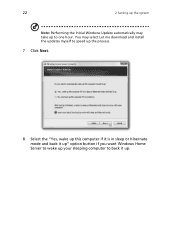
22 2 Setting up the system Note: Performing the initial Windows Update automatically may select Let me download and install the updates myself to speed up the process. 7 Click Next. 8 Select the "Yes, wake up this computer if it is in sleep or hibernate mode and back it up" option button if you want Windows Home Server to wake up your sleeping computer to back it up to one hour. You may take up .
22 2 Setting up the system Note: Performing the initial Windows Update automatically may select Let me download and install the updates myself to speed up the process. 7 Click Next. 8 Select the "Yes, wake up this computer if it is in sleep or hibernate mode and back it up" option button if you want Windows Home Server to wake up your sleeping computer to back it up to one hour. You may take up .

User Guide
Page 37
Note: The initial configuration of the home server. 23 9 Click Next. 10 Click Next to perform an initial configuration of the home server is performed once on the first home computer.
Note: The initial configuration of the home server. 23 9 Click Next. 10 Click Next to perform an initial configuration of the home server is performed once on the first home computer.

User Guide
Page 38
24 2 Setting up the system Note: You will need to switch to perform the initial configuration on your hardware. 12 Once the initialization is completed, click the Next arrow. You will not be able to a higher resolution before doing the initial configuration. 11 Click the Next arrow. The Windows Home Server initialization begins and could take several hours depending on a default resolution of 1024 x 600.
24 2 Setting up the system Note: You will need to switch to perform the initial configuration on your hardware. 12 Once the initialization is completed, click the Next arrow. You will not be able to a higher resolution before doing the initial configuration. 11 Click the Next arrow. The Windows Home Server initialization begins and could take several hours depending on a default resolution of 1024 x 600.

User Guide
Page 39
...Caution: 1. Keep the administrator password for your home server. If you forget the password, you enter a wrong password. Restoring the server requires a wired connection between the This is Acer123. The strong password must be able to log on to manage your home server can contain a maximum of a strong password is... the password that you can use to the server if you will have to restore the server, and all system settings, user accounts and data will not be...
...Caution: 1. Keep the administrator password for your home server. If you forget the password, you enter a wrong password. Restoring the server requires a wired connection between the This is Acer123. The strong password must be able to log on to manage your home server can contain a maximum of a strong password is... the password that you can use to the server if you will have to restore the server, and all system settings, user accounts and data will not be...

User Guide
Page 40
26 2 Setting up the system server and client PC. Connect the two and insert the Server Recovery Disc into the client PC's optical drive to start the process. 16 Click the Next arrow. 17 Select the "User recommended settings" option button if you want to use Windows Update to automatically download and install updates for Windows Home Server, then click the Next arrow.
26 2 Setting up the system server and client PC. Connect the two and insert the Server Recovery Disc into the client PC's optical drive to start the process. 16 Click the Next arrow. 17 Select the "User recommended settings" option button if you want to use Windows Update to automatically download and install updates for Windows Home Server, then click the Next arrow.

User Guide
Page 42
This could take some time to automatically download and install available Windows Home Server updates. Important: Do not restart or turn off your home server during the update process. 21 Once installation is complete the Windows Home Server windows displays. 28 2 Setting up the system 20 Click the Next arrow to complete but will not need additional information from you.
This could take some time to automatically download and install available Windows Home Server updates. Important: Do not restart or turn off your home server during the update process. 21 Once installation is complete the Windows Home Server windows displays. 28 2 Setting up the system 20 Click the Next arrow to complete but will not need additional information from you.

User Guide
Page 43
29 22 Click the Next arrow. The Setting Password dialog box appears. The Windows Home Server log in window displays. You can now manage the home server through the remote admin console. 23 Enter the administrator password, then click the Next arrow.
29 22 Click the Next arrow. The Setting Password dialog box appears. The Windows Home Server log in window displays. You can now manage the home server through the remote admin console. 23 Enter the administrator password, then click the Next arrow.

User Guide
Page 44
... start the hardware health and performance monitor service, then click OK. appears on the home server. The Windows Home Server Console window appears. The Windows Home Server icon also appears in the system task tray and the Shared Folders desktop shortcut your home network. 30 2 Setting up the system 24 Enter the administrator password to your desktop...
... start the hardware health and performance monitor service, then click OK. appears on the home server. The Windows Home Server Console window appears. The Windows Home Server icon also appears in the system task tray and the Shared Folders desktop shortcut your home network. 30 2 Setting up the system 24 Enter the administrator password to your desktop...
User Guide
Page 45
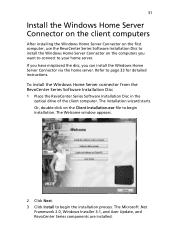
...click on the computers you can install the Windows Home Server Connector via the home server. The Welcome window appears. 2 Click Next. 3 Click Install to begin installation. The Microsoft .Net Framework 2.0, Windows Installer 3.1, and Acer Update, and RevoCenter Series components are installed. ...If you have misplaced the disc, you want to connect to your home server. To install the Windows Home Server connector from the RevoCenter Series Software Installation Disc 1...
...click on the computers you can install the Windows Home Server Connector via the home server. The Welcome window appears. 2 Click Next. 3 Click Install to begin installation. The Microsoft .Net Framework 2.0, Windows Installer 3.1, and Acer Update, and RevoCenter Series components are installed. ...If you have misplaced the disc, you want to connect to your home server. To install the Windows Home Server connector from the RevoCenter Series Software Installation Disc 1...

User Guide
Page 46
...window appears. 5 Click Next. 6 Read the End-User License Agreement. 32 2 Setting up the system 4 After the components are installed, the Windows Home Server Connector installation starts to find and connect to your desktop. The installation status window appears. 8 Click Next. 9 Enter the Windows... Home Server administrator password. 10 Click Next and follow all onscreen instructions until you agree with the terms of the agreement, then select the ...
...window appears. 5 Click Next. 6 Read the End-User License Agreement. 32 2 Setting up the system 4 After the components are installed, the Windows Home Server Connector installation starts to find and connect to your desktop. The installation status window appears. 8 Click Next. 9 Enter the Windows... Home Server administrator password. 10 Click Next and follow all onscreen instructions until you agree with the terms of the agreement, then select the ...

