

User Manual
Page 1
All Rights Reserved. Acer Incorporated. Acer Projector User's Guide Original Issue: 03/2019 Acer Projector H6522BD/V6510/H6518ST/E145F+/ V150/E146S/HE-801K+/HT-800/ E145S+/H6517ABD+/HV520/ HE-802ST/ GM513/TH-420/HE-801ST+/VH-413/ H6517ST+/H6522ABD/GM513S/ VH-413S/D1P1845/D1P1849/ D1P1848 User's Guide Copyright © 2019.
All Rights Reserved. Acer Incorporated. Acer Projector User's Guide Original Issue: 03/2019 Acer Projector H6522BD/V6510/H6518ST/E145F+/ V150/E146S/HE-801K+/HT-800/ E145S+/H6517ABD+/HV520/ HE-802ST/ GM513/TH-420/HE-801ST+/VH-413/ H6517ST+/H6522ABD/GM513S/ VH-413S/D1P1845/D1P1849/ D1P1848 User's Guide Copyright © 2019.

User Manual
Page 2
... for identification purposes only and belong to their respective companies. Model number Serial number Date of purchase Place of purchase Acer and the Acer logo are trademarks or registered trademarks of HDMI Licensing LLC." "HDMI™, the HDMI logo and High-Definition Multimedia .... Changes may be made periodically to the information in this publication without the prior written permission of Acer Incorporated. All correspondence concerning your projector. Such changes will be incorporated in new editions of this manual or supplementary documents and publications.
... for identification purposes only and belong to their respective companies. Model number Serial number Date of purchase Place of purchase Acer and the Acer logo are trademarks or registered trademarks of HDMI Licensing LLC." "HDMI™, the HDMI logo and High-Definition Multimedia .... Changes may be made periodically to the information in this publication without the prior written permission of Acer Incorporated. All correspondence concerning your projector. Such changes will be incorporated in new editions of this manual or supplementary documents and publications.

User Manual
Page 3
... when connecting and disconnecting power to the external power supply unit: • Install the power supply unit before removing the power supply unit from the projector. • If the system has multiple sources of the product and to unplug the power cord from the power supplies. Follow all power cords from...
... when connecting and disconnecting power to the external power supply unit: • Install the power supply unit before removing the power supply unit from the projector. • If the system has multiple sources of the product and to unplug the power cord from the power supplies. Follow all power cords from...
User Manual
Page 5
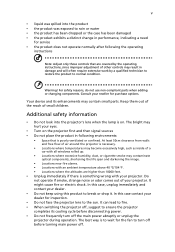
...above 40 ºC/104 ºF. • Locations where the altitudes are higher than 10000 feet. • Unplug immediately if there is on the projector first and then signal sources • Do not place the product in following environments: • Space that is to wait for service • the...Consult your eyes. • Turn on . Your device and its cooling cycle before turning main power off the main power abruptly or unplug the projector during operation. The bright may contain small parts. Do not operate if smoke, strange noise or odor comes out of small children. It might...
...above 40 ºC/104 ºF. • Locations where the altitudes are higher than 10000 feet. • Unplug immediately if there is on the projector first and then signal sources • Do not place the product in following environments: • Space that is to wait for service • the...Consult your eyes. • Turn on . Your device and its cooling cycle before turning main power off the main power abruptly or unplug the projector during operation. The bright may contain small parts. Do not operate if smoke, strange noise or odor comes out of small children. It might...
User Manual
Page 6
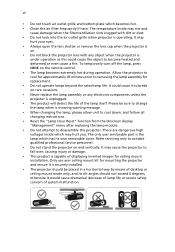
...degrees, otherwise it to suitable qualified professional service personnel. • Do not stand the projector on rare occasions. • Never replace the lamp assembly or any object when the projector is operating. Only use acer ceiling mount kit for replacement. • Do not operate lamps beyond the rated lamp ...its own removable cover. It may hurt your eyes. • Always open the lens shutter or remove the lens cap when the projector is on the remote control. • The lamp becomes extremely hot during operation. There are dangerous high voltages inside may hurt you. ...
...degrees, otherwise it to suitable qualified professional service personnel. • Do not stand the projector on rare occasions. • Never replace the lamp assembly or any object when the projector is operating. Only use acer ceiling mount kit for replacement. • Do not operate lamps beyond the rated lamp ...its own removable cover. It may hurt your eyes. • Always open the lens shutter or remove the lens cap when the projector is on the remote control. • The lamp becomes extremely hot during operation. There are dangerous high voltages inside may hurt you. ...

User Manual
Page 7
... into the trash when discarding. For more information on the Waste from Electrical and Electronics Equipment (WEEE) regulations, visit http://www.acer-group.com/public/Sustainability/sustainability01.htm Mercury advisory For projectors or electronic products containing an LCD/CRT monitor or display: "Lamp(s) contain Mercury, Dispose Properly." vii Caution for Listening To...
... into the trash when discarding. For more information on the Waste from Electrical and Electronics Equipment (WEEE) regulations, visit http://www.acer-group.com/public/Sustainability/sustainability01.htm Mercury advisory For projectors or electronic products containing an LCD/CRT monitor or display: "Lamp(s) contain Mercury, Dispose Properly." vii Caution for Listening To...
User Manual
Page 8
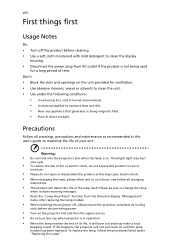
... or solvents to clean the unit. • Use under "Replacing the Lamp". viii First things first Usage Notes Do: • Turn off , please ensure the projector completes its life, it will not turn back on the unit provided for a long period of fire or electric shock, do not expose this product... lamp when it shows warning messages. • Reset the "Lamp Hour Reset" function from AC outlet if the product is on. If this happens, the projector will burn out and may cause electric shock. • When changing the lamp, please allow unit to maximize the life of the lamp itself. To...
... or solvents to clean the unit. • Use under "Replacing the Lamp". viii First things first Usage Notes Do: • Turn off , please ensure the projector completes its life, it will not turn back on the unit provided for a long period of fire or electric shock, do not expose this product... lamp when it shows warning messages. • Reset the "Lamp Hour Reset" function from AC outlet if the product is on. If this happens, the projector will burn out and may cause electric shock. • When changing the lamp, please allow unit to maximize the life of the lamp itself. To...

User Manual
Page 9
... 4 Control Panel 6 Remote Control Layout 7 MHL (Mobile High-Definition Link) Control 10 Getting Started 12 Connecting the Projector 12 Turning the Projector On/Off 14 Turning on the Projector 14 Turning the projector off 15 Adjusting the Projected Image 16 Adjusting the Height of Projected Image 16 How to get a preferred image size by...
... 4 Control Panel 6 Remote Control Layout 7 MHL (Mobile High-Definition Link) Control 10 Getting Started 12 Connecting the Projector 12 Turning the Projector On/Off 14 Turning on the Projector 14 Turning the projector off 15 Adjusting the Projected Image 16 Adjusting the Height of Projected Image 16 How to get a preferred image size by...

User Manual
Page 11
... 3D supported • Acer ColorBoost technology delivers nature's true colors for vivid, life-like images • High brightness and contrast ratio • Acer LumiSense technology can intelligently... • Lower power consumption, economy (ECO) mode and EcoPro mode extend lamp life • Acer EcoProjeciton Technology delivers Intelligent power management approach and physical efficiency improvement • Equipped with HDMI™...• Support 8.3ms low input lag • Support Acer Display Widget Note: Functions vary depending on model definition. English 1 Introduction Product Features This product...
... 3D supported • Acer ColorBoost technology delivers nature's true colors for vivid, life-like images • High brightness and contrast ratio • Acer LumiSense technology can intelligently... • Lower power consumption, economy (ECO) mode and EcoPro mode extend lamp life • Acer EcoProjeciton Technology delivers Intelligent power management approach and physical efficiency improvement • Equipped with HDMI™...• Support 8.3ms low input lag • Support Acer Display Widget Note: Functions vary depending on model definition. English 1 Introduction Product Features This product...

User Manual
Page 12
... with all the items shown below. English Projector Power cord HDMI cable (option) VGA cable (option) Quick Start Guide Panduan ringkas Ghid de pornire rapidă Stručná příruč...
... with all the items shown below. English Projector Power cord HDMI cable (option) VGA cable (option) Quick Start Guide Panduan ringkas Ghid de pornire rapidă Stručná příruč...

User Manual
Page 14
English 4 Projector Overview Projector Outlook Front / upper side 12 34 56 76 7 8 8 11 # Description 1 Lamp cover 2 Air outlet 3 Control panel 4 Power button 5 Zoom ring 6 Air inlet 9 9 10 10 # Description 7 Focus ring 8 Remote control receiver 9 Projection lens 10 Lens cap 11 Tilt adjusting wheels
English 4 Projector Overview Projector Outlook Front / upper side 12 34 56 76 7 8 8 11 # Description 1 Lamp cover 2 Air outlet 3 Control panel 4 Power button 5 Zoom ring 6 Air inlet 9 9 10 10 # Description 7 Focus ring 8 Remote control receiver 9 Projection lens 10 Lens cap 11 Tilt adjusting wheels
User Manual
Page 16
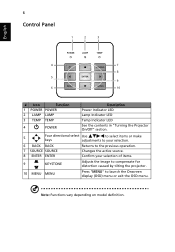
... # Icon Function 1 POWER POWER 2 LAMP LAMP 3 TEMP TEMP 4 POWER Description Power Indicator LED Lamp Indicator LED Temp Indicator LED See the contents in "Turning the Projector On/Off" section. 5 Four directional select Use to select items or make keys adjustments to your selection of items. 9 KEYSTONE Adjusts the image to compensate...
... # Icon Function 1 POWER POWER 2 LAMP LAMP 3 TEMP TEMP 4 POWER Description Power Indicator LED Lamp Indicator LED Temp Indicator LED See the contents in "Turning the Projector On/Off" section. 5 Four directional select Use to select items or make keys adjustments to your selection of items. 9 KEYSTONE Adjusts the image to compensate...

User Manual
Page 17
English Remote Control Layout 1 1 7 2 8 2 3 7 4 9 4 5 10 5 6 Model No:T-2501 11 12 13 MC.JPQ11.003 Model No:T-2502 14 15 16 17 18 MC.JPQ11.004 2 3 4 5 6 19 11 20 12 21 13 22 14 23 15 24 16 25 17 18 1 7 8 9 10 7 26 8 9 10 19 20 21 22 23 24 Model No:J-25091 25 27 MC.JQ011.004 28 6 11 12 13 14 15 Model No:J-25021 16 17 18 MC.JMV11.006 19 20 21 22 23 24 25 Model No:J-25050 MC.JMV11.009 # Icon Function Description 1 Infrared transmitter Sends signals to the projector. 2 POWER Refer to the "Turning the Projector On/Off" section.
English Remote Control Layout 1 1 7 2 8 2 3 7 4 9 4 5 10 5 6 Model No:T-2501 11 12 13 MC.JPQ11.003 Model No:T-2502 14 15 16 17 18 MC.JPQ11.004 2 3 4 5 6 19 11 20 12 21 13 22 14 23 15 24 16 25 17 18 1 7 8 9 10 7 26 8 9 10 19 20 21 22 23 24 Model No:J-25091 25 27 MC.JQ011.004 28 6 11 12 13 14 15 Model No:J-25021 16 17 18 MC.JMV11.006 19 20 21 22 23 24 25 Model No:J-25050 MC.JMV11.009 # Icon Function Description 1 Infrared transmitter Sends signals to the projector. 2 POWER Refer to the "Turning the Projector On/Off" section.

User Manual
Page 18
... select 3D models. 8 SOURCE Changes the active source. 9 MODE Chooses a display mode. 10 KEYSTONE Adjusts the image to compensate for distortion caused by tilting the projector. 11 BACK STOP Returns to the previous operation. Press "VGA" to change source to a computer via a USB cable. 15 COMPONENT No function. This 12 VGA...
... select 3D models. 8 SOURCE Changes the active source. 9 MODE Chooses a display mode. 10 KEYSTONE Adjusts the image to compensate for distortion caused by tilting the projector. 11 BACK STOP Returns to the previous operation. Press "VGA" to change source to a computer via a USB cable. 15 COMPONENT No function. This 12 VGA...
User Manual
Page 19
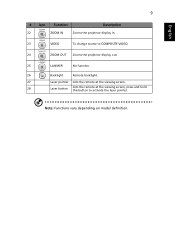
Note: Functions vary depending on model definition. English 9 # Icon Function Description 22 ZOOM IN Zooms the projector display in. 23 VIDEO To change source to COMPOSITE VIDEO. 24 ZOOM OUT Zooms the projector display out. 25 LAN/WiFi No function. 26 Backlight Remote backlight. 27 Laser pointer Aim the remote at the viewing screen. 28 Laser button Aim the remote at the viewing screen, press and hold this button to activate the laser pointer.
Note: Functions vary depending on model definition. English 9 # Icon Function Description 22 ZOOM IN Zooms the projector display in. 23 VIDEO To change source to COMPOSITE VIDEO. 24 ZOOM OUT Zooms the projector display out. 25 LAN/WiFi No function. 26 Backlight Remote backlight. 27 Laser pointer Aim the remote at the viewing screen. 28 Laser button Aim the remote at the viewing screen, press and hold this button to activate the laser pointer.

User Manual
Page 22
English 12 Getting Started Connecting the Projector 2 2 LR HDTV adapter 3 3 10 9 10 3 4 5 7 8 Smart devices 5 RCA 6 Display Video output 2 Speakers 11 Screen 12 13 14 3D IR emitter 1
English 12 Getting Started Connecting the Projector 2 2 LR HDTV adapter 3 3 10 9 10 3 4 5 7 8 Smart devices 5 RCA 6 Display Video output 2 Speakers 11 Screen 12 13 14 3D IR emitter 1

User Manual
Page 23
... dongle 10 Wireless dongle 11 Wired remote control 12 LAN cable 13 12V DC cable 14 3D SYNC cable Note 1: To ensure the projector works well with the projector. Note 4: Some smartphones require a converter (supplied by the smart device maker) to enable the MHL function. Note 7: Some smart devices require a converter (supplied...
... dongle 10 Wireless dongle 11 Wired remote control 12 LAN cable 13 12V DC cable 14 3D SYNC cable Note 1: To ensure the projector works well with the projector. Note 4: Some smartphones require a converter (supplied by the smart device maker) to enable the MHL function. Note 7: Some smart devices require a converter (supplied...

User Manual
Page 24
...the remote control or direct source key on the remote control to switch between inputs. The Power indicator LED will flash red. 2 Turn on the projector by pressing "Power" button on your source automatically. • If the screen displays "Lock" and "Source" icons, it means the... is no such type of input signal detected. • If the screen displays "No Signal", please make sure the signal cables are securely connected. The projector will turn blue. 3 Turn on the control panel or remote control, and the Power indicator LED will detect your source (computer, notebook, video player ,...
...the remote control or direct source key on the remote control to switch between inputs. The Power indicator LED will flash red. 2 Turn on the projector by pressing "Power" button on your source automatically. • If the screen displays "Lock" and "Source" icons, it means the... is no such type of input signal detected. • If the screen displays "No Signal", please make sure the signal cables are securely connected. The projector will turn blue. 3 Turn on the control panel or remote control, and the Power indicator LED will detect your source (computer, notebook, video player ,...

User Manual
Page 25
... contact your local reseller or service center. Attention! Please do not turn RED and blink rapidly after power on. English 15 Turning the projector off 1 To turn off soon." Contact your local dealer or service center. • "Fan failed. This onscreen message indicates that the...has finished cooling, the LED power indicator will continue to operate for about 2 minutes to unplug the power cord. Note 1: Whenever the projector automatically shuts down period to complete the shutdown process." Lamp will automatically turn solid red to indicate standby mode. 5 It is turned off...
... contact your local reseller or service center. Attention! Please do not turn RED and blink rapidly after power on. English 15 Turning the projector off 1 To turn off soon." Contact your local dealer or service center. • "Fan failed. This onscreen message indicates that the...has finished cooling, the LED power indicator will continue to operate for about 2 minutes to unplug the power cord. Note 1: Whenever the projector automatically shuts down period to complete the shutdown process." Lamp will automatically turn solid red to indicate standby mode. 5 It is turned off...

User Manual
Page 26
English 16 Adjusting the Projected Image Adjusting the Height of Projected Image The projector is equipped with elevator feet for adjusting the height of image. To raise/lower the image: Use Tilt adjusting wheel to fine-tune the display angle. Tilt adjusting wheel
English 16 Adjusting the Projected Image Adjusting the Height of Projected Image The projector is equipped with elevator feet for adjusting the height of image. To raise/lower the image: Use Tilt adjusting wheel to fine-tune the display angle. Tilt adjusting wheel


