
User Manual
Page 2
... the screen depending on the desktop pattern you use. · The LCD screen has effective pixels of the previous screen may flicker during initial use. X223W SPECIAL NOTES ON LCD MONITORS The following symptoms are normal with LCD monitor and do not indicate a problem. NOTES · Due to the nature of...
... the screen depending on the desktop pattern you use. · The LCD screen has effective pixels of the previous screen may flicker during initial use. X223W SPECIAL NOTES ON LCD MONITORS The following symptoms are normal with LCD monitor and do not indicate a problem. NOTES · Due to the nature of...

User Manual
Page 3
... cord from the system by unplugging all warnings and instructions marked on a bed, sofa, rug or other similar surface. Information for your safety and comfort X223W Safety instructions Read these instructions, suggested by hearing experts,to protect your earing. • Gradually increase the volume until you can 't hear people speaking near...
... cord from the system by unplugging all warnings and instructions marked on a bed, sofa, rug or other similar surface. Information for your safety and comfort X223W Safety instructions Read these instructions, suggested by hearing experts,to protect your earing. • Gradually increase the volume until you can 't hear people speaking near...
User Manual
Page 4
X223W Product servicing Do not attempt to service this product from staying too long in one fixed posture • avoid slouching forward and/or leaning backward &#...
X223W Product servicing Do not attempt to service this product from staying too long in one fixed posture • avoid slouching forward and/or leaning backward &#...
User Manual
Page 5
Developing good work habits Develop the following work for extended periods of time. The following websites: Worldwide: http://global.acer.com/about/sustainability.htm EN-4 Display • Keep your display clean. • Keep your head at a higher level than your display in recycling, ...edge • Avoid adjusting your display to an awkward viewing angle. • Avoid looking at the center of your desk to make your eyes. X223W • take breaks regularly, and do not recommend using a display visor, such as a piece of cardboard extended from drying out.
Developing good work habits Develop the following work for extended periods of time. The following websites: Worldwide: http://global.acer.com/about/sustainability.htm EN-4 Display • Keep your display clean. • Keep your head at a higher level than your display in recycling, ...edge • Avoid adjusting your display to an awkward viewing angle. • Avoid looking at the center of your desk to make your eyes. X223W • take breaks regularly, and do not recommend using a display visor, such as a piece of cardboard extended from drying out.
User Manual
Page 6
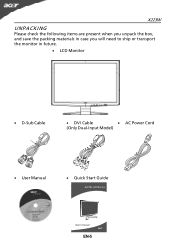
X223W UNPACKING Please check the following items are present when you unpack the box, and save the packing materials in case you will need to ship or transport the monitor in future. · LCD Monitor · D-Sub Cable · DVI Cable · AC Power Cord (Only Dual-Input Model) · User Manual · Quick Start Guide X223W LCD Monitor EN-5
X223W UNPACKING Please check the following items are present when you unpack the box, and save the packing materials in case you will need to ship or transport the monitor in future. · LCD Monitor · D-Sub Cable · DVI Cable · AC Power Cord (Only Dual-Input Model) · User Manual · Quick Start Guide X223W LCD Monitor EN-5

User Manual
Page 7
... 15 degrees up or 5 degrees down as indicated first before removing the base and follow the arrow direction to hold the edges of the base. X223W Attaching / Removing the Base Install: Align the release button on the bottom of the monitor with the corresponding slots on the bottom of the monitor...
... 15 degrees up or 5 degrees down as indicated first before removing the base and follow the arrow direction to hold the edges of the base. X223W Attaching / Removing the Base Install: Align the release button on the bottom of the monitor with the corresponding slots on the bottom of the monitor...
User Manual
Page 8
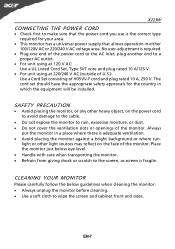
... have the appropriate safety approvals for your area. · This monitor has a universal power supply that allows operation in which the equipment will be installed. X223W CONNECTING THE POWER CORD · Check first to make sure that the power cord you use is required. · Plug one end of the power...
... have the appropriate safety approvals for your area. · This monitor has a universal power supply that allows operation in which the equipment will be installed. X223W CONNECTING THE POWER CORD · Check first to make sure that the power cord you use is required. · Plug one end of the power...

User Manual
Page 9
EN-8 The DDC (Display Data Channel) is activated. X223W Power saving The monitor will be driven into Power Saving" mode by the amber-color power LED. The recovery time from the display controller, as ...
EN-8 The DDC (Display Data Channel) is activated. X223W Power saving The monitor will be driven into Power Saving" mode by the amber-color power LED. The recovery time from the display controller, as ...

User Manual
Page 10
DESCRIPTION Red Green Blue Monitor Ground DDC-return R-Ground G-Ground B-Ground PIN NO. 9. 10. 11. 12. 13. 14. 15. CONNECTOR PIN ASSIGNMENT X223W 15-Pin Color Display Signal Cable PIN NO. 1. 2. 3. 4. 5. 6. 7. 8. DESCRIPTION +5V Logic Ground Monitor Ground DDC-Serial Data H-Sync V-Sync DDC-Serial Clock EN-9
DESCRIPTION Red Green Blue Monitor Ground DDC-return R-Ground G-Ground B-Ground PIN NO. 9. 10. 11. 12. 13. 14. 15. CONNECTOR PIN ASSIGNMENT X223W 15-Pin Color Display Signal Cable PIN NO. 1. 2. 3. 4. 5. 6. 7. 8. DESCRIPTION +5V Logic Ground Monitor Ground DDC-Serial Data H-Sync V-Sync DDC-Serial Clock EN-9

User Manual
Page 11
TMDS Data2- 13. NC 16. TMDS Data0- 6. TMDS Data0+ 7. DDC Data 19. TMDS Data 1/3 Shield 23. TMDS Data 2/4 Shield 15. DDC Clock 18. NC 9. TMDS Clock Shield 11. NC 24. Hot Plug Detect 5. TMDS Data1- 21. TMDS Data1+ 22. TMDS Clock+ 12. EN-10 NC 2. NC 17. NC 20. DDC TMDS Clock- TMDS Data2+ 14. +5V Power 3. NC 10. X223W 24-Pin Color Display Signal Cable PIN Meaning PIN Meaning 1. TMDS Data 0/5 Shield 8. GND(return for +5V hsync.vsync) 4.
TMDS Data2- 13. NC 16. TMDS Data0- 6. TMDS Data0+ 7. DDC Data 19. TMDS Data 1/3 Shield 23. TMDS Data 2/4 Shield 15. DDC Clock 18. NC 9. TMDS Clock Shield 11. NC 24. Hot Plug Detect 5. TMDS Data1- 21. TMDS Data1+ 22. TMDS Clock+ 12. EN-10 NC 2. NC 17. NC 20. DDC TMDS Clock- TMDS Data2+ 14. +5V Power 3. NC 10. X223W 24-Pin Color Display Signal Cable PIN Meaning PIN Meaning 1. TMDS Data 0/5 Shield 8. GND(return for +5V hsync.vsync) 4.
User Manual
Page 12
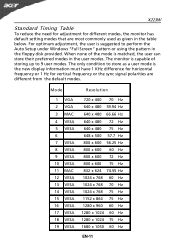
... x 768 75 Hz 1152 x 864 75 Hz 1280 x 960 60 Hz 1280 x 1024 60 Hz 1280 x 1024 75 Hz 1680 x 1050 60 Hz EN-11 X223W Standard Timing Table To reduce the need for adjustment for vertical frequency or the sync signal polarities are most commonly used as a user mode is...
... x 768 75 Hz 1152 x 864 75 Hz 1280 x 960 60 Hz 1280 x 1024 60 Hz 1280 x 1024 75 Hz 1680 x 1050 60 Hz EN-11 X223W Standard Timing Table To reduce the need for adjustment for vertical frequency or the sync signal polarities are most commonly used as a user mode is...
User Manual
Page 13
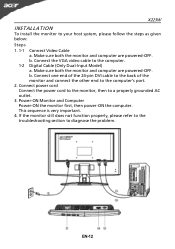
b. Make sure both the monitor and computer are powered-OFF. This sequence is very important. 4. EN-12 X223W INSTALLATION To install the monitor to diagnose the problem. b. Power-ON Monitor and Computer Power-ON the monitor first, then power-ON the computer. If ...
b. Make sure both the monitor and computer are powered-OFF. This sequence is very important. 4. EN-12 X223W INSTALLATION To install the monitor to diagnose the problem. b. Power-ON Monitor and Computer Power-ON the monitor first, then power-ON the computer. If ...
User Manual
Page 14
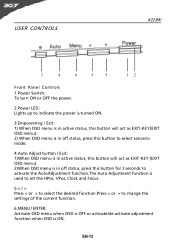
USER CONTROLS X223W 3 4 6 5 5 12 Front Panel Controls 1.Power Switch: To turn ON or OFF the power. 2.Power LED: Lights up to indicate the power is turned ON. 3.Empowering / ...
USER CONTROLS X223W 3 4 6 5 5 12 Front Panel Controls 1.Power Switch: To turn ON or OFF the power. 2.Power LED: Lights up to indicate the power is turned ON. 3.Empowering / ...

User Manual
Page 15
...B A. Only Analog Input Model II. If you want to change the settings of the current function. 5. Acer eColor Management If selected to select the desired function. 3. Press < or > to "Acer eColor Management " item, will appear the Standard OSD I. Press the MENU-button to select the function that ...you want to "USER" item, will appear the Acer eColor" OSD B. USER If selected to adjust. 4. Only Dual Input Model EN-14 X223W HOW TO ADJUST A SETTING 1. To exit and save, select the exit function. Press the MENU-...
...B A. Only Analog Input Model II. If you want to change the settings of the current function. 5. Acer eColor Management If selected to select the desired function. 3. Press < or > to "Acer eColor Management " item, will appear the Standard OSD I. Press the MENU-button to select the function that ...you want to "USER" item, will appear the Acer eColor" OSD B. USER If selected to adjust. 4. Only Dual Input Model EN-14 X223W HOW TO ADJUST A SETTING 1. To exit and save, select the exit function. Press the MENU-...
User Manual
Page 16
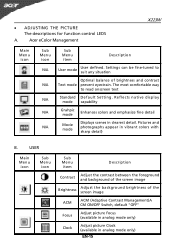
.../OFF Switch, default "OFF" Focus Adjust picture Focus (available in analog mode only) Clock Adjust picture Clock (available in analog mode only) EN-15 Acer eColor Management X223W Main Menu icon Sub Menu icon N/A N/A N/A N/A N/A Sub Menu item Description User mode User defined. · ADJUSTING THE PICTURE The descriptions for function control LEDS...
.../OFF Switch, default "OFF" Focus Adjust picture Focus (available in analog mode only) Clock Adjust picture Clock (available in analog mode only) EN-15 Acer eColor Management X223W Main Menu icon Sub Menu icon N/A N/A N/A N/A N/A Sub Menu item Description User mode User defined. · ADJUSTING THE PICTURE The descriptions for function control LEDS...
User Manual
Page 17
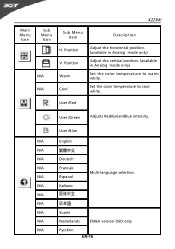
User /Red User /Green Adjusts Red/Green/Blue intensity. User /Blue N/A English N/A N/A Deutsch N/A Francais N/A Espanol Multi-language selection. N/A Italiano N/A N/A N/A Suomi N/A Nederlands EMEA version OSD only N/A Pyccknn EN-16 Set the color temperature to warm white. Position Warm Cool Description Adjust the horizontal position. (available in Analog mode only) Adjust the vertical position. (available in Analog mode only) Set the color temperature to cool white. X223W Main Menu Icon Sub Menu Icon N/A N/A Sub Menu Item H. Position V.
User /Red User /Green Adjusts Red/Green/Blue intensity. User /Blue N/A English N/A N/A Deutsch N/A Francais N/A Espanol Multi-language selection. N/A Italiano N/A N/A N/A Suomi N/A Nederlands EMEA version OSD only N/A Pyccknn EN-16 Set the color temperature to warm white. Position Warm Cool Description Adjust the horizontal position. (available in Analog mode only) Adjust the vertical position. (available in Analog mode only) Set the color temperature to cool white. X223W Main Menu Icon Sub Menu Icon N/A N/A Sub Menu Item H. Position V.
User Manual
Page 18
...-17 N/A Reset Clear each old status of the OSD. Position Adjust the vertical position of Autoconfigurationand set the color temperature to Cool. Main Menu Icon X223W Sub Menu Icon Sub Menu Item H. N/A Exit Save user adjustment and OSD disappear. V. OSD Timeout Adjust the OSD timeout.
...-17 N/A Reset Clear each old status of the OSD. Position Adjust the vertical position of Autoconfigurationand set the color temperature to Cool. Main Menu Icon X223W Sub Menu Icon Sub Menu Item H. N/A Exit Save user adjustment and OSD disappear. V. OSD Timeout Adjust the OSD timeout.

User Manual
Page 19
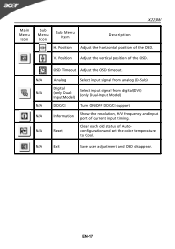
· Acer eColor Management OSD X223W · Operation instructions Acer eColor Management Step 1: Press " Key " to open the Acer eColor Management OSD and access the scenario modes Step 2: Press "" to select the mode Step 3: Press " Auto Key " to confirm the mode and run Auto Adjust · Features and Benefits EN-18
· Acer eColor Management OSD X223W · Operation instructions Acer eColor Management Step 1: Press " Key " to open the Acer eColor Management OSD and access the scenario modes Step 2: Press "" to select the mode Step 3: Press " Auto Key " to confirm the mode and run Auto Adjust · Features and Benefits EN-18
User Manual
Page 20
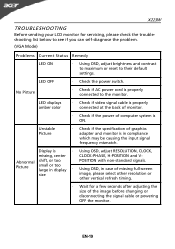
... contrast to maximum or reset to the monitor. Abnormal Picture shift, or too small or too large in display · POSITION with non-standard signals. X223W TROUBLESHOOTING Before sending your LCD monitor for a few seconds after adjusting the size of the image before changing or disconnecting the signal cable or powering...
... contrast to maximum or reset to the monitor. Abnormal Picture shift, or too small or too large in display · POSITION with non-standard signals. X223W TROUBLESHOOTING Before sending your LCD monitor for a few seconds after adjusting the size of the image before changing or disconnecting the signal cable or powering...
User Manual
Page 21
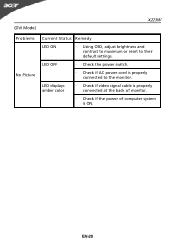
EN-20 LED OFF · Check the power switch. · Check if AC power cord is ON. (DVI Mode) X223W Problems No Picture Current Status Remedy LED ON · Using OSD, adjust brightness and contrast to maximum or reset to the monitor. LED displays amber color · Check if video signal cable is properly connected at the back of monitor. · Check if the power of computer system is properly connected to their default settings.
EN-20 LED OFF · Check the power switch. · Check if AC power cord is ON. (DVI Mode) X223W Problems No Picture Current Status Remedy LED ON · Using OSD, adjust brightness and contrast to maximum or reset to the monitor. LED displays amber color · Check if video signal cable is properly connected at the back of monitor. · Check if the power of computer system is properly connected to their default settings.

