
User Manual
Page 2
... the model number, serial number, purchase date and place of purchase information in this publication without the prior written permission of Acer Incorporated. All Rights Reserved. Other companies' product names or trademarks are used herein for a particular purpose. The serial number ...and model number are registered trademarks of Acer Incorporated. Such changes will be reproduced, stored in a retrieval system, or transmitted, in new editions of this manual or supplementary ...
... the model number, serial number, purchase date and place of purchase information in this publication without the prior written permission of Acer Incorporated. All Rights Reserved. Other companies' product names or trademarks are used herein for a particular purpose. The serial number ...and model number are registered trademarks of Acer Incorporated. Such changes will be reproduced, stored in a retrieval system, or transmitted, in new editions of this manual or supplementary ...
User Manual
Page 3
In this document for a few hours. Keep this case, the screen is attached to its base before connecting the power cord to the AC power outlet. • Make sure both the LCD monitor and the computer are normal with the LCD monitor and do not indicate a problem. • Due to the nature of power, disconnect power from the power supplies. When you need to disconnect power from the equipment, be sure to unplug the power cord from the LCD monitor: • Make sure the monitor is recovered slowly by unplugging all warnings and instructions marked on the product. Special ...
In this document for a few hours. Keep this case, the screen is attached to its base before connecting the power cord to the AC power outlet. • Make sure both the LCD monitor and the computer are normal with the LCD monitor and do not indicate a problem. • Due to the nature of power, disconnect power from the power supplies. When you need to disconnect power from the equipment, be sure to unplug the power cord from the LCD monitor: • Make sure the monitor is recovered slowly by unplugging all warnings and instructions marked on the product. Special ...
User Manual
Page 4
The openings should be blocked or covered. The grounding pin is properly grounded before inserting the power cord plug. Safe listening To protect your hearing, follow these instructions. • Gradually increase the volume until you can hear it clearly and comfortably and without distortion. • After setting the volume level, do not place the product on a vibrating surface. • Never use this product near or over a radiator or heat register, or in a built-in a grounded power outlet. Using electrical power • This product should never be blocked by plugging ...
The openings should be blocked or covered. The grounding pin is properly grounded before inserting the power cord plug. Safe listening To protect your hearing, follow these instructions. • Gradually increase the volume until you can hear it clearly and comfortably and without distortion. • After setting the volume level, do not place the product on a vibrating surface. • Never use this product near or over a radiator or heat register, or in a built-in a grounded power outlet. Using electrical power • This product should never be blocked by plugging ...
User Manual
Page 5
If you need for service • the product does not operate normally after following the operating instructions Note: Adjust only those controls that are covered by other nearby electrical devices that the new power cord meets the following requirements: detachable type, UL listed/CSA certified, type SPT-2, rated 7 A 125 V minimum, VDE approved or its enhancements may result in damage and will often require extensive work by a qualified technician to restore the product to rain or water • the product has been dropped or the case has been damaged • the product exhibits a ...
If you need for service • the product does not operate normally after following the operating instructions Note: Adjust only those controls that are covered by other nearby electrical devices that the new power cord meets the following requirements: detachable type, UL listed/CSA certified, type SPT-2, rated 7 A 125 V minimum, VDE approved or its enhancements may result in damage and will often require extensive work by a qualified technician to restore the product to rain or water • the product has been dropped or the case has been damaged • the product exhibits a ...
User Manual
Page 6
... produced with high-precision manufacturing techniques. Disposal instructions Do not throw this website: http://www.acergroup.com/public/Sustainability/ Visit www.acer-group.com for power management: • Activate display's Sleep mode within 15 minutes of user inactivity. • Activate computer's... Sleep mode within 30 minutes of the global environment, please recycle. This has no effect on the environment.We at Acer are very conscious of the environmental effects of our business and strive to identify and provide the best working procedures to reduce the ...
... produced with high-precision manufacturing techniques. Disposal instructions Do not throw this website: http://www.acergroup.com/public/Sustainability/ Visit www.acer-group.com for power management: • Activate display's Sleep mode within 15 minutes of user inactivity. • Activate computer's... Sleep mode within 30 minutes of the global environment, please recycle. This has no effect on the environment.We at Acer are very conscious of the environmental effects of our business and strive to identify and provide the best working procedures to reduce the ...
User Manual
Page 7
Finding your comfort zone Find your comfort zone by adjusting the viewing angle of the display. • Adjust the display brightness and/or contrast to a comfortable level for enhanced text readability and graphics clarity. • Eliminate glare and reflections by: • placing your display in one fixed posture • avoid slouching forward and/or leaning backward • stand up and walk around regularly to remove the strain on a distant point. • Blink frequently to keep your eyes from the monitor and focusing on your leg muscles Taking care of physical injury. Eyes ...
Finding your comfort zone Find your comfort zone by adjusting the viewing angle of the display. • Adjust the display brightness and/or contrast to a comfortable level for enhanced text readability and graphics clarity. • Eliminate glare and reflections by: • placing your display in one fixed posture • avoid slouching forward and/or leaning backward • stand up and walk around regularly to remove the strain on a distant point. • Blink frequently to keep your eyes from the monitor and focusing on your leg muscles Taking care of physical injury. Eyes ...
User Manual
Page 8
Developing good work habits Develop the following work habits to make your computer use more relaxing and productive: • Take short breaks regularly and often. • Perform some stretching exercises. • Breathe fresh air as often as possible. • Exercise regularly and maintain a healthy body. • In order to prevent damage to an awkward viewing angle. • Avoid looking at bright light sources, such as a piece of time. viii • using a task light • changing the display's viewing angle • using a glare-reduction filter • using a display visor...
Developing good work habits Develop the following work habits to make your computer use more relaxing and productive: • Take short breaks regularly and often. • Perform some stretching exercises. • Breathe fresh air as often as possible. • Exercise regularly and maintain a healthy body. • In order to prevent damage to an awkward viewing angle. • Avoid looking at bright light sources, such as a piece of time. viii • using a task light • changing the display's viewing angle • using a glare-reduction filter • using a display visor...

User Manual
Page 9
... 3 Connecting the power cord 4 Power saving 4 Display Data Channel (DDC) 4 Connector pin assignment 5 Standard timing table 8 Installation 9 User controls 10 How to adjust a setting 11 Acer eColor Management 11 Adjusting the OSD settings 12 Adjusting the picture quality 12 Adjusting the OSD setting 13 Adjusting the setting 14 Product information 15...
... 3 Connecting the power cord 4 Power saving 4 Display Data Channel (DDC) 4 Connector pin assignment 5 Standard timing table 8 Installation 9 User controls 10 How to adjust a setting 11 Acer eColor Management 11 Adjusting the OSD settings 12 Adjusting the picture quality 12 Adjusting the OSD setting 13 Adjusting the setting 14 Product information 15...
User Manual
Page 10
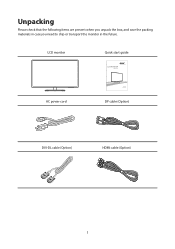
Unpacking Please check that the following items are present when you unpack the box, and save the packing materials in case you need to ship or transport the monitor in the future. LCD monitor Quick start guide LCD MONITOR EB321HQU AC power cord DP cable (Option) DVI-DL cable (Option) HDMI cable (Option) 1
Unpacking Please check that the following items are present when you unpack the box, and save the packing materials in case you need to ship or transport the monitor in the future. LCD monitor Quick start guide LCD MONITOR EB321HQU AC power cord DP cable (Option) DVI-DL cable (Option) HDMI cable (Option) 1
User Manual
Page 11
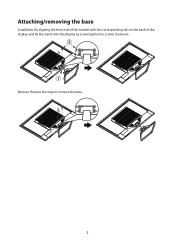
Attaching/removing the base Installation: By aligning the front-end of the bracket with the corresponding slot on the back of the display, and fix the stand onto the display by screwing the four screws clockwise. 2 1 Remove: Reverse the steps to remove the base. 2
Attaching/removing the base Installation: By aligning the front-end of the bracket with the corresponding slot on the back of the display, and fix the stand onto the display by screwing the four screws clockwise. 2 1 Remove: Reverse the steps to remove the base. 2

User Manual
Page 12
The monitor can adjust the monitor tilt by using both of your hands to 10 degrees up or 5 degrees down. 5° 10° 3 Screen position adjustment To optimize the viewing position, you can be adjusted to hold the edges of the monitor as shown below.
The monitor can adjust the monitor tilt by using both of your hands to 10 degrees up or 5 degrees down. 5° 10° 3 Screen position adjustment To optimize the viewing position, you can be adjusted to hold the edges of the monitor as shown below.
User Manual
Page 13
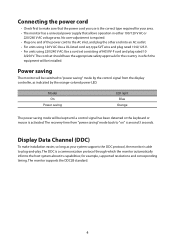
The recovery time from the display controller, as your area. • The monitor has a universal power supply that the power cord you use is the correct type required for your system supports the DDC protocol, the monitor is around 3 seconds. The DDC is a communication protocol through which the equipment will be installed. The cord set consisting of H05VV-F cord and plug rated 10 A/250 V. Model On Power saving LED light Blue Orange The power saving mode will be kept until a control signal has been detected or the keyboard or mouse is required. • Plug one end ...
The recovery time from the display controller, as your area. • The monitor has a universal power supply that the power cord you use is the correct type required for your system supports the DDC protocol, the monitor is around 3 seconds. The DDC is a communication protocol through which the equipment will be installed. The cord set consisting of H05VV-F cord and plug rated 10 A/250 V. Model On Power saving LED light Blue Orange The power saving mode will be kept until a control signal has been detected or the keyboard or mouse is required. • Plug one end ...
User Manual
Page 16
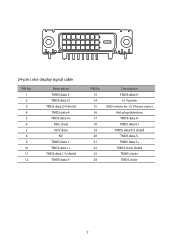
24-pin color display signal cable PIN No. 1 2 3 4 5 6 7 8 9 10 11 12 Description TMDS data 2TMDS data 2+ TMDS data 2/4 shield TMDS data 4TMDS data 4+ DDC clock DDC data NC TMDS data 1TMDS data 1+ TMDS data 1/3 shield TMDS data 3- PIN No. 13 14 15 16 17 18 19 20 21 22 23 24 Description TMDS data3+ +5 V power GND (return for +5 V hsync.vsync) Hot-plug detection TMDS data 0TMDS data 0+ TMDS data 0/5 shield TMDS data 5TMDS data 5+ TMDS clock shield TMDS clock+ TMDS clock- 7
24-pin color display signal cable PIN No. 1 2 3 4 5 6 7 8 9 10 11 12 Description TMDS data 2TMDS data 2+ TMDS data 2/4 shield TMDS data 4TMDS data 4+ DDC clock DDC data NC TMDS data 1TMDS data 1+ TMDS data 1/3 shield TMDS data 3- PIN No. 13 14 15 16 17 18 19 20 21 22 23 24 Description TMDS data3+ +5 V power GND (return for +5 V hsync.vsync) Hot-plug detection TMDS data 0TMDS data 0+ TMDS data 0/5 shield TMDS data 5TMDS data 5+ TMDS clock shield TMDS clock+ TMDS clock- 7

User Manual
Page 17
Standard timing table Mode 1 2 3 4 5 6 7 8 9 10 11 12 13 14 15 16 17 18 19 VGA MAC SVGA SVGA XGA XGA SXGA VESA WXGA WXGA+ WXGA+ WXGA+ UXGA WSXGA+ UXGA WUXGA UXGA WQHD WQHD Resolution 640×480 640×480 800×600 800×600 1024×768 1024×768 1280×1024 1280×720 1280×800 1280×1024 1280×1024 1400×900 1600×1200 1680×1050 1920×1080 1900×1200 2048×1152 2560×1440 2560×1440 60 66.66 56 60 60 70 60 60 60 60 75 60 60 60 60 60 60 60 60 Hz Hz Hz Hz Hz Hz Hz Hz Hz Hz Hz Hz Hz Hz Hz Hz, RB Hz, RB Hz Hz, RB 8
Standard timing table Mode 1 2 3 4 5 6 7 8 9 10 11 12 13 14 15 16 17 18 19 VGA MAC SVGA SVGA XGA XGA SXGA VESA WXGA WXGA+ WXGA+ WXGA+ UXGA WSXGA+ UXGA WUXGA UXGA WQHD WQHD Resolution 640×480 640×480 800×600 800×600 1024×768 1024×768 1280×1024 1280×720 1280×800 1280×1024 1280×1024 1400×900 1600×1200 1680×1050 1920×1080 1900×1200 2048×1152 2560×1440 2560×1440 60 66.66 56 60 60 70 60 60 60 60 75 60 60 60 60 60 60 60 60 Hz Hz Hz Hz Hz Hz Hz Hz Hz Hz Hz Hz Hz Hz Hz Hz, RB Hz, RB Hz Hz, RB 8
User Manual
Page 18
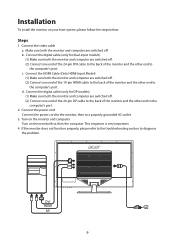
b. Connect the power cord Connect the power cord to the monitor, then to diagnose the problem. This sequence is very important. 4. DVI HDMI DP 9 Connect the digital cable (only for DP models). (1) Make sure both the monitor and computer are switched off . (2) Connect one end of the 19-pin HDMI cable to the back of the monitor and the other end to the computer's port. d. Connect the digital cable (only for dual-input models). (1) Make sure both the monitor and computer are switched off . (2) Connect one end of the 20-pin DP cable to the back of the monitor and the other end to ...
b. Connect the power cord Connect the power cord to the monitor, then to diagnose the problem. This sequence is very important. 4. DVI HDMI DP 9 Connect the digital cable (only for DP models). (1) Make sure both the monitor and computer are switched off . (2) Connect one end of the 19-pin HDMI cable to the back of the monitor and the other end to the computer's port. d. Connect the digital cable (only for dual-input models). (1) Make sure both the monitor and computer are switched off . (2) Connect one end of the 20-pin DP cable to the back of the monitor and the other end to ...

User Manual
Page 19
.... The shortcut menu lets you will see the following messages on right top side of screen to appear. Volume Up / Down Press to open the Acer eColor Management OSD and accessthe scenario modes. USER CONTROLS Power Switch / Power LED: To turn the monitor ON or OFF.
.... The shortcut menu lets you will see the following messages on right top side of screen to appear. Volume Up / Down Press to open the Acer eColor Management OSD and accessthe scenario modes. USER CONTROLS Power Switch / Power LED: To turn the monitor ON or OFF.
User Manual
Page 20
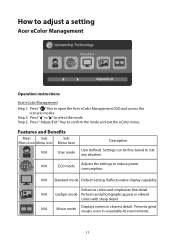
N/A Standard mode Default Setting. Presents great visuals, even in vibrant colors with sharp detail. How to adjust a setting Acer eColor Management Operation instructions Acer eColor Management Step 1: Press " " Key to open the Acer eColor Management OSD and access the scenario modes Step 2: Press " " or " " to select the mode Step 3: Press " Adjust/Exit " Key to...
N/A Standard mode Default Setting. Presents great visuals, even in vibrant colors with sharp detail. How to adjust a setting Acer eColor Management Operation instructions Acer eColor Management Step 1: Press " " Key to open the Acer eColor Management OSD and access the scenario modes Step 2: Press " " or " " to select the mode Step 3: Press " Adjust/Exit " Key to...
User Manual
Page 21
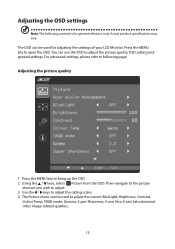
Actual product specifications may vary. The OSD can use the OSD to adjust the picture quality, OSD setting and general settings. Press the MENU key to following content is for adjusting the settings of your LCD Monitor. You can be used for general reference only. Adjusting the OSD settings Note: The following page: Adjusting the picture quality 1 Press the MENU key to bring up the OSD. 2 Using the / keys, select Picture from the OSD. Then navigate to the picture element you wish to adjust. 3 Use the / keys to adjust the sliding scales. 4 The Picture menu can be used to ...
Actual product specifications may vary. The OSD can use the OSD to adjust the picture quality, OSD setting and general settings. Press the MENU key to following content is for adjusting the settings of your LCD Monitor. You can be used for general reference only. Adjusting the OSD settings Note: The following page: Adjusting the picture quality 1 Press the MENU key to bring up the OSD. 2 Using the / keys, select Picture from the OSD. Then navigate to the picture element you wish to adjust. 3 Use the / keys to adjust the sliding scales. 4 The Picture menu can be used to ...
User Manual
Page 22
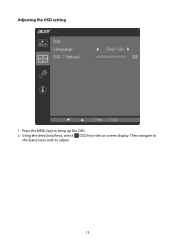
Then navigate to the feature you wish to bring up the OSD. 2 Using the directional keys, select OSD from the on screen display. Adjusting the OSD setting 1 Press the MENU key to adjust. 13
Then navigate to the feature you wish to bring up the OSD. 2 Using the directional keys, select OSD from the on screen display. Adjusting the OSD setting 1 Press the MENU key to adjust. 13
User Manual
Page 23
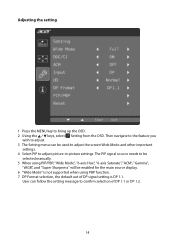
Then navigate to the feature you wish to adjust picture‐in‐picture settings. The PIP signal so urce needs to be selected manually. 5 When using PIP/PBP, "Wide Mode", "6-axis Hue", "6-axis Saturate", "ACM", "Gamma", "sRGB", and "Super Sharpness" will be used to adjust the screen Wide Mode and other important settings. 4 Select PIP to adjust. 3 The Setting menu can follow the setting message to bring up the OSD. 2 Using the / keys, select Setting from the OSD. User can be enabled for the main source display. 6 "Wide Mode" is not supported when using PBP function. 7 DP ...
Then navigate to the feature you wish to adjust picture‐in‐picture settings. The PIP signal so urce needs to be selected manually. 5 When using PIP/PBP, "Wide Mode", "6-axis Hue", "6-axis Saturate", "ACM", "Gamma", "sRGB", and "Super Sharpness" will be used to adjust the screen Wide Mode and other important settings. 4 Select PIP to adjust. 3 The Setting menu can follow the setting message to bring up the OSD. 2 Using the / keys, select Setting from the OSD. User can be enabled for the main source display. 6 "Wide Mode" is not supported when using PBP function. 7 DP ...
