Aspire X3810 - X5810 Service Guide
Page 7
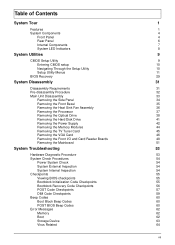
... System Utilities 9 CMOS Setup Utility 9 Entering CMOS setup 10 Navigating Through the Setup Utility 10 Setup Utility Menus 11 BIOS Recovery 29 System Disassembly 31 Disassembly Requirements 31 Pre-disassembly Procedure 32 Main Unit Disassembly 33 Removing the Side Panel 34 Removing the... External Inspection 54 System Internal Inspection 54 Checkpoints 55 Viewing BIOS checkpoints 55 Bootblock Initialization Code Checkpoints 55 Bootblock Recovery Code Checkpoints 56 POST Code Checkpoints 57 DIM Code Checkpoints 59 Beep Codes 60 Boot Block Beep Codes 60 ...
... System Utilities 9 CMOS Setup Utility 9 Entering CMOS setup 10 Navigating Through the Setup Utility 10 Setup Utility Menus 11 BIOS Recovery 29 System Disassembly 31 Disassembly Requirements 31 Pre-disassembly Procedure 32 Main Unit Disassembly 33 Removing the Side Panel 34 Removing the... External Inspection 54 System Internal Inspection 54 Checkpoints 55 Viewing BIOS checkpoints 55 Bootblock Initialization Code Checkpoints 55 Bootblock Recovery Code Checkpoints 56 POST Code Checkpoints 57 DIM Code Checkpoints 59 Beep Codes 60 Boot Block Beep Codes 60 ...
Aspire X3810 - X5810 Service Guide
Page 37
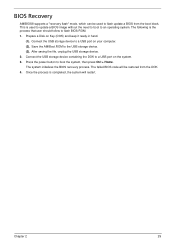
... the USB storage device containing the DOK to a USB port on Key (DOK) and keep it ready in hand. (1). The system initializes the BIOS recovery process. The following is the process that user should follow to boot the system, then press Ctrl + Home. After saving the file, unplug the USB...completed, the system will be used to update a BIOS image without the need to boot to flash update a BIOS from the DOK. 4. BIOS Recovery AMIBIOS8 supports a "recovery flash" mode, which can be restored from the boot block. Save the AMIBoot.ROM to the USB storage device. (3). The failed BIOS code ...
... the USB storage device containing the DOK to a USB port on Key (DOK) and keep it ready in hand. (1). The system initializes the BIOS recovery process. The following is the process that user should follow to boot the system, then press Ctrl + Home. After saving the file, unplug the USB...completed, the system will be used to update a BIOS image without the need to boot to flash update a BIOS from the DOK. 4. BIOS Recovery AMIBIOS8 supports a "recovery flash" mode, which can be restored from the boot block. Save the AMIBoot.ROM to the USB storage device. (3). The failed BIOS code ...

Aspire X3810 - X5810 Service Guide
Page 63
... to BIOS POST (ExecutePOSTKernel). Save power-on the bottom right corner of the BIOS. Do additional chipset initialization. If BIOS recovery is currently executing. Give control to flat mode with 4GB limit and GA20 enabled. Viewing BIOS checkpoints Viewing all RAM below 1MB...memory sizing in scratch CMOS. Re-enable CACHE. Test base 512KB memory. Main BIOS checksum is stored in PMM. See Bootblock Recovery Code Checkpoints section for more information. CPUID information is tested. Store the Uncompressed pointer for more information. Copying Main BIOS into ...
... to BIOS POST (ExecutePOSTKernel). Save power-on the bottom right corner of the BIOS. Do additional chipset initialization. If BIOS recovery is currently executing. Give control to flat mode with 4GB limit and GA20 enabled. Viewing BIOS checkpoints Viewing all RAM below 1MB...memory sizing in scratch CMOS. Re-enable CACHE. Test base 512KB memory. Main BIOS checksum is stored in PMM. See Bootblock Recovery Code Checkpoints section for more information. CPUID information is tested. Store the Uncompressed pointer for more information. Copying Main BIOS into ...

Aspire X3810 - X5810 Service Guide
Page 64
...at F000:FFF0h. 56 Chapter 4 Program the flash part. The flash has been updated successfully. Disable ATAPI hardware. Recovery file not found flash part size. Disable L1 cache. The recovery file size does not equal the found . Give control to the current configuration of checkpoints that the found flash ... size. Checkpoints may change due to find the clusters occupied by cluster. L1 cache is initialized. Start reading the recovery file cluster by the recovery file. Erase the flash part. Checkpoint E0 E9 EA EB EF E9 or EA F0 F1 F2 F3 F5 FA FB F4 ...
...at F000:FFF0h. 56 Chapter 4 Program the flash part. The flash has been updated successfully. Disable ATAPI hardware. Recovery file not found flash part size. Disable L1 cache. The recovery file size does not equal the found . Give control to the current configuration of checkpoints that the found flash ... size. Checkpoints may change due to find the clusters occupied by cluster. L1 cache is initialized. Start reading the recovery file cluster by the recovery file. Erase the flash part. Checkpoint E0 E9 EA EB EF E9 or EA F0 F1 F2 F3 F5 FA FB F4 ...
Aspire X3810 - X5810 Service Guide
Page 68
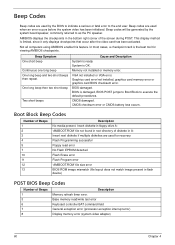
... jumps to Boot Block to as the PC speaker. VGA not installed or VGA error. In most cases, a checkpoint card is the best tool for recovery Flash Programming successful Floppy read /write test error Keyboard controller BAT command field General exception error (processor exception interrupt error) Display memory error (system video...
... jumps to Boot Block to as the PC speaker. VGA not installed or VGA error. In most cases, a checkpoint card is the best tool for recovery Flash Programming successful Floppy read /write test error Keyboard controller BAT command field General exception error (processor exception interrupt error) Display memory error (system video...

