
Acer Aspire V5-531 Notebook Service Guide
Page 164
...at a time. 1. Start the computer. Perform the "Reinstalling the HDD Module" and "Reinstalling the ODD Module" procedures described on the screen). different colored spots in the same location, the LCD panel is discovered. 10. If the display is not normal, right-click on...necessary. 4. Abnormal Video 0 If the video appears abnormal, perform the following one until the failure point is faulty and should be replaced. 3. Hold the power button for instructions on the desktop and select Personalize Display Settings. Click and drag the Resolution ...
...at a time. 1. Start the computer. Perform the "Reinstalling the HDD Module" and "Reinstalling the ODD Module" procedures described on the screen). different colored spots in the same location, the LCD panel is discovered. 10. If the display is not normal, right-click on...necessary. 4. Abnormal Video 0 If the video appears abnormal, perform the following one until the failure point is faulty and should be replaced. 3. Hold the power button for instructions on the desktop and select Personalize Display Settings. Click and drag the Resolution ...
Acer Aspire V5-531 Notebook Service Guide
Page 165
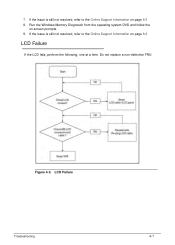
7. If the issue is still not resolved, refer to the Online Support Information on -screen prompts. 9. LCD Failure Troubleshooting 4-7 If the issue is still not resolved, refer to the Online Support Information on page 8-3 LCD Failure 0 If the LCD fails, perform the following, one at a time. Do not replace a non-defective FRU: Figure 4-3. Run the Windows Memory Diagnostic from the operating system DVD and follow the on page 8-3 8.
7. If the issue is still not resolved, refer to the Online Support Information on -screen prompts. 9. LCD Failure Troubleshooting 4-7 If the issue is still not resolved, refer to the Online Support Information on page 8-3 LCD Failure 0 If the LCD fails, perform the following, one at a time. Do not replace a non-defective FRU: Figure 4-3. Run the Windows Memory Diagnostic from the operating system DVD and follow the on page 8-3 8.


