
User Manual
Page 3
Turning the product off before cleaning. Do not use when no cards are in the card slots. When you need to disconnect power to the equipment, be sure to block out noisy surroundings. • Decrease the volume if you can hear clearly and comfortably. • Do not increase the volume level after your hearing, follow these instructions carefully. CAUTION for Listening To...
Turning the product off before cleaning. Do not use when no cards are in the card slots. When you need to disconnect power to the equipment, be sure to block out noisy surroundings. • Decrease the volume if you can hear clearly and comfortably. • Do not increase the volume level after your hearing, follow these instructions carefully. CAUTION for Listening To...
User Manual
Page 5
... damaged • the product exhibits a distinct change in electric shock and/or injury. Guidelines for use it to qualified service personnel. v Warning! The power cord included with the performance of this product yourself, as opening or removing covers may result in damage and will often require extensive work by the operating instructions, since improper adjustment of voltages; 100 to 120 or...
... damaged • the product exhibits a distinct change in electric shock and/or injury. Guidelines for use it to qualified service personnel. v Warning! The power cord included with the performance of this product yourself, as opening or removing covers may result in damage and will often require extensive work by the operating instructions, since improper adjustment of voltages; 100 to 120 or...
User Manual
Page 6
... battery pack The notebook uses lithium batteries. Replace the battery with your The battery can occur when a metallic object such as household waste. Use the battery only for this device, please contact your product. Keep them in hot or cold places, such as they may explode. When the operation time becomes noticeably shorter than normal, buy a new battery. Please recycle when possible. Batteries may not work...
... battery pack The notebook uses lithium batteries. Replace the battery with your The battery can occur when a metallic object such as household waste. Use the battery only for this device, please contact your product. Keep them in hot or cold places, such as they may explode. When the operation time becomes noticeably shorter than normal, buy a new battery. Please recycle when possible. Batteries may not work...
User Manual
Page 13
... meeting your computer on and off , the Just for Starters...poster helps you get started with language such as the AcerSystem User Guide mentioned below the LCD screen beside the easy-launch buttons. This guide contains detailed information on such subjects as Acer eRecovery Management, using your computer Turning your mobile computing needs. It covers basic topics such as system utilities, data recovery, expansion options and troubleshooting.
... meeting your computer on and off , the Just for Starters...poster helps you get started with language such as the AcerSystem User Guide mentioned below the LCD screen beside the easy-launch buttons. This guide contains detailed information on such subjects as Acer eRecovery Management, using your computer Turning your mobile computing needs. It covers basic topics such as system utilities, data recovery, expansion options and troubleshooting.
User Manual
Page 17
...care of your battery pack xv Cleaning and servicing xv Touchpad 1 Touchpad basics (with fingerprint reader) 1 Touchpad basics (with two-click buttons) 2 Using the keyboard 3 Lock keys and embedded numeric keypad* 3 Windows keys 4 Audio 5 Acer PureZone (only for certain models) 5 Tuba (only for certain models) 5 Using Dolby Home Theater for certain models) 7 Acer GridVista (dual-display compatible) 8 Acer Backup Manager 9 Power management 10 Acer eRecovery Management 11 Burn backup discs 12 Restore 13 Restore Windows from backup discs 14 Acer Arcade Deluxe...
...care of your battery pack xv Cleaning and servicing xv Touchpad 1 Touchpad basics (with fingerprint reader) 1 Touchpad basics (with two-click buttons) 2 Using the keyboard 3 Lock keys and embedded numeric keypad* 3 Windows keys 4 Audio 5 Acer PureZone (only for certain models) 5 Tuba (only for certain models) 5 Using Dolby Home Theater for certain models) 7 Acer GridVista (dual-display compatible) 8 Acer Backup Manager 9 Power management 10 Acer eRecovery Management 11 Burn backup discs 12 Restore 13 Restore Windows from backup discs 14 Acer Arcade Deluxe...
User Manual
Page 19
... network feature 34 Consumer Infrared (CIR) (only for certain models) 34 Universal Serial Bus (USB) 35 IEEE 1394 port (only for certain models) 35 High-Definition Multimedia Interface (only for certain models) 36 ExpressCard (only for certain models) 36 Installing memory 37 Enjoying TV with an external antenna or cable socket 40 BIOS utility 41 Boot sequence 41 Enable disk-to RF fields (RSS-102) 54 LCD panel ergonomic specifications...
... network feature 34 Consumer Infrared (CIR) (only for certain models) 34 Universal Serial Bus (USB) 35 IEEE 1394 port (only for certain models) 35 High-Definition Multimedia Interface (only for certain models) 36 ExpressCard (only for certain models) 36 Installing memory 37 Enjoying TV with an external antenna or cable socket 40 BIOS utility 41 Boot sequence 41 Enable disk-to RF fields (RSS-102) 54 LCD panel ergonomic specifications...
User Manual
Page 21
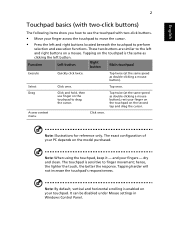
... be disabled under Mouse settings in Windows Control Panel. hence, the lighter the touch, the better the response. These two buttons are similar to the left and right buttons located beneath the touchpad to perform selection and execution functions. Function Left button Right button Main touchpad Execute Select Drag Access context menu Quickly click twice. dry and clean. Tapping harder will not increase the touchpad's responsiveness. Tapping on the touchpad is enabled...
... be disabled under Mouse settings in Windows Control Panel. hence, the lighter the touch, the better the response. These two buttons are similar to the left and right buttons located beneath the touchpad to perform selection and execution functions. Function Left button Right button Main touchpad Execute Select Drag Access context menu Quickly click twice. dry and clean. Tapping harder will not increase the touchpad's responsiveness. Tapping on the touchpad is enabled...
User Manual
Page 22
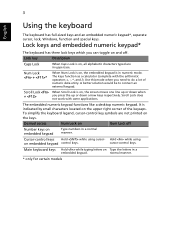
... screen moves one line up or down arrow keys respectively. Num Lock + * When Num Lock is in uppercase. Scroll Lock When Scroll Lock is on, all alphabetic characters typed are not printed on and off Number keys on Type the letters in a normal manner. Hold while using cursor- To simplify the keyboard legend, cursor-control key symbols are in numeric mode. normal manner. * only for certain models The keys function...
... screen moves one line up or down arrow keys respectively. Num Lock + * When Num Lock is in uppercase. Scroll Lock When Scroll Lock is on, all alphabetic characters typed are not printed on and off Number keys on Type the letters in a normal manner. Hold while using cursor- To simplify the keyboard legend, cursor-control key symbols are in numeric mode. normal manner. * only for certain models The keys function...
User Manual
Page 23
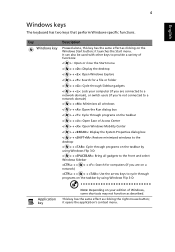
... on the taskbar by using Windows Flip 3-D Application key Note: Depending on the Windows Start button; it launches the Start menu. English 4 Windows keys The keyboard has two keys that perform Windows-specific functions. Key Windows key Description Pressed alone, this key has the same effect as clicking on your computer (if you are connected to a network domain), or switch users (if you're not connected to a network domain) < > + : Minimizes all windows < > + : Open the Run dialog box...
... on the taskbar by using Windows Flip 3-D Application key Note: Depending on the Windows Start button; it launches the Start menu. English 4 Windows keys The keyboard has two keys that perform Windows-specific functions. Key Windows key Description Pressed alone, this key has the same effect as clicking on your computer (if you are connected to a network domain), or switch users (if you're not connected to a network domain) < > + : Minimizes all windows < > + : Open the Run dialog box...
User Manual
Page 28
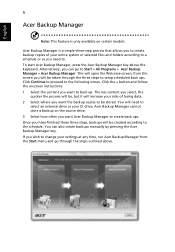
... start Acer Backup Manager, press the Acer Backup Manager key above . Click the + button and follow the onscreen instructions: 1 Select the content you want Acer Backup Manager to create back ups. Acer Backup Manager cannot store a backup on certain models. Once you have finished these three steps, backups will open the Welcome screen; You can go through the three steps to setup scheduled back ups. If you wish to change your risks of your D: drive...
... start Acer Backup Manager, press the Acer Backup Manager key above . Click the + button and follow the onscreen instructions: 1 Select the content you want Acer Backup Manager to create back ups. Acer Backup Manager cannot store a backup on certain models. Once you have finished these three steps, backups will open the Welcome screen; You can go through the three steps to setup scheduled back ups. If you wish to change your risks of your D: drive...
User Manual
Page 29
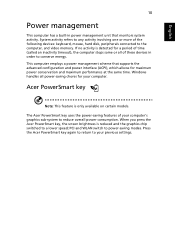
... chip switched to power-saving modes. This computer employs a power management scheme that monitors system activity. PCI and WLAN switch to a lower speed; The Acer PowerSmart key uses the power-saving features of your previous settings. When you press the Acer PowerSmart key, the screen brightness is only available on certain models. Press the Acer PowerSmart key again to return to your computer's graphics sub-system to the computer, and video memory. Windows...
... chip switched to power-saving modes. This computer employs a power management scheme that monitors system activity. PCI and WLAN switch to a lower speed; The Acer PowerSmart key uses the power-saving features of your previous settings. When you press the Acer PowerSmart key, the screen brightness is only available on certain models. Press the Acer PowerSmart key again to return to your computer's graphics sub-system to the computer, and video memory. Windows...
User Manual
Page 33
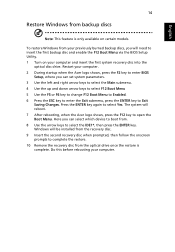
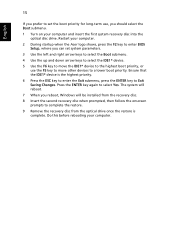
... need to insert the first backup disc and enable the F12 Boot Menu via the BIOS Setup Utility. 1 Turn on certain models. Windows will reboot. 7 After rebooting, when the Acer logo shows, press the F12 key to open the Boot Menu. Press the ENTER key again to boot from the optical drive once the restore is only available on your computer and insert the first system recovery disc into the optical disc drive. Here you can set system parameters. 3 Use...
... need to insert the first backup disc and enable the F12 Boot Menu via the BIOS Setup Utility. 1 Turn on certain models. Windows will reboot. 7 After rebooting, when the Acer logo shows, press the F12 key to open the Boot Menu. Press the ENTER key again to boot from the optical drive once the restore is only available on your computer and insert the first system recovery disc into the optical disc drive. Here you can set system parameters. 3 Use...
User Manual
Page 34
... F2 key to enter BIOS Setup, where you can set the boot priority for long-term use the F5 key to move the IDE1* device to the highest boot priority, or use , you should select the Boot submenu. 1 Turn on your computer and insert the first system recovery disc into the optical disc drive. The system will reboot. 7 When you reboot, Windows will be installed from the optical drive once the restore is...
... F2 key to enter BIOS Setup, where you can set the boot priority for long-term use the F5 key to move the IDE1* device to the highest boot priority, or use , you should select the Boot submenu. 1 Turn on your computer and insert the first system recovery disc into the optical disc drive. The system will reboot. 7 When you reboot, Windows will be installed from the optical drive once the restore is...
User Manual
Page 35
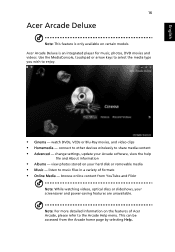
... videos. connect to other devices wirelessly to enjoy. • Cinema - Note: For more detailed information on the features of formats • Online Media - Use the MediaConsole, touchpad or arrow keys to select the media type you wish to share media content • Advanced - view photos stored on certain models. This can be accessed from YouTube and Flickr Note: While watching videos, optical discs or slideshows, your hard disk...
... videos. connect to other devices wirelessly to enjoy. • Cinema - Note: For more detailed information on the features of formats • Online Media - Use the MediaConsole, touchpad or arrow keys to select the media type you wish to share media content • Advanced - view photos stored on certain models. This can be accessed from YouTube and Flickr Note: While watching videos, optical discs or slideshows, your hard disk...
User Manual
Page 46
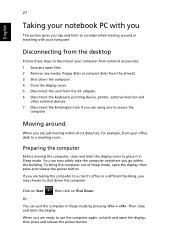
...open the display; Disconnecting from the desktop Follow these steps to disconnect your computer from external accessories: 1 Save any media, floppy disks or compact disks from the drive(s). 3 Shut down the computer: Click on Start then click on Shut Down. You can put the computer in Sleep mode. Or: You can now safely... display. then press and release the power button. To bring the computer out of Sleep mode, open files. 2 Remove any open the display; Then close and latch the display cover to place it in Sleep mode by pressing + . 27 English Taking your notebook ...
...open the display; Disconnecting from the desktop Follow these steps to disconnect your computer from external accessories: 1 Save any media, floppy disks or compact disks from the drive(s). 3 Shut down the computer: Click on Start then click on Shut Down. You can put the computer in Sleep mode. Or: You can now safely... display. then press and release the power button. To bring the computer out of Sleep mode, open files. 2 Remove any open the display; Then close and latch the display cover to place it in Sleep mode by pressing + . 27 English Taking your notebook ...
User Manual
Page 50
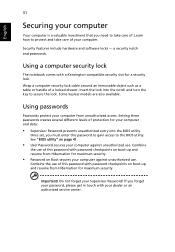
... notch and turn the key to the BIOS utility. Combine the use of protection for maximum security. Using a computer security lock The notebook comes with password checkpoints on Boot secures your dealer or an authorized service center. Setting these passwords creates several different levels of this password with a Kensington-compatible security slot for maximum security. • Password on boot-up and resume from unauthorized access. See "BIOS utility" on boot-up and...
... notch and turn the key to the BIOS utility. Combine the use of protection for maximum security. Using a computer security lock The notebook comes with password checkpoints on Boot secures your dealer or an authorized service center. Setting these passwords creates several different levels of this password with a Kensington-compatible security slot for maximum security. • Password on boot-up and resume from unauthorized access. See "BIOS utility" on boot-up and...
User Manual
Page 51
..., a warning message appears. English 32 Entering passwords When a password is set, a password prompt appears in the center of the display screen. • When the Supervisor Password is enabled, a prompt appears at boot-up . • Type the User Password and press to use the computer. If you enter the password incorrectly, a warning message appears. Try again and press . Press and hold the power button for four seconds to shut...
..., a warning message appears. English 32 Entering passwords When a password is set, a password prompt appears in the center of the display screen. • When the Supervisor Password is enabled, a prompt appears at boot-up . • Type the User Password and press to use the computer. If you enter the password incorrectly, a warning message appears. Try again and press . Press and hold the power button for four seconds to shut...
User Manual
Page 52
... modem port, connect a phone cable from the modem port to the computer, read the following section. To use is not compatible with a desktop PC. Plugging this modem into a digital phone line will damage the modem. Warning! Please make sure that the cable you are working. For instructions on how to connect different external devices to a telephone jack. English 33 Expanding through options Your notebook PC...
... modem port, connect a phone cable from the modem port to the computer, read the following section. To use is not compatible with a desktop PC. Plugging this modem into a digital phone line will damage the modem. Warning! Please make sure that the cable you are working. For instructions on how to connect different external devices to a telephone jack. English 33 Expanding through options Your notebook PC...
User Manual
Page 60
... the notebook PC logo is a hardware configuration program built into your computer's BIOS. Enable disk-to-disk recovery To enable disk-to-disk recovery (hard disk recovery), activate the BIOS utility, then select Main from the categories listed at the top of the screen. Boot sequence To set the boot sequence in the BIOS utility, activate the BIOS utility, then select Boot from the categories listed at the bottom of the screen. However, if you encounter configuration problems, you do not need to run...
... the notebook PC logo is a hardware configuration program built into your computer's BIOS. Enable disk-to-disk recovery To enable disk-to-disk recovery (hard disk recovery), activate the BIOS utility, then select Main from the categories listed at the top of the screen. Boot sequence To set the boot sequence in the BIOS utility, activate the BIOS utility, then select Boot from the categories listed at the bottom of the screen. However, if you encounter configuration problems, you do not need to run...
User Manual
Page 62
... the use the volume control buttons to the power outlet. • If it is in the external USB floppy drive? Remove or replace it is a list of your computer. If pressing a key does not turn the display back on. I turned on the screen. Nothing appears on the power, but the computer does not start or boot up. Press + < > (increase) to the computer. No audio is being supplied to adjust the brightness level...
... the use the volume control buttons to the power outlet. • If it is in the external USB floppy drive? Remove or replace it is a list of your computer. If pressing a key does not turn the display back on. I turned on the screen. Nothing appears on the power, but the computer does not start or boot up. Press + < > (increase) to the computer. No audio is being supplied to adjust the brightness level...


