Aspire T136 Service Guide
Page 6
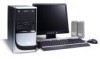
Chapter1 System Specifications 1 Features 2 Mainboard Placement 5 Block Diagram 7 Aspire T136 Front Panel 8 Aspire T136 Rear Panel 9 AcerPower M36 Front Panel 10 AcerPower M36 Rear Panel 11 System Peripherals 12 Acer eRecovery 14 Acer disc-to-disc recovery 16 Hardware Specifications and Configurations 17 Power Management Function (ACPI support function) . . . . 22 Chapter2 System Utilities 23 Entering Setup 24 Product...
Chapter1 System Specifications 1 Features 2 Mainboard Placement 5 Block Diagram 7 Aspire T136 Front Panel 8 Aspire T136 Rear Panel 9 AcerPower M36 Front Panel 10 AcerPower M36 Rear Panel 11 System Peripherals 12 Acer eRecovery 14 Acer disc-to-disc recovery 16 Hardware Specifications and Configurations 17 Power Management Function (ACPI support function) . . . . 22 Chapter2 System Utilities 23 Entering Setup 24 Product...

Aspire T136 Service Guide
Page 20
... the process. Boot to complete the restore process. Press + to open the Acer eRecovery utility. 3. In the Acer eRecovery window, select Recovery settings and click Next 5. Select the backup method. Press + to open the Acer eRecovery utility. 3. In the Acer eRecovery window, select Recovery settings and click Next. 5. Factory default image and click Next. 14 Chapter...
... the process. Boot to complete the restore process. Press + to open the Acer eRecovery utility. 3. In the Acer eRecovery window, select Recovery settings and click Next 5. Select the backup method. Press + to open the Acer eRecovery utility. 3. In the Acer eRecovery window, select Recovery settings and click Next. 5. Factory default image and click Next. 14 Chapter...
Aspire T136 Service Guide
Page 21
... bring up the software content window. Follow the instructions on screen to open the Acer eRecovery utility. 3. In the Acer eRecovery window, select Recovery actions and click Next. 5. In the Recovery settings window, select Reinstall applications/drivers and click Next. 6. Select the desired driver... and follow the instructions on screen to proceed. Enter the password to re-install. Change Password Acer eRecovery and Acer disc-to Windows XP. 2. 7. Boot to -disc recovery are protected by a password that can be changed by the user. Enter the password to Windows...
... bring up the software content window. Follow the instructions on screen to open the Acer eRecovery utility. 3. In the Acer eRecovery window, select Recovery actions and click Next. 5. In the Recovery settings window, select Reinstall applications/drivers and click Next. 6. Select the desired driver... and follow the instructions on screen to proceed. Enter the password to re-install. Change Password Acer eRecovery and Acer disc-to Windows XP. 2. 7. Boot to -disc recovery are protected by a password that can be changed by the user. Enter the password to Windows...

Aspire T136 Service Guide
Page 22
...selection menu will pop-up all data will be reformatted and all data files before you use this option. 1. Acer disc-to-disc recovery Restore without a Recovery CD This recovery process helps you restore the C: drive with the original software content that is showing, press + at the same... time to enter the recovery process. 3. Enter six zeros and continue. 5. Restart the system. 2. While the Acer logo is installed when you purchase your notebook. The message "The system has password protection. The ...
...selection menu will pop-up all data will be reformatted and all data files before you use this option. 1. Acer disc-to-disc recovery Restore without a Recovery CD This recovery process helps you restore the C: drive with the original software content that is showing, press + at the same... time to enter the recovery process. 3. Enter six zeros and continue. 5. Restart the system. 2. While the Acer logo is installed when you purchase your notebook. The message "The system has password protection. The ...
Aspire T136 Service Guide
Page 28
...hard disk drive devices (0-15 minutes, time step=1 minute). Global Standby Mode T Global power management timer (2-120 minutes, time step=10 minute). T Resume recovery time: 7-10 sec. T LED on the panel turns amber colour. T Ultra I/O and VGA chip go into the Stop Grant State. T S0, ... mouse for ACPI mode. T On board device power management support. T Hard disk drive goes into SLEEP mode (for ATA standard interface). T Resume recovery time: 3-5 sec. Suspend Mode T Independent power management timer (2-120 minutes, time step=10 minutes) or pushing external switch button. T Hard disk ...
...hard disk drive devices (0-15 minutes, time step=1 minute). Global Standby Mode T Global power management timer (2-120 minutes, time step=10 minute). T Resume recovery time: 7-10 sec. T LED on the panel turns amber colour. T Ultra I/O and VGA chip go into the Stop Grant State. T S0, ... mouse for ACPI mode. T On board device power management support. T Hard disk drive goes into SLEEP mode (for ATA standard interface). T Resume recovery time: 3-5 sec. Suspend Mode T Independent power management timer (2-120 minutes, time step=10 minutes) or pushing external switch button. T Hard disk ...

