Aspire L Series User's Guide EN
Page 2
...or by any means, electronically, mechanically, by photocopy, recording, or otherwise, without obligation to notify any implied warranties of Acer Incorporated. Acer Incorporated makes no representations or warranties, either express or implied, with respect to the information in the space provided below. No...The serial number and model number are used herein for a particular purpose. All correspondence concerning your computer. All Rights Reserved. Acer Incorporated. For your convenience, we suggest that you enter the model number, serial number, purchase date, and place of this ...
...or by any means, electronically, mechanically, by photocopy, recording, or otherwise, without obligation to notify any implied warranties of Acer Incorporated. Acer Incorporated makes no representations or warranties, either express or implied, with respect to the information in the space provided below. No...The serial number and model number are used herein for a particular purpose. All correspondence concerning your computer. All Rights Reserved. Acer Incorporated. For your convenience, we suggest that you enter the model number, serial number, purchase date, and place of this ...
Aspire L Series User's Guide EN
Page 3
Do not use this product near or over a radiator or heat register, or in a built-in too many devices. The openings should be blocked or covered. Turning the product off before cleaning. These openings must not exceed 80% of the equipment plugged into the wall outlet does not exceed the fuse rating. • Do not overload a power outlet, strip or receptacle by placing the product on the marking label. Never spill liquid of any kind into this product, make sure that the total ampere rating of the branch Do not locate this product where people will walk on the product...
Do not use this product near or over a radiator or heat register, or in a built-in too many devices. The openings should be blocked or covered. Turning the product off before cleaning. These openings must not exceed 80% of the equipment plugged into the wall outlet does not exceed the fuse rating. • Do not overload a power outlet, strip or receptacle by placing the product on the marking label. Never spill liquid of any kind into this product, make sure that the total ampere rating of the branch Do not locate this product where people will walk on the product...
Aspire L Series User's Guide EN
Page 4
If power strips are covered by the operating instructions, since improper adjustment of other controls may expose you need for details. Note: The grounding pin also provides good protection from the wall outlet and refer servicing to qualified service personnel when: • the power cord or plug is damaged, cut or frayed • liquid was spilled into a non-grounded power outlet. If you to service this product yourself, as opening or removing covers may result in electric shock and/or injury. Product servicing Do not attempt to dangerous voltage points or other nearby ...
If power strips are covered by the operating instructions, since improper adjustment of other controls may expose you need for details. Note: The grounding pin also provides good protection from the wall outlet and refer servicing to qualified service personnel when: • the power cord or plug is damaged, cut or frayed • liquid was spilled into a non-grounded power outlet. If you to service this product yourself, as opening or removing covers may result in electric shock and/or injury. Product servicing Do not attempt to dangerous voltage points or other nearby ...

Aspire L Series User's Guide EN
Page 5
For more information on the Waste from Electrical and Electronics Equipment (WEEE) regulations, visit http://global.acer.com/about/sustainability.htm. For lamp-specific disposal information, check www.lamprecycle.org. Tips and information for comfortable use Computer users may complain of eyestrain ...
For more information on the Waste from Electrical and Electronics Equipment (WEEE) regulations, visit http://global.acer.com/about/sustainability.htm. For lamp-specific disposal information, check www.lamprecycle.org. Tips and information for comfortable use Computer users may complain of eyestrain ...
Aspire L Series User's Guide EN
Page 6
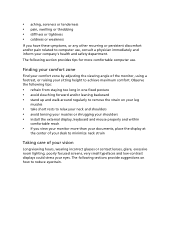
The following sections provide suggestions on your leg muscles • take short rests to relax your neck and shoulders • avoid tensing your muscles or shrugging your shoulders • install the external display, keyboard and mouse properly and within comfortable reach • if you have these symptoms, or any other recurring or persistent discomfort and/or pain related to computer use . The following section provides tips for more than your documents, place the display at the center of your vision Long viewing hours, wearing incorrect glasses or contact lenses, glare, ...
The following sections provide suggestions on your leg muscles • take short rests to relax your neck and shoulders • avoid tensing your muscles or shrugging your shoulders • install the external display, keyboard and mouse properly and within comfortable reach • if you have these symptoms, or any other recurring or persistent discomfort and/or pain related to computer use . The following section provides tips for more than your documents, place the display at the center of your vision Long viewing hours, wearing incorrect glasses or contact lenses, glare, ...
Aspire L Series User's Guide EN
Page 7
Warning! If this is unavoidable, work habits to a comfortable level for only short periods, take breaks regularly, and do not recommend using a display visor, such as a piece of cardboard extended from drying out. We do some stretching exercises. • Breathe fresh air as often as open windows, for extended periods of the display. • Adjust the display brightness and/or contrast to make your computer use more information, please refer to an awkward viewing angle. • Avoid looking at the middle of time. Display • Keep your display clean. • Keep your ...
Warning! If this is unavoidable, work habits to a comfortable level for only short periods, take breaks regularly, and do not recommend using a display visor, such as a piece of cardboard extended from drying out. We do some stretching exercises. • Breathe fresh air as often as open windows, for extended periods of the display. • Adjust the display brightness and/or contrast to make your computer use more information, please refer to an awkward viewing angle. • Avoid looking at the middle of time. Display • Keep your display clean. • Keep your ...
Aspire L Series User's Guide EN
Page 9
Contents Information for your safety and comfort iii Safety instructions iii Disposal instructions v Tips and information for comfortable use v 1 System tour 1 Package contents 3 Front and rear panels 5 Keyboard 6 2 Setting up your computer 7 Arranging a comfortable work area 9 Positioning your PC 9 Connecting peripherals 10 Connecting your mouse and keyboard (for selected models) 10 Connecting a monitor 11 Connecting the power cable 12 Taking care of Conformity for CE marking 30 Low-power license-exempt radio communication devices (RSS-210) 28 Federal ...
Contents Information for your safety and comfort iii Safety instructions iii Disposal instructions v Tips and information for comfortable use v 1 System tour 1 Package contents 3 Front and rear panels 5 Keyboard 6 2 Setting up your computer 7 Arranging a comfortable work area 9 Positioning your PC 9 Connecting peripherals 10 Connecting your mouse and keyboard (for selected models) 10 Connecting a monitor 11 Connecting the power cable 12 Taking care of Conformity for CE marking 30 Low-power license-exempt radio communication devices (RSS-210) 28 Federal ...

Aspire L Series User's Guide EN
Page 12
This chapter discusses the features and components of your computer.
This chapter discusses the features and components of your computer.
Aspire L Series User's Guide EN
Page 13
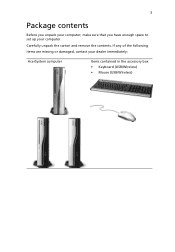
If any of the following items are missing or damaged, contact your computer. 3 Package contents Before you unpack your computer, make sure that you have enough space to set up your dealer immediately: AcerSystem computer Items contained in the accessory box • Keyboard (USB/Wireless) • Mouse (USB/Wireless) Carefully unpack the carton and remove the contents.
If any of the following items are missing or damaged, contact your computer. 3 Package contents Before you unpack your computer, make sure that you have enough space to set up your dealer immediately: AcerSystem computer Items contained in the accessory box • Keyboard (USB/Wireless) • Mouse (USB/Wireless) Carefully unpack the carton and remove the contents.
Aspire L Series User's Guide EN
Page 14
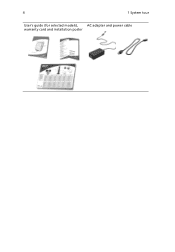
4 1 System tour User's guide (for selected models), AC adapter and power cable warranty card and installation poster
4 1 System tour User's guide (for selected models), AC adapter and power cable warranty card and installation poster
Aspire L Series User's Guide EN
Page 15
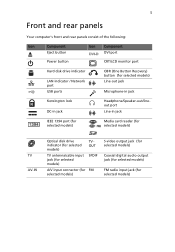
5 Front and rear panels Your computer's front and rear panels consist of the following: Icon Component Eject button Icon Component DVI port Power button CRT/LCD monitor port Hard disk drive indicator LAN indicator / Network port USB ports OBR (One Button Recovery) button (for selected models) Line-out jack Microphone-in jack Kensington lock DC-in jack Headphone/Speaker-out/lineout port Line-in jack IEEE 1394 port (for selected models) Media card reader (for selected models) TV AV-IN Optical disk drive indicator (for selected models) TVOUT TV antenna/cable input jack (for ...
5 Front and rear panels Your computer's front and rear panels consist of the following: Icon Component Eject button Icon Component DVI port Power button CRT/LCD monitor port Hard disk drive indicator LAN indicator / Network port USB ports OBR (One Button Recovery) button (for selected models) Line-out jack Microphone-in jack Kensington lock DC-in jack Headphone/Speaker-out/lineout port Line-in jack IEEE 1394 port (for selected models) Media card reader (for selected models) TV AV-IN Optical disk drive indicator (for selected models) TVOUT TV antenna/cable input jack (for ...

Aspire L Series User's Guide EN
Page 16
For information on how to connect your keyboard, see "Connecting your mouse and keyboard (for selected models)" on page 10. Description 2 Internet/Email/Search keys 4 Volume control/mute keys 6 Num Lock key 8 Application key 10 Caps Lock key 6 1 System tour Keyboard The keyboard has full-sized keys that include separate cursor keys, two Windows keys, four multimedia keys, and 12 function keys. Description 1 Sleep button 3 Multimedia keys 5 e key (Scroll Lock) 7 Cursor keys 9 Windows logo key 11 Function keys No. No.
For information on how to connect your keyboard, see "Connecting your mouse and keyboard (for selected models)" on page 10. Description 2 Internet/Email/Search keys 4 Volume control/mute keys 6 Num Lock key 8 Application key 10 Caps Lock key 6 1 System tour Keyboard The keyboard has full-sized keys that include separate cursor keys, two Windows keys, four multimedia keys, and 12 function keys. Description 1 Sleep button 3 Multimedia keys 5 e key (Scroll Lock) 7 Cursor keys 9 Windows logo key 11 Function keys No. No.
Aspire L Series User's Guide EN
Page 17
2 Setting up your computer
2 Setting up your computer

Aspire L Series User's Guide EN
Page 18
This chapter contains step-by-step instructions on how to set up your computer and connect additional peripherals.
This chapter contains step-by-step instructions on how to set up your computer and connect additional peripherals.
Aspire L Series User's Guide EN
Page 19
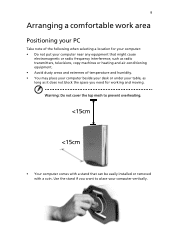
9 Arranging a comfortable work area Positioning your PC Take note of temperature and humidity. • You may place your computer beside your desk or under your computer vertically. Warning: Do not cover the top mesh to place your table, as long as radio transmitters, televisions, copy machines or heating and air-conditioning equipment. • Avoid dusty areas and extremes of the following when selecting a location for working and moving. Use the stand if you want to prevent overheating. • Your computer comes with a stand that might cause electromagnetic or radio ...
9 Arranging a comfortable work area Positioning your PC Take note of temperature and humidity. • You may place your computer beside your desk or under your computer vertically. Warning: Do not cover the top mesh to place your table, as long as radio transmitters, televisions, copy machines or heating and air-conditioning equipment. • Avoid dusty areas and extremes of the following when selecting a location for working and moving. Use the stand if you want to prevent overheating. • Your computer comes with a stand that might cause electromagnetic or radio ...
Aspire L Series User's Guide EN
Page 20
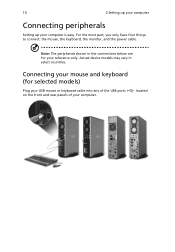
Connecting your mouse and keyboard (for your reference only. Actual device models may vary in the connections below are for selected models) Plug your USB mouse or keyboard cable into any of the USB ports on the front and rear panels of your computer is easy. For the most part, you only have four things to connect: the mouse, the keyboard, the monitor, and the power cable. Note: The peripherals shown in select countries. 10 2 Setting up your computer Connecting peripherals Setting up your computer. located
Connecting your mouse and keyboard (for your reference only. Actual device models may vary in the connections below are for selected models) Plug your USB mouse or keyboard cable into any of the USB ports on the front and rear panels of your computer is easy. For the most part, you only have four things to connect: the mouse, the keyboard, the monitor, and the power cable. Note: The peripherals shown in select countries. 10 2 Setting up your computer Connecting peripherals Setting up your computer. located
Aspire L Series User's Guide EN
Page 21
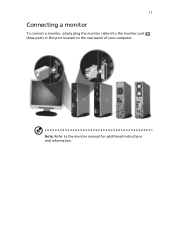
Note: Refer to the monitor manual for additional instructions and information. 11 Connecting a monitor To connect a monitor, simply plug the monitor cable into the monitor port (blue port) or DVI port located on the rear panel of your computer .
Note: Refer to the monitor manual for additional instructions and information. 11 Connecting a monitor To connect a monitor, simply plug the monitor cable into the monitor port (blue port) or DVI port located on the rear panel of your computer .
Aspire L Series User's Guide EN
Page 22
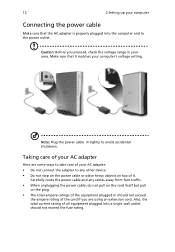
Taking care of your AC adapter Here are using an extension cord. Also, the total current rating of all equipment plugged into the computer and to the power outlet. Note: Plug the power cable in your area. Carefully route the power cable and any other device. • Do not step on the power cable or place heavy objects on the plug. • The total ampere ratings of the equipment plugged in should not exceed the fuse rating. Make sure that the AC adapter is properly plugged into a single wall outlet should not exceed the ampere rating of the cord if you proceed, check the ...
Taking care of your AC adapter Here are using an extension cord. Also, the total current rating of all equipment plugged into the computer and to the power outlet. Note: Plug the power cable in your area. Carefully route the power cable and any other device. • Do not step on the power cable or place heavy objects on the plug. • The total ampere ratings of the equipment plugged in should not exceed the fuse rating. Make sure that the AC adapter is properly plugged into a single wall outlet should not exceed the ampere rating of the cord if you proceed, check the ...
Aspire L Series User's Guide EN
Page 23
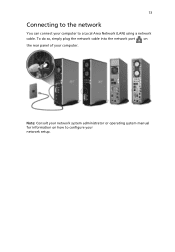
Note: Consult your network system administrator or operating system manual for information on the rear panel of your computer. 13 Connecting to a Local Area Network (LAN) using a network cable. To do so, simply plug the network cable into the network port on how to configure your computer to the network You can connect your network setup.
Note: Consult your network system administrator or operating system manual for information on the rear panel of your computer. 13 Connecting to a Local Area Network (LAN) using a network cable. To do so, simply plug the network cable into the network port on how to configure your computer to the network You can connect your network setup.
Aspire L Series User's Guide EN
Page 24
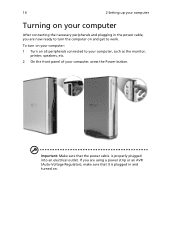
14 2 Setting up your computer Turning on your computer, press the Power button. If you are now ready to turn on your computer: 1 Turn on all peripherals connected to your computer, such as the monitor, printer, speakers, etc. 2 On the front panel of your computer After connecting the necessary peripherals and plugging in the power cable, you are using a power strip or an AVR (Auto-Voltage Regulator), make sure that the power cable is plugged in and turned on and get to work. To turn the computer on . Important: Make sure that it is properly plugged into an electrical outlet....
14 2 Setting up your computer Turning on your computer, press the Power button. If you are now ready to turn on your computer: 1 Turn on all peripherals connected to your computer, such as the monitor, printer, speakers, etc. 2 On the front panel of your computer After connecting the necessary peripherals and plugging in the power cable, you are using a power strip or an AVR (Auto-Voltage Regulator), make sure that the power cable is plugged in and turned on and get to work. To turn the computer on . Important: Make sure that it is properly plugged into an electrical outlet....
