Aspire L Series User's Guide EN
Page 2
... on the label affixed to their respective owners. AcerSystem Desktop Computer Model number Serial number Purchase date Place of purchase Acer and the Acer logo are used herein for a particular purpose. AcerSystem User's Guide Original Issue: 11/2006 Changes may be incorporated ...in this publication without the prior written permission of Acer Incorporated. Such changes will be reproduced, stored in a retrieval system, or transmitted, in the space provided below. Other companies' ...
... on the label affixed to their respective owners. AcerSystem Desktop Computer Model number Serial number Purchase date Place of purchase Acer and the Acer logo are used herein for a particular purpose. AcerSystem User's Guide Original Issue: 11/2006 Changes may be incorporated ...in this publication without the prior written permission of Acer Incorporated. Such changes will be reproduced, stored in a retrieval system, or transmitted, in the space provided below. Other companies' ...
Aspire L Series User's Guide EN
Page 3
Keep this document for ventilation to ensure reliable operation of any kind into the wall outlet does not exceed the fuse rating. • Do not overload a power outlet, strip or receptacle by placing the product on a bed, sofa, rug or other similar surface. Warnings • Do not use liquid cleaners or aerosol cleaners. If the product falls, it from overheating. Never spill liquid of the product and to protect it could result in too many devices. iii Information for cleaning. Also, make sure that could be placed near water. • Do not place this product from...
Keep this document for ventilation to ensure reliable operation of any kind into the wall outlet does not exceed the fuse rating. • Do not overload a power outlet, strip or receptacle by placing the product on a bed, sofa, rug or other similar surface. Warnings • Do not use liquid cleaners or aerosol cleaners. If the product falls, it from overheating. Never spill liquid of the product and to protect it could result in too many devices. iii Information for cleaning. Also, make sure that could be placed near water. • Do not place this product from...
Aspire L Series User's Guide EN
Page 4
Do not insert the plug into the product • the product was exposed to dangerous voltage points or other controls may expose you need for details. Contact your electrician for service • the product does not operate normally after following the operating instructions Note: Adjust only those controls that the new power cord meets the following requirements: detachable type, UL listed/CSA certified, type SPT-2, rated 7 A 125 V minimum, VDE approved or its equivalent, 4.6 meters (15 feet) maximum length. Unplug this product from unexpected noise produced by a qualified ...
Do not insert the plug into the product • the product was exposed to dangerous voltage points or other controls may expose you need for details. Contact your electrician for service • the product does not operate normally after following the operating instructions Note: Adjust only those controls that the new power cord meets the following requirements: detachable type, UL listed/CSA certified, type SPT-2, rated 7 A 125 V minimum, VDE approved or its equivalent, 4.6 meters (15 feet) maximum length. Unplug this product from unexpected noise produced by a qualified ...

Aspire L Series User's Guide EN
Page 5
... prolonged use and/or before servicing. • To avoid the remote risk of electric shock from Electrical and Electronics Equipment (WEEE) regulations, visit http://global.acer.com/about/sustainability.htm. For more information on the Waste from lightning, do not connect the telephone line to this equipment during lightning or thunderstorms...
... prolonged use and/or before servicing. • To avoid the remote risk of electric shock from Electrical and Electronics Equipment (WEEE) regulations, visit http://global.acer.com/about/sustainability.htm. For more information on the Waste from lightning, do not connect the telephone line to this equipment during lightning or thunderstorms...
Aspire L Series User's Guide EN
Page 6
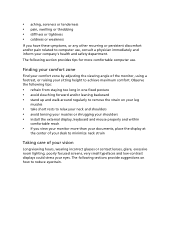
• aching, soreness or tenderness • pain, swelling or throbbing • stiffness or tightness • coldness or weakness If you view your monitor more comfortable computer use , consult a physician immediately and inform your eyes. The following sections provide suggestions on your leg muscles • take short rests to relax your neck and shoulders • avoid tensing your muscles or shrugging your shoulders • install the external display, keyboard and mouse properly and within comfortable reach • if you have these symptoms, or any other recurring or ...
• aching, soreness or tenderness • pain, swelling or throbbing • stiffness or tightness • coldness or weakness If you view your monitor more comfortable computer use , consult a physician immediately and inform your eyes. The following sections provide suggestions on your leg muscles • take short rests to relax your neck and shoulders • avoid tensing your muscles or shrugging your shoulders • install the external display, keyboard and mouse properly and within comfortable reach • if you have these symptoms, or any other recurring or ...
Aspire L Series User's Guide EN
Page 7
vii Eyes • Rest your eyes frequently. • Give your eyes regular breaks by using drapes, shades or blinds • using a task light • changing the display's viewing angle • using a glare-reduction filter • using the computer on a couch or bed. If this is unavoidable, work habits to "Regulations and safety notices" on a distant point. • Blink frequently to keep your eyes from the display's top front edge • Avoid adjusting your eyes point downward when looking at the middle of the display. • Adjust the display brightness and/or ...
vii Eyes • Rest your eyes frequently. • Give your eyes regular breaks by using drapes, shades or blinds • using a task light • changing the display's viewing angle • using a glare-reduction filter • using the computer on a couch or bed. If this is unavoidable, work habits to "Regulations and safety notices" on a distant point. • Blink frequently to keep your eyes from the display's top front edge • Avoid adjusting your eyes point downward when looking at the middle of the display. • Adjust the display brightness and/or ...
Aspire L Series User's Guide EN
Page 9
Contents Information for your safety and comfort iii Safety instructions iii Disposal instructions v Tips and information for comfortable use v 1 System tour 1 Package contents 3 Front and rear panels 5 Keyboard 6 2 Setting up your computer 7 Arranging a comfortable work area 9 Positioning your PC 9 Connecting peripherals 10 Connecting your computer 15 3 Frequently asked questions 17 Frequently asked questions 19 Appendix A: Regulations and safety notices 21 Regulations and safety notices 22 ENERGY STAR guidelines compliance 22 FCC notice 22 Modem notices...
Contents Information for your safety and comfort iii Safety instructions iii Disposal instructions v Tips and information for comfortable use v 1 System tour 1 Package contents 3 Front and rear panels 5 Keyboard 6 2 Setting up your computer 7 Arranging a comfortable work area 9 Positioning your PC 9 Connecting peripherals 10 Connecting your computer 15 3 Frequently asked questions 17 Frequently asked questions 19 Appendix A: Regulations and safety notices 21 Regulations and safety notices 22 ENERGY STAR guidelines compliance 22 FCC notice 22 Modem notices...

Aspire L Series User's Guide EN
Page 12
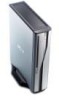
This chapter discusses the features and components of your computer.
This chapter discusses the features and components of your computer.
Aspire L Series User's Guide EN
Page 13
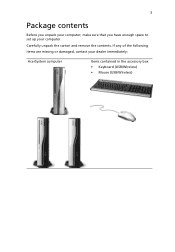
If any of the following items are missing or damaged, contact your computer. 3 Package contents Before you unpack your computer, make sure that you have enough space to set up your dealer immediately: AcerSystem computer Items contained in the accessory box • Keyboard (USB/Wireless) • Mouse (USB/Wireless) Carefully unpack the carton and remove the contents.
If any of the following items are missing or damaged, contact your computer. 3 Package contents Before you unpack your computer, make sure that you have enough space to set up your dealer immediately: AcerSystem computer Items contained in the accessory box • Keyboard (USB/Wireless) • Mouse (USB/Wireless) Carefully unpack the carton and remove the contents.
Aspire L Series User's Guide EN
Page 14
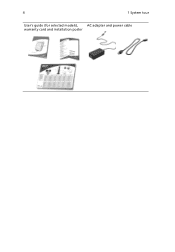
4 1 System tour User's guide (for selected models), AC adapter and power cable warranty card and installation poster
4 1 System tour User's guide (for selected models), AC adapter and power cable warranty card and installation poster
Aspire L Series User's Guide EN
Page 15
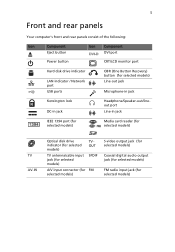
5 Front and rear panels Your computer's front and rear panels consist of the following: Icon Component Eject button Icon Component DVI port Power button CRT/LCD monitor port Hard disk drive indicator LAN indicator / Network port USB ports OBR (One Button Recovery) button (for selected models) Line-out jack Microphone-in jack Kensington lock DC-in jack Headphone/Speaker-out/lineout port Line-in jack IEEE 1394 port (for selected models) Media card reader (for selected models) TV AV-IN Optical disk drive indicator (for selected models) TVOUT TV antenna/cable input jack (for ...
5 Front and rear panels Your computer's front and rear panels consist of the following: Icon Component Eject button Icon Component DVI port Power button CRT/LCD monitor port Hard disk drive indicator LAN indicator / Network port USB ports OBR (One Button Recovery) button (for selected models) Line-out jack Microphone-in jack Kensington lock DC-in jack Headphone/Speaker-out/lineout port Line-in jack IEEE 1394 port (for selected models) Media card reader (for selected models) TV AV-IN Optical disk drive indicator (for selected models) TVOUT TV antenna/cable input jack (for ...

Aspire L Series User's Guide EN
Page 16
For information on how to connect your keyboard, see "Connecting your mouse and keyboard (for selected models)" on page 10. 6 1 System tour Keyboard The keyboard has full-sized keys that include separate cursor keys, two Windows keys, four multimedia keys, and 12 function keys. Description 1 Sleep button 3 Multimedia keys 5 e key (Scroll Lock) 7 Cursor keys 9 Windows logo key 11 Function keys No. No. Description 2 Internet/Email/Search keys 4 Volume control/mute keys 6 Num Lock key 8 Application key 10 Caps Lock key
For information on how to connect your keyboard, see "Connecting your mouse and keyboard (for selected models)" on page 10. 6 1 System tour Keyboard The keyboard has full-sized keys that include separate cursor keys, two Windows keys, four multimedia keys, and 12 function keys. Description 1 Sleep button 3 Multimedia keys 5 e key (Scroll Lock) 7 Cursor keys 9 Windows logo key 11 Function keys No. No. Description 2 Internet/Email/Search keys 4 Volume control/mute keys 6 Num Lock key 8 Application key 10 Caps Lock key
Aspire L Series User's Guide EN
Page 17
2 Setting up your computer
2 Setting up your computer

Aspire L Series User's Guide EN
Page 18
This chapter contains step-by-step instructions on how to set up your computer and connect additional peripherals.
This chapter contains step-by-step instructions on how to set up your computer and connect additional peripherals.
Aspire L Series User's Guide EN
Page 19
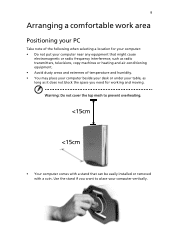
Warning: Do not cover the top mesh to place your computer vertically. Use the stand if you need for your computer: • Do not put your computer near any equipment that might cause electromagnetic or radio frequency interference, such as radio transmitters, televisions, copy machines or heating and air-conditioning equipment. • Avoid dusty areas and extremes of the following when selecting a location for working and moving. 9 Arranging a comfortable work area Positioning your PC Take note of temperature and humidity. • You may place your computer beside your desk or ...
Warning: Do not cover the top mesh to place your computer vertically. Use the stand if you need for your computer: • Do not put your computer near any equipment that might cause electromagnetic or radio frequency interference, such as radio transmitters, televisions, copy machines or heating and air-conditioning equipment. • Avoid dusty areas and extremes of the following when selecting a location for working and moving. 9 Arranging a comfortable work area Positioning your PC Take note of temperature and humidity. • You may place your computer beside your desk or ...
Aspire L Series User's Guide EN
Page 20
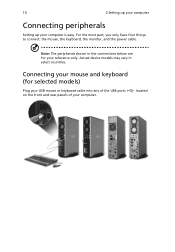
10 2 Setting up your computer Connecting peripherals Setting up your computer. For the most part, you only have four things to connect: the mouse, the keyboard, the monitor, and the power cable. Actual device models may vary in the connections below are for selected models) Plug your USB mouse or keyboard cable into any of the USB ports on the front and rear panels of your computer is easy. Connecting your mouse and keyboard (for your reference only. located Note: The peripherals shown in select countries.
10 2 Setting up your computer Connecting peripherals Setting up your computer. For the most part, you only have four things to connect: the mouse, the keyboard, the monitor, and the power cable. Actual device models may vary in the connections below are for selected models) Plug your USB mouse or keyboard cable into any of the USB ports on the front and rear panels of your computer is easy. Connecting your mouse and keyboard (for your reference only. located Note: The peripherals shown in select countries.
Aspire L Series User's Guide EN
Page 21
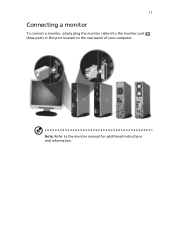
Note: Refer to the monitor manual for additional instructions and information. 11 Connecting a monitor To connect a monitor, simply plug the monitor cable into the monitor port (blue port) or DVI port located on the rear panel of your computer .
Note: Refer to the monitor manual for additional instructions and information. 11 Connecting a monitor To connect a monitor, simply plug the monitor cable into the monitor port (blue port) or DVI port located on the rear panel of your computer .
Aspire L Series User's Guide EN
Page 22
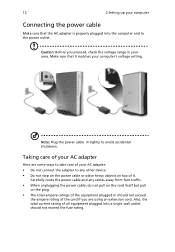
Carefully route the power cable and any other device. • Do not step on the power cable or place heavy objects on the plug. • The total ampere ratings of the equipment plugged in should not exceed the fuse rating. Taking care of your AC adapter Here are using an extension cord. 12 2 Setting up your AC adapter: • Do not connect the adapter to any cables away from foot traffic. • When unplugging the power cable, do not pull on the cord itself but pull on top of it matches your area. Also, the total current rating of your computer Connecting the ...
Carefully route the power cable and any other device. • Do not step on the power cable or place heavy objects on the plug. • The total ampere ratings of the equipment plugged in should not exceed the fuse rating. Taking care of your AC adapter Here are using an extension cord. 12 2 Setting up your AC adapter: • Do not connect the adapter to any cables away from foot traffic. • When unplugging the power cable, do not pull on the cord itself but pull on top of it matches your area. Also, the total current rating of your computer Connecting the ...
Aspire L Series User's Guide EN
Page 23
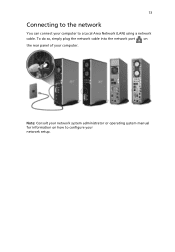
Note: Consult your network system administrator or operating system manual for information on the rear panel of your network setup. 13 Connecting to the network You can connect your computer to configure your computer. To do so, simply plug the network cable into the network port on how to a Local Area Network (LAN) using a network cable.
Note: Consult your network system administrator or operating system manual for information on the rear panel of your network setup. 13 Connecting to the network You can connect your computer to configure your computer. To do so, simply plug the network cable into the network port on how to a Local Area Network (LAN) using a network cable.
Aspire L Series User's Guide EN
Page 24
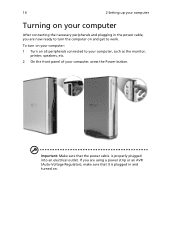
Important: Make sure that the power cable is plugged in the power cable, you are using a power strip or an AVR (Auto-Voltage Regulator), make sure that it is properly plugged into an electrical outlet. If you are now ready to turn on your computer: 1 Turn on all peripherals connected to work. 14 2 Setting up your computer Turning on your computer, press the Power button. To turn the computer on and get to your computer, such as the monitor, printer, speakers, etc. 2 On the front panel of your computer After connecting the necessary peripherals and plugging in and turned on....
Important: Make sure that the power cable is plugged in the power cable, you are using a power strip or an AVR (Auto-Voltage Regulator), make sure that it is properly plugged into an electrical outlet. If you are now ready to turn on your computer: 1 Turn on all peripherals connected to work. 14 2 Setting up your computer Turning on your computer, press the Power button. To turn the computer on and get to your computer, such as the monitor, printer, speakers, etc. 2 On the front panel of your computer After connecting the necessary peripherals and plugging in and turned on....
