Aspire 9920G Service Guide
Page 61
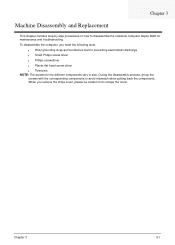
... driver q Tweezers NOTE: The screws for maintenance and troubleshooting. Chapter 3 Machine Disassembly and Replacement This chapter contains step-by-step procedures on how to disassemble the notebook computer Aspire 9920 for the different components vary in size. Chapter 3 61 During the disassembly process, group the screws with the corresponding components to scrape the cover...
... driver q Tweezers NOTE: The screws for maintenance and troubleshooting. Chapter 3 Machine Disassembly and Replacement This chapter contains step-by-step procedures on how to disassemble the notebook computer Aspire 9920 for the different components vary in size. Chapter 3 61 During the disassembly process, group the screws with the corresponding components to scrape the cover...
Aspire 9920G Service Guide
Page 62
Turn off the power to the system and all power and signal cables from the system. 3. Remove the battery pack. 62 Chapter 3 Unplug the AC adapter and all peripherals. 2. General Information Before You Begin Before proceeding with the disassembly procedure, make sure that you do the following: 1.
Turn off the power to the system and all power and signal cables from the system. 3. Remove the battery pack. 62 Chapter 3 Unplug the AC adapter and all peripherals. 2. General Information Before You Begin Before proceeding with the disassembly procedure, make sure that you do the following: 1.
Aspire 9920G Service Guide
Page 63
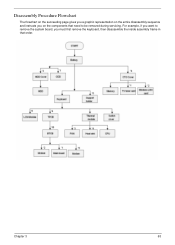
Chapter 3 63 Disassembly Procedure Flowchart The flowchart on the succeeding page gives you a graphic representation on the components that order. For example, if you want to remove the system board, you on the entire disassembly sequence and instructs you must first remove the keyboard, then disassemble the inside assembly frame in that need to be removed during servicing.
Chapter 3 63 Disassembly Procedure Flowchart The flowchart on the succeeding page gives you a graphic representation on the components that order. For example, if you want to remove the system board, you on the entire disassembly sequence and instructs you must first remove the keyboard, then disassemble the inside assembly frame in that need to be removed during servicing.
Aspire 9920G Service Guide
Page 71
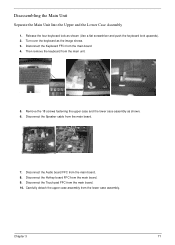
... remove the keyboard from the main board 4. Disconnect the Keyboard FFC from the main unit. 123 4 5. Disconnect the Audio board FFC from the main board. 8. Disassembling the Main Unit Separate the Main Unit Into the Upper and the Lower Case Assembly 1. Turn over the keyboard as the image shows. 3.
... remove the keyboard from the main board 4. Disconnect the Keyboard FFC from the main unit. 123 4 5. Disconnect the Audio board FFC from the main board. 8. Disassembling the Main Unit Separate the Main Unit Into the Upper and the Lower Case Assembly 1. Turn over the keyboard as the image shows. 3.
Aspire 9920G Service Guide
Page 72
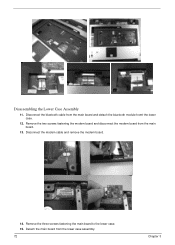
Disassembling the Lower Case Assembly 11. Disconnect the modem cable and remove the modem board. 14. Remove the two screws fastening the modem board and disconnect the modem board from the main board and detach the bluetooth module fromt the lower case. 12. Remove the three screws fastening the main board to the lower case. 15. Disconnect the bluetooth cable from the main board. 13. Detach the main board from the lower case assembly. 72 Chapter 3
Disassembling the Lower Case Assembly 11. Disconnect the modem cable and remove the modem board. 14. Remove the two screws fastening the modem board and disconnect the modem board from the main board and detach the bluetooth module fromt the lower case. 12. Remove the three screws fastening the main board to the lower case. 15. Disconnect the bluetooth cable from the main board. 13. Detach the main board from the lower case assembly. 72 Chapter 3

Aspire 9920G Service Guide
Page 73
Remove MB fom lower case. 20. Disassembling the Upper Case Assembly 1. Detach the IO board from the lower case. Then remove the speaker and sub-woofer set from the lower case. 18. ...
Remove MB fom lower case. 20. Disassembling the Upper Case Assembly 1. Detach the IO board from the lower case. Then remove the speaker and sub-woofer set from the lower case. 18. ...
Aspire 9920G Service Guide
Page 77
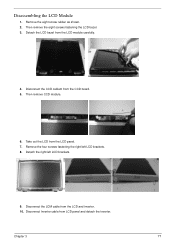
Remove the eight screw rubber as shown. 2. Detach the LCD bazel from the LCD and inverter. 10. Detach the right/left LCD brackets. 8. Remove the four screws fastening the right/left LCD brackets. 9. Disconnect the LCM cable from the LCD module carefully. 4. Then remove CCD module. 6. Disconnect the CCD cablem from the LCD panel. 7. Take out the LCD from the CCD board. 5. Chapter 3 77 Disconnect Inverter cable from LCD panel and detach the inverter. Disassembling the LCD Module 1. Then remove the eight screws fastening the LCD bezel. 3.
Remove the eight screw rubber as shown. 2. Detach the LCD bazel from the LCD and inverter. 10. Detach the right/left LCD brackets. 8. Remove the four screws fastening the right/left LCD brackets. 9. Disconnect the LCM cable from the LCD module carefully. 4. Then remove CCD module. 6. Disconnect the CCD cablem from the LCD panel. 7. Take out the LCD from the CCD board. 5. Chapter 3 77 Disconnect Inverter cable from LCD panel and detach the inverter. Disassembling the LCD Module 1. Then remove the eight screws fastening the LCD bezel. 3.
Aspire 9920G Service Guide
Page 79
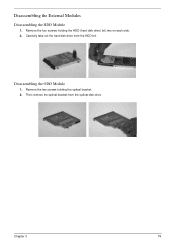
Disassembling the ODD Module 1. Then remove the optical bracket from the HDD foil. Chapter 3 79 Remove the two screws holding the HDD (hard disk drive) foil; Carefully take out the hard disk drive from the optical disk drive. Disassembling the External Modules Disassembling the HDD Module 1. Remove the four screws holding the optical bracket. 2. two on each side. 2.
Disassembling the ODD Module 1. Then remove the optical bracket from the HDD foil. Chapter 3 79 Remove the two screws holding the HDD (hard disk drive) foil; Carefully take out the hard disk drive from the optical disk drive. Disassembling the External Modules Disassembling the HDD Module 1. Remove the four screws holding the optical bracket. 2. two on each side. 2.
Aspire 9920G User's Guide
Page 5
... oven or in a pressurized container, and do not expose it in performance, indicating a need to replace the power cord set . Do not pierce, open or disassemble the battery. For safety reasons, and to prolong the lifetime of the battery, charging will often require extensive work by other risks. Guidelines for service...
... oven or in a pressurized container, and do not expose it in performance, indicating a need to replace the power cord set . Do not pierce, open or disassemble the battery. For safety reasons, and to prolong the lifetime of the battery, charging will often require extensive work by other risks. Guidelines for service...

Aspire 9920G User's Guide
Page 6
...a closed car in a fire as household waste. Sparks in such areas could affect performance. They include below freezing. Do not disassemble or dispose of them away from the battery, which came bundled with a potentially explosive atmosphere and obey all signs and instructions.... where you carry a spare battery in bodily injury or even death. Areas with Acer approved chargers designated for its intended purpose. Battery performance is damaged. Use only Acer approved batteries, and recharge your pocket or purse. Warning! Potentially explosive environments Switch off...
...a closed car in a fire as household waste. Sparks in such areas could affect performance. They include below freezing. Do not disassemble or dispose of them away from the battery, which came bundled with a potentially explosive atmosphere and obey all signs and instructions.... where you carry a spare battery in bodily injury or even death. Areas with Acer approved chargers designated for its intended purpose. Battery performance is damaged. Use only Acer approved batteries, and recharge your pocket or purse. Warning! Potentially explosive environments Switch off...
Aspire 9920G User's Guide
Page 110
... ABIERTO. This has no effect on the drive. Nevertheless, some pixels may occasionally misfire or appear as black or red dots. VARO! Reverse engineering or disassembly is protected by Macrovision.
... ABIERTO. This has no effect on the drive. Nevertheless, some pixels may occasionally misfire or appear as black or red dots. VARO! Reverse engineering or disassembly is protected by Macrovision.


