Acer Aspire 7535 Notebook Service Guide
Page 7
...Specifications 1 Features 1 System Block Diagram 4 Your Acer Notebook tour 6 Right View 9 Indicators 10 Easy-Launch Buttons 11 Touchpad Basics (with fingerprint reader 11 Touchpad basics (with two-click buttons 12 Using the Keyboard 13 Lock Keys and numeric keypad 13 Windows Keys... 42 Pre-disassembly Instructions 42 Disassembly Process 42 External Module Disassembly Process 43 External Modules Disassembly Flowchart 43 Removing the Battery Pack 44 Removing the SD Dummy Card 45 Removing the Hard Disk Drive 2 (HDD2) Module 46 Removing the Back Cover 48 Removing the Hard Disk ...
...Specifications 1 Features 1 System Block Diagram 4 Your Acer Notebook tour 6 Right View 9 Indicators 10 Easy-Launch Buttons 11 Touchpad Basics (with fingerprint reader 11 Touchpad basics (with two-click buttons 12 Using the Keyboard 13 Lock Keys and numeric keypad 13 Windows Keys... 42 Pre-disassembly Instructions 42 Disassembly Process 42 External Module Disassembly Process 43 External Modules Disassembly Flowchart 43 Removing the Battery Pack 44 Removing the SD Dummy Card 45 Removing the Hard Disk Drive 2 (HDD2) Module 46 Removing the Back Cover 48 Removing the Hard Disk ...
Acer Aspire 7535 Notebook Service Guide
Page 50
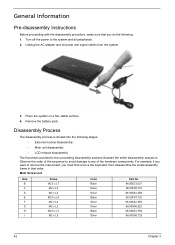
...00H06.622 86.9A553.7R0 86.00G58.725 42 Chapter 3 General Information Pre-disassembly Instructions Before proceeding with the disassembly procedure, make sure that you must first remove the keyboard, then disassemble the inside assembly frame in the succeeding disassembly sections illustrate the entire... disassembly sequence. Remove the battery pack. Turn off the power to any of the sequence...
...00H06.622 86.9A553.7R0 86.00G58.725 42 Chapter 3 General Information Pre-disassembly Instructions Before proceeding with the disassembly procedure, make sure that you must first remove the keyboard, then disassemble the inside assembly frame in the succeeding disassembly sections illustrate the entire... disassembly sequence. Remove the battery pack. Turn off the power to any of the sequence...
Acer Aspire 7535 Notebook Service Guide
Page 51
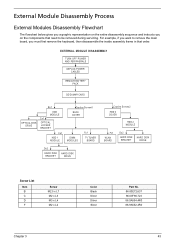
... Process External Modules Disassembly Flowchart The flowchart below gives you a graphic representation on the entire disassembly sequence and instructs you must first remove the keyboard, then disassemble the inside assembly frame in that need to remove the main board, you on the components that order. EXTERNAL MODULE DISASSEMBLY TURN OFF POWER AND PERIPHERALS UNPLUG...
... Process External Modules Disassembly Flowchart The flowchart below gives you a graphic representation on the entire disassembly sequence and instructs you must first remove the keyboard, then disassemble the inside assembly frame in that need to remove the main board, you on the components that order. EXTERNAL MODULE DISASSEMBLY TURN OFF POWER AND PERIPHERALS UNPLUG...
Acer Aspire 7535 Notebook Service Guide
Page 104
...to select the test device. 1. Follow the instructions in the message window. Replace the external diskette drive/CD-ROM module. 3. Replace the main board. Keyboard or Auxiliary Input Device Check Remove the external keyboard if the internal keyboard is correctly seated in the connector on the system... board. Do not replace a non-defective FRU: 1. Follow the instructions in the message window. If an error ...
...to select the test device. 1. Follow the instructions in the message window. Replace the external diskette drive/CD-ROM module. 3. Replace the main board. Keyboard or Auxiliary Input Device Check Remove the external keyboard if the internal keyboard is correctly seated in the connector on the system... board. Do not replace a non-defective FRU: 1. Follow the instructions in the message window. If an error ...


