
Acer Aspire 7250 Service Guide
Page 24
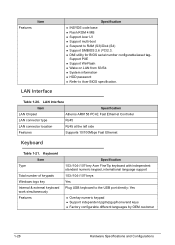
...Plug USB keyboard to RAM (S3)/Disk (S4) Support SMBIOS 2.6 ,PCI2.3. Features Item LAN Interface Specification INSYDE code base Flash ROM 4 MB Support Acer UI Support multi-boot Suspend to the USB port directly: Yes Overlay numeric keypad Support independent pgdn/pgup/home/end keys ...Factory configurable different languages by OEM customer 1-28 Hardware Specifications and Configurations DMI utility for BIOS serial number configurable/asset tagSupport PXE Support WinFlash Wake on LAN from S3/S4 System information HDD password Refer to Acer BIOS specification. 0 Table 1-20.
...Plug USB keyboard to RAM (S3)/Disk (S4) Support SMBIOS 2.6 ,PCI2.3. Features Item LAN Interface Specification INSYDE code base Flash ROM 4 MB Support Acer UI Support multi-boot Suspend to the USB port directly: Yes Overlay numeric keypad Support independent pgdn/pgup/home/end keys ...Factory configurable different languages by OEM customer 1-28 Hardware Specifications and Configurations DMI utility for BIOS serial number configurable/asset tagSupport PXE Support WinFlash Wake on LAN from S3/S4 System information HDD password Refer to Acer BIOS specification. 0 Table 1-20.
Acer Aspire 7250 Service Guide
Page 48
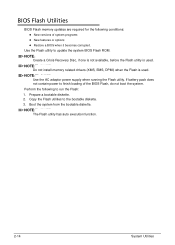
...(XMS, EMS, DPMI) when the Flash is used . Prepare a bootable diskette. 2. Copy the Flash utilities to update the system BIOS Flash ROM. Use the Flash utility to the bootable diskette. 3. NOTE: NOTE: Use the AC adaptor power supply when running the Flash utility. NOTE: NOTE: Create a .... If battery pack does not contain power to run the Flash: 1. Boot the system from the bootable diskette. NOTE: NOTE: The Flash utility has auto execution function. 2-14 System Utilities BIOS Flash Utilities 0 BIOS Flash memory updates are required for the following to finish loading of...
...(XMS, EMS, DPMI) when the Flash is used . Prepare a bootable diskette. 2. Copy the Flash utilities to update the system BIOS Flash ROM. Use the Flash utility to the bootable diskette. 3. NOTE: NOTE: Use the AC adaptor power supply when running the Flash utility. NOTE: NOTE: Create a .... If battery pack does not contain power to run the Flash: 1. Boot the system from the bootable diskette. NOTE: NOTE: The Flash utility has auto execution function. 2-14 System Utilities BIOS Flash Utilities 0 BIOS Flash memory updates are required for the following to finish loading of...

Acer Aspire 7250 Service Guide
Page 49
The flash process begins as shown in Figure 2-13. BIOS Boot 3. Execute the < FLASH.BAT > batch file to position 1. Example: If using USB HDD to Update BIOS, move USB HDD to update BIOS. Figure 2-12. Press F2 during boot to modify the boot priority order. System Utilities 2-15 Select Boot Menu to enter the Setup Menu. 2. DOS Flash Utility 0 Perform the following to use the DOS Flash Utility: 1.
The flash process begins as shown in Figure 2-13. BIOS Boot 3. Execute the < FLASH.BAT > batch file to position 1. Example: If using USB HDD to Update BIOS, move USB HDD to update BIOS. Figure 2-12. Press F2 during boot to modify the boot priority order. System Utilities 2-15 Select Boot Menu to enter the Setup Menu. 2. DOS Flash Utility 0 Perform the following to use the DOS Flash Utility: 1.

Acer Aspire 7250 Service Guide
Page 50
In flash BIOS, the message Please do not remove AC Power Source is shown. Figure 2-14. AC Power Warning NOTE: NOTE: Plug in the AC power to continue. 5. NOTE: NOTE: If AC power is not connected, the following message (Figure 2-14) is shown. DOS Flash 4. Flash is complete when the message Flash Programming Complete is shown. 2-16 System Utilities Figure 2-13.
In flash BIOS, the message Please do not remove AC Power Source is shown. Figure 2-14. AC Power Warning NOTE: NOTE: Plug in the AC power to continue. 5. NOTE: NOTE: If AC power is not connected, the following message (Figure 2-14) is shown. DOS Flash 4. Flash is complete when the message Flash Programming Complete is shown. 2-16 System Utilities Figure 2-13.
Acer Aspire 7250 Service Guide
Page 55
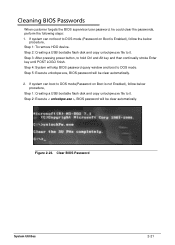
Figure 2-23. Step 4: System will be clear automatically. 2. Clear BIOS Password System Utilities 2-21 Cleaning BIOS Passwords 0 When customer forgets the BIOS supervisor/user password, he could clear the passwords, perform the following steps: 1. Step 2: Creating a USB bootable flash disk and copy unlockpw.exe file to it . If system can not boot to DOS mode...
Figure 2-23. Step 4: System will be clear automatically. 2. Clear BIOS Password System Utilities 2-21 Cleaning BIOS Passwords 0 When customer forgets the BIOS supervisor/user password, he could clear the passwords, perform the following steps: 1. Step 2: Creating a USB bootable flash disk and copy unlockpw.exe file to it . If system can not boot to DOS mode...
Acer Aspire 7250 Service Guide
Page 146
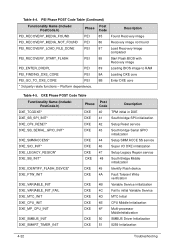
... not found PEI_RECOVERY_LOAD_FILE_DONE PEI 87 Load Recovery Image completed PEI_RECOVERY_START_FLASH PEI 88 Start Flash BIOS with Recovery image PEI_ENTER_DXEIPL PEI 89 Loading BIOS image to initial Variable Service DXE_MTC_INIT DXE 4D MTC Initial DXE_CPU_INIT DXE 4E ... DXE 47 Setup Legacy Region service DXE_SB_INIT* DXE 48 South Bridge Middle initialization DXE_IDENTIFY_FLASH_DEVICE* DXE 49 Identify Flash device DXE_FTW_INIT DXE 4A Fault Tolerant Write verification DXE_VARIABLE_INIT DXE 4B Variable Service initialization DXE_VARIABLE_INIT_FAIL DXE 4C Fail ...
... not found PEI_RECOVERY_LOAD_FILE_DONE PEI 87 Load Recovery Image completed PEI_RECOVERY_START_FLASH PEI 88 Start Flash BIOS with Recovery image PEI_ENTER_DXEIPL PEI 89 Loading BIOS image to initial Variable Service DXE_MTC_INIT DXE 4D MTC Initial DXE_CPU_INIT DXE 4E ... DXE 47 Setup Legacy Region service DXE_SB_INIT* DXE 48 South Bridge Middle initialization DXE_IDENTIFY_FLASH_DEVICE* DXE 49 Identify Flash device DXE_FTW_INIT DXE 4A Fault Tolerant Write verification DXE_VARIABLE_INIT DXE 4B Variable Service initialization DXE_VARIABLE_INIT_FAIL DXE 4C Fail ...

Acer Aspire 7250 Service Guide
Page 159
...in another system with a workable BIOS. 8. Users can enable this function is enabled, the system will force the BIOS to enter a special BIOS block, called Boot Block. If this feature to restore the BIOS firmware once the previous BIOS flashing process failed. Press button then ...FD) to initiate system CRISIS mode. 7. To use this machine by regular BIOS flashing process. To Create a Crisis USB key, perform the following: 1. The Power button flashes once. 6. Update the latest version BIOS for BIOS Recovery from USB Storage 0 NOTE: NOTE: Prior to performing the recovery, prepare...
...in another system with a workable BIOS. 8. Users can enable this function is enabled, the system will force the BIOS to enter a special BIOS block, called Boot Block. If this feature to restore the BIOS firmware once the previous BIOS flashing process failed. Press button then ...FD) to initiate system CRISIS mode. 7. To use this machine by regular BIOS flashing process. To Create a Crisis USB key, perform the following: 1. The Power button flashes once. 6. Update the latest version BIOS for BIOS Recovery from USB Storage 0 NOTE: NOTE: Prior to performing the recovery, prepare...


