
Service Guide
Page 1
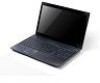
Aspire 5742/5742G/5742Z/5742ZG Series Service Guide Service guide files and updates are available on the ACER/CSD web; for more information, please refer to http://csd.acer.com.tw PRINTED IN TAIWAN
Aspire 5742/5742G/5742Z/5742ZG Series Service Guide Service guide files and updates are available on the ACER/CSD web; for more information, please refer to http://csd.acer.com.tw PRINTED IN TAIWAN

Service Guide
Page 2
Date Chapter Updates II Revision History Please refer to the table below for the updates made on Aspire 5741/5741G service guides.
Date Chapter Updates II Revision History Please refer to the table below for the updates made on Aspire 5741/5741G service guides.
Service Guide
Page 15
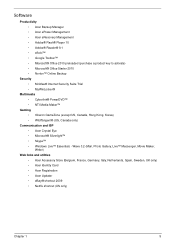
..., Italy, Netherlands, Spain, Sweden, UK only) • Acer Identity Card • Acer Registration • Acer Updater • eBay® shortcut 2009 • Netflix shortcut (US only) Chapter 1 5 Software Productivity • Acer Backup Manager • Acer ePower Management • Acer eRecovery Management • Adobe® Flash® Player 10 ... (except US, Canada, Hong Kong, Korea) • WildTangent® (US, Canada only) Communication and ISP • Acer Crystal Eye • Microsoft® Silverlight™ • Skype™ • Windows Live™ Essentials -
..., Italy, Netherlands, Spain, Sweden, UK only) • Acer Identity Card • Acer Registration • Acer Updater • eBay® shortcut 2009 • Netflix shortcut (US only) Chapter 1 5 Software Productivity • Acer Backup Manager • Acer ePower Management • Acer eRecovery Management • Adobe® Flash® Player 10 ... (except US, Canada, Hong Kong, Korea) • WildTangent® (US, Canada only) Communication and ISP • Acer Crystal Eye • Microsoft® Silverlight™ • Skype™ • Windows Live™ Essentials -

Service Guide
Page 49
BIOS Flash Utilities The BIOS flash memory update is not completely loaded. Use the Flash utility to run the Flash utility. NOTE: If you do not have a crisis recovery diskette at hand, then ... following conditions: • New versions of system programs • New features or options • Restore a BIOS when it becomes corrupted. Fellow the steps below to update the system BIOS Flash ROM. Copy the Flash utilities to finish BIOS Flash, you use the Flash. NOTE: Do not install memory-related drivers (XMS...
BIOS Flash Utilities The BIOS flash memory update is not completely loaded. Use the Flash utility to run the Flash utility. NOTE: If you do not have a crisis recovery diskette at hand, then ... following conditions: • New versions of system programs • New features or options • Restore a BIOS when it becomes corrupted. Fellow the steps below to update the system BIOS Flash ROM. Copy the Flash utilities to finish BIOS Flash, you use the Flash. NOTE: Do not install memory-related drivers (XMS...
Service Guide
Page 50
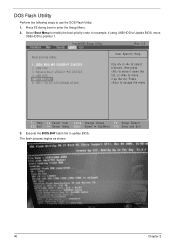
Select Boot Menu to modify the boot priority order, for example, if using USB HDD to Update BIOS, move USB HDD to escape the menu F1 Help ESC Exit Select Item F5/F6 Change Values F9 Setup Default Select Menu Enter Select ... to position 1. Execute the BIOS.BAT batch file to enter the Setup Menu. 2. IDE0: WDC WD 3200BEVT-22A23TO 2. USB HDD : 5. Press F2 during boot to update BIOS. DOS Flash Utility Perform the following steps to move it down the list, or to use the DOS Flash Utility: 1. Network Boot: LEGACY PCI...
Select Boot Menu to modify the boot priority order, for example, if using USB HDD to Update BIOS, move USB HDD to escape the menu F1 Help ESC Exit Select Item F5/F6 Change Values F9 Setup Default Select Menu Enter Select ... to position 1. Execute the BIOS.BAT batch file to enter the Setup Menu. 2. IDE0: WDC WD 3200BEVT-22A23TO 2. USB HDD : 5. Press F2 during boot to update BIOS. DOS Flash Utility Perform the following steps to move it down the list, or to use the DOS Flash Utility: 1. Network Boot: LEGACY PCI...

Service Guide
Page 51
Chapter 2 41 NOTE: If the AC power is complete when the message Flash programming complete displays. Click OK to continue. 5. WinFlash Utility Perform the following message displays. Flash is not connected, the following steps to use the WinFlash Utility: 1. A progress screen displays. Double-click the WinFlash executable. 2. 4. In flash BIOS, the message Please do not remove AC Power Source displays. Plug in the AC power to begin the update.
Chapter 2 41 NOTE: If the AC power is complete when the message Flash programming complete displays. Click OK to continue. 5. WinFlash Utility Perform the following message displays. Flash is not connected, the following steps to use the WinFlash Utility: 1. A progress screen displays. Double-click the WinFlash executable. 2. 4. In flash BIOS, the message Please do not remove AC Power Source displays. Plug in the AC power to begin the update.
Service Guide
Page 55
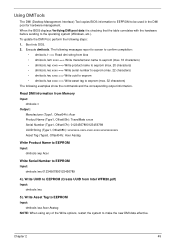
To update the DMI Pool, perform the following messages report to screen to... make the new DMI data effective. The following steps: 1. Write Asset Tag to EEPROM Input: dmitools /wa Acer Asstag NOTE: When using any of the Write options, restart the system to the operating system (Windows, etc....). Execute dmitools. Read DMI Information from Memory Input: dmitools /r Output: Manufacturer (Type1, Offset04h): Acer Product Name (Type1, Offset05h): TravelMate xxxxx Serial Number (Type1, Offset07h): 01234567890123456789 UUID String (Type1, Offset08h): xxxxxxxx-xxxx-xxxx-...
To update the DMI Pool, perform the following messages report to screen to... make the new DMI data effective. The following steps: 1. Write Asset Tag to EEPROM Input: dmitools /wa Acer Asstag NOTE: When using any of the Write options, restart the system to the operating system (Windows, etc....). Execute dmitools. Read DMI Information from Memory Input: dmitools /r Output: Manufacturer (Type1, Offset04h): Acer Product Name (Type1, Offset05h): TravelMate xxxxx Serial Number (Type1, Offset07h): 01234567890123456789 UUID String (Type1, Offset08h): xxxxxxxx-xxxx-xxxx-...
Service Guide
Page 172
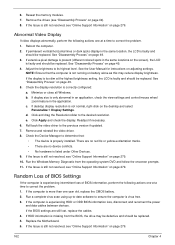
... the brightness to the desired resolution. b. Click and drag the Resolution slider to its highest level. Check the Device Manager to the previous version if updated. 7. If the Issue is still not resolved, see "Online Support Information" on page 279. 10. If the Issue is properly installed. Remove the drives (see...
... the brightness to the desired resolution. b. Click and drag the Resolution slider to its highest level. Check the Device Manager to the previous version if updated. 7. If the Issue is still not resolved, see "Online Support Information" on page 279. 10. If the Issue is properly installed. Remove the drives (see...

Service Guide
Page 175
Navigate to the previous version, if updated recently. 4. NOTE: If Speakers does not show, right-click on page 279. Roll back the audio driver to Start´ Control Panel´ System and ...
Navigate to the previous version, if updated recently. 4. NOTE: If Speakers does not show, right-click on page 279. Roll back the audio driver to Start´ Control Panel´ System and ...
Service Guide
Page 184
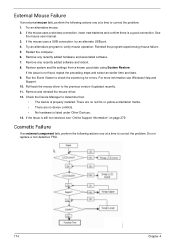
... the program experiencing mouse failure. 5. Try an alternative program to check the events log for errors. Check the Device Manager to the previous version if updated recently. 11. Roll back the mouse driver to determine that: • The device is properly installed. For more information see "Online Support Information" on page...
... the program experiencing mouse failure. 5. Try an alternative program to check the events log for errors. Check the Device Manager to the previous version if updated recently. 11. Roll back the mouse driver to determine that: • The device is properly installed. For more information see "Online Support Information" on page...
Service Guide
Page 207
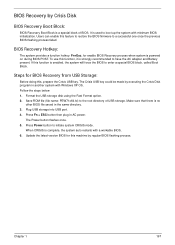
... the Fast Format option. 2. Press Fn + ESC button then plug in the same directory. 3. When CRISIS is no other BIOS file saved in AC power. Update the latest version BIOS for enable BIOS Recovery process when system is used to a successful one once the previous BIOS flashing process failed. Chapter 1 197...
... the Fast Format option. 2. Press Fn + ESC button then plug in the same directory. 3. When CRISIS is no other BIOS file saved in AC power. Update the latest version BIOS for enable BIOS Recovery process when system is used to a successful one once the previous BIOS flashing process failed. Chapter 1 197...
Service Guide
Page 289
... i.d. In the Technical Information section you have included an Acrobat File to facilitate the problem-free downloading of Acer's Notebook, Desktop and Server models including: • Service guides for all models • Bios updates • Software utilities • Spare parts lists • TABs (Technical Announcement Bulletin) For these purposes, we have any...
... i.d. In the Technical Information section you have included an Acrobat File to facilitate the problem-free downloading of Acer's Notebook, Desktop and Server models including: • Service guides for all models • Bios updates • Software utilities • Spare parts lists • TABs (Technical Announcement Bulletin) For these purposes, we have any...


