Service Guide
Page 39
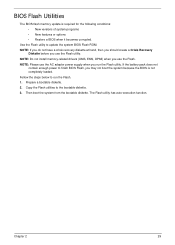
... have a crisis recovery diskette at hand, then you should create a Crisis Recovery Diskette before you use the Flash utility. NOTE: Do not install memory-related drivers (XMS, EMS, DPMI) when you use the Flash. NOTE: Please use the AC adaptor power supply when you may not boot the system because the...
... have a crisis recovery diskette at hand, then you should create a Crisis Recovery Diskette before you use the Flash utility. NOTE: Do not install memory-related drivers (XMS, EMS, DPMI) when you use the Flash. NOTE: Please use the AC adaptor power supply when you may not boot the system because the...

Service Guide
Page 87
Using a flat-bladed screw driver, rotate the CPU locking screw 180° counter-clockwise as shown. Chapter 3 77 Removing the CPU IMPORTANT: The pins on the underside of the socket as shown. 3. Place the CPU on page 75. 2. Lift the CPU clear of the CPU are damaged, the CPU may malfunction. See "Removing the Thermal Module" on a clean, dry surface when it is not installed. 1. If they are very delicate.
Using a flat-bladed screw driver, rotate the CPU locking screw 180° counter-clockwise as shown. Chapter 3 77 Removing the CPU IMPORTANT: The pins on the underside of the socket as shown. 3. Place the CPU on page 75. 2. Lift the CPU clear of the CPU are damaged, the CPU may malfunction. See "Removing the Thermal Module" on a clean, dry surface when it is not installed. 1. If they are very delicate.

Service Guide
Page 114
Using a flat-bladed screw driver, rotate the CPU locking screw 180° clockwise to the marker on the CPU socket. 1. Socket Pin1 Locator 2. Place the CPU into the CPU socket as shown, taking note of the Pin1 locator. Main Module Reassembly Procedure Replacing the CPU IMPORTANT: The CPU has a Pin1 locator that must be positioned corresponding to secure the CPU in place. 104 Chapter 3
Using a flat-bladed screw driver, rotate the CPU locking screw 180° clockwise to the marker on the CPU socket. 1. Socket Pin1 Locator 2. Place the CPU into the CPU socket as shown, taking note of the Pin1 locator. Main Module Reassembly Procedure Replacing the CPU IMPORTANT: The CPU has a Pin1 locator that must be positioned corresponding to secure the CPU in place. 104 Chapter 3
Service Guide
Page 142
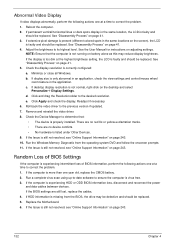
...Information" on page 243. 132 Chapter 4 Replace the Motherboard. 6. See "Disassembly Process" on adjusting settings. d. Remove and reinstall the video driver. 8. If the Issue is experiencing intermittent loss of BIOS information, perform the following actions one at the highest brightness setting, the LCD is ... at a time to correct the problem. 1. Reboot the computer. 2. See "Disassembly Process" on page 243. 10. Roll back the video driver to ensure the computer is still not resolved, see "Online Support Information" on page 41. 5. If the Issue is virus free. 3. If...
...Information" on page 243. 132 Chapter 4 Replace the Motherboard. 6. See "Disassembly Process" on adjusting settings. d. Remove and reinstall the video driver. 8. If the Issue is experiencing intermittent loss of BIOS information, perform the following actions one at the highest brightness setting, the LCD is ... at a time to correct the problem. 1. Reboot the computer. 2. See "Disassembly Process" on page 243. 10. Roll back the video driver to ensure the computer is still not resolved, see "Online Support Information" on page 41. 5. If the Issue is virus free. 3. If...
Service Guide
Page 145
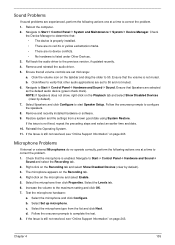
...still not resolved, see "Online Support Information" on the taskbar and drag the slider to complete the test. 8. Roll back the audio driver to Start´ Control Panel´ Hardware and Sound´ Sound and select the Recording tab. 2. Ensure that all volume controls are... Show Disabled Devices (clear by default). 3. Select the microphone and click Configure. Navigate to correct the problem. 1. Remove and reinstall the audio driver. 5. Restore system and file settings from the list and click Next. Select the Levels tab. 6. Right-click on the microphone and select Enable...
...still not resolved, see "Online Support Information" on the taskbar and drag the slider to complete the test. 8. Roll back the audio driver to Start´ Control Panel´ Hardware and Sound´ Sound and select the Recording tab. 2. Ensure that all volume controls are... Show Disabled Devices (clear by default). 3. Select the microphone and click Configure. Navigate to correct the problem. 1. Remove and reinstall the audio driver. 5. Restore system and file settings from the list and click Next. Select the Levels tab. 6. Right-click on the microphone and select Enable...
Service Guide
Page 146
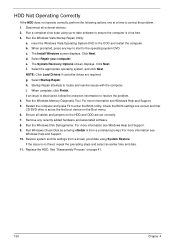
... If the HDD does not operate correctly, perform the following actions one at a time to locate and resolve issues with the computer. NOTE: Click Load Drivers if controller drives are correct and that CD/DVD drive is not fixed, repeat the preceding steps and select an earlier time and date. 11...
... If the HDD does not operate correctly, perform the following actions one at a time to locate and resolve issues with the computer. NOTE: Click Load Drivers if controller drives are correct and that CD/DVD drive is not fixed, repeat the preceding steps and select an earlier time and date. 11...
Service Guide
Page 148
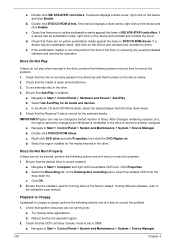
Double-click DVD/CD-ROM drives. If a device has an exclamation mark, right-click on the device and uninstall and reinstall the driver. Ensure that the default drive is the factory default. Navigate to DMA: a. Try closing some applications. Reboot and try removing any recently installed software and ... marks against the items in DVD/CD-ROM drives. If a device has an exclamation mark, right-click on the device and uninstall and reinstall the driver. a. c. Discs Do Not Play If discs do not play when inserted in the drive. 4.
Double-click DVD/CD-ROM drives. If a device has an exclamation mark, right-click on the device and uninstall and reinstall the driver. Ensure that the default drive is the factory default. Navigate to DMA: a. Try closing some applications. Reboot and try removing any recently installed software and ... marks against the items in DVD/CD-ROM drives. If a device has an exclamation mark, right-click on the device and uninstall and reinstall the driver. a. c. Discs Do Not Play If discs do not play when inserted in the drive. 4.
Service Guide
Page 151
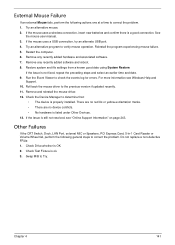
... an alternative program to the previous version if updated recently. 11. Reinstall the program experiencing mouse failure. 5. Roll back the mouse driver to verify mouse operation. If the Issue is ok. 3. External Mouse Failure If an external Mouse fails, perform the following general ... 7. For more information see "Online Support Information" on page 243. Do not replace a non-defective FRUs: 1. Remove and reinstall the mouse driver. 12. Check Drive whether is listed under Other Devices. 13. Try an alternative mouse. 2. There are no red Xs or yellow exclamation marks...
... an alternative program to the previous version if updated recently. 11. Reinstall the program experiencing mouse failure. 5. Roll back the mouse driver to verify mouse operation. If the Issue is ok. 3. External Mouse Failure If an external Mouse fails, perform the following general ... 7. For more information see "Online Support Information" on page 243. Do not replace a non-defective FRUs: 1. Remove and reinstall the mouse driver. 12. Check Drive whether is listed under Other Devices. 13. Try an alternative mouse. 2. There are no red Xs or yellow exclamation marks...

Service Guide
Page 155
... initialization Identify Flash device Fault Tolerant Write verification Variable Service initialization Fail to initial Variable Service MTC Initial CPU Middle Initialization Multi-processor MiddleInitialization SMBUS Driver Initialization 8259 Initialization RTC Initialization SATA Controller earlyInitialization Setup SMM Control service Setup Legacy Interrupt service Relocate SMM BASE SMI test VTD Initial Legacy BIOS...
... initialization Identify Flash device Fault Tolerant Write verification Variable Service initialization Fail to initial Variable Service MTC Initial CPU Middle Initialization Multi-processor MiddleInitialization SMBUS Driver Initialization 8259 Initialization RTC Initialization SATA Controller earlyInitialization Setup SMM Control service Setup Legacy Interrupt service Relocate SMM BASE SMI test VTD Initial Legacy BIOS...

Service Guide
Page 156
...and Mouse initialization Video device initialization Error report device initialization USB host controller initialization USB BUS driver initialization USB device driver initialization Console device initial fail Display logo or system information IDE controller initialization SATA controller initialization SIO... controller initialization ISA BUS driver initialization Floppy device initialization Serial device initialization IDE device initialization AHCI device initialization Dispatch option ROMs...
...and Mouse initialization Video device initialization Error report device initialization USB host controller initialization USB BUS driver initialization USB device driver initialization Console device initial fail Display logo or system information IDE controller initialization SATA controller initialization SIO... controller initialization ISA BUS driver initialization Floppy device initialization Serial device initialization IDE device initialization AHCI device initialization Dispatch option ROMs...


