Acer Aspire 5739G Series Service Guide
Page 7
...numeric keypad 12 Windows Keys 13 Special Key 14 Using the System Utilities 15 Acer GridVista (dual-display compatible 15 Hardware Specifications and Configurations 17 System Utilities 27... 37 Remove HDD/BIOS Password Utilities 40 Miscellaneous Utilities 43 Machine Disassembly and Replacement 47 Disassembly Requirements 47 General Information 48 Pre-disassembly Instructions 48 Disassembly Process ...48 External Module Disassembly Process 49 External Modules Disassembly Flowchart 49 Removing the Battery Pack 49 Removing the SD dummy card 50 Removing the Lower Cover 51 ...
...numeric keypad 12 Windows Keys 13 Special Key 14 Using the System Utilities 15 Acer GridVista (dual-display compatible 15 Hardware Specifications and Configurations 17 System Utilities 27... 37 Remove HDD/BIOS Password Utilities 40 Miscellaneous Utilities 43 Machine Disassembly and Replacement 47 Disassembly Requirements 47 General Information 48 Pre-disassembly Instructions 48 Disassembly Process ...48 External Module Disassembly Process 49 External Modules Disassembly Flowchart 49 Removing the Battery Pack 49 Removing the SD dummy card 50 Removing the Lower Cover 51 ...
Acer Aspire 5739G Series Service Guide
Page 8
... Hinge Covers 120 External Unit Reassembly Process 122 Replacing the CPU 122 Replacing the RTC Battery 123 Replacing the Graphics Card 123 Replacing the ODD Module 125 Replacing the Hard Disk Drive Module 126 Replacing the DIMM Modules 126 Replacing the WLAN Module 128 Replacing the TV Tuner 128 Replacing the Lower Cover 130 Replacing the SD Card Dummy Tray 130...
... Hinge Covers 120 External Unit Reassembly Process 122 Replacing the CPU 122 Replacing the RTC Battery 123 Replacing the Graphics Card 123 Replacing the ODD Module 125 Replacing the Hard Disk Drive Module 126 Replacing the DIMM Modules 126 Replacing the WLAN Module 128 Replacing the TV Tuner 128 Replacing the Lower Cover 130 Replacing the SD Card Dummy Tray 130...
Acer Aspire 5739G Series Service Guide
Page 128
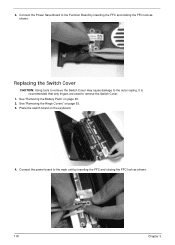
It is recommended that only fingers are used to the main unit by inserting the FFC and closing the FFC lock as shown. Connect the power board to remove the Switch Cover. 1. See "Removing the Battery Pack" on page 63. 3. See "Removing the Hinge Covers" on page 49. 2. Connect the Power Save Board to the outer casing. Replacing the Switch Cover CAUTION: Using tools to remove the Switch Cover may cause damage to the Function Board by inserting the FFC and closing the FFC lock as shown. 118 Chapter 3 4. Place the switch board on the keyboard. 4.
It is recommended that only fingers are used to the main unit by inserting the FFC and closing the FFC lock as shown. Connect the power board to remove the Switch Cover. 1. See "Removing the Battery Pack" on page 63. 3. See "Removing the Hinge Covers" on page 49. 2. Connect the Power Save Board to the outer casing. Replacing the Switch Cover CAUTION: Using tools to remove the Switch Cover may cause damage to the Function Board by inserting the FFC and closing the FFC lock as shown. 118 Chapter 3 4. Place the switch board on the keyboard. 4.
Acer Aspire 5739G Series Service Guide
Page 133
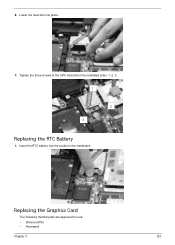
Insert the RTC battery into place. 7. Replacing the Graphics Card The following thermal pads are approved for use: • Silmore GP50 • Honeywell Chapter 3 123 Lower the heat sink into the socket in the indicated order: 1, 2, 3. 1. 1 1. 3 1. 2 Replacing the RTC Battery 1. Tighten the three screws of the CPU heat sink in the mainboard. 6.
Insert the RTC battery into place. 7. Replacing the Graphics Card The following thermal pads are approved for use: • Silmore GP50 • Honeywell Chapter 3 123 Lower the heat sink into the socket in the indicated order: 1, 2, 3. 1. 1 1. 3 1. 2 Replacing the RTC Battery 1. Tighten the three screws of the CPU heat sink in the mainboard. 6.
Acer Aspire 5739G Series Service Guide
Page 141
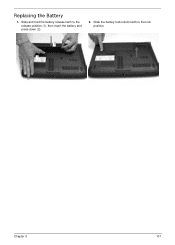
Slide the battery lock/unlock latch to the release position (1), then insert the battery and press down (2). 2. Slide and hold the battery release latch to the lock position. 2 1 Chapter 3 131 Replacing the Battery 1.
Slide the battery lock/unlock latch to the release position (1), then insert the battery and press down (2). 2. Slide and hold the battery release latch to the lock position. 2 1 Chapter 3 131 Replacing the Battery 1.

Acer Aspire 5739G Series Service Guide
Page 148
... Check the Device Manager to determine that the computer is not running on battery alone as this may be defective and should be replaced. 5. If the Issue is still not resolved, see "Online Support Information...abnormally, perform the following actions one at the highest brightness setting, the LCD is faulty and should be replaced. See "Disassembly Process" on page 48. 5. e. Readjust if necessary. 6. Adjust the brightness to ... information is more than one year old, replace the CMOS battery. 2. If desktop display resolution is not normal, right-click on page 215. 138 Chapter ...
... Check the Device Manager to determine that the computer is not running on battery alone as this may be defective and should be replaced. 5. If the Issue is still not resolved, see "Online Support Information...abnormally, perform the following actions one at the highest brightness setting, the LCD is faulty and should be replaced. See "Disassembly Process" on page 48. 5. e. Readjust if necessary. 6. Adjust the brightness to ... information is more than one year old, replace the CMOS battery. 2. If desktop display resolution is not normal, right-click on page 215. 138 Chapter ...

Acer Aspire 5739G Series Service Guide
Page 163
... is listed under Other Devices. 13. Try an alternative mouse. 2. Remove any recently added software and reboot. 8. Do not replace a non-defective FRUs: 1. If the mouse uses a wireless connection, insert new batteries and confirm there is not fixed, repeat the preceding steps and select an earlier time and date. 9. Reinstall the program...
... is listed under Other Devices. 13. Try an alternative mouse. 2. Remove any recently added software and reboot. 8. Do not replace a non-defective FRUs: 1. If the mouse uses a wireless connection, insert new batteries and confirm there is not fixed, repeat the preceding steps and select an earlier time and date. 9. Reinstall the program...

Acer Aspire 5739G Series Service Guide
Page 164
...that the power supply being used at a time until you find the failing FRU. 7. Determine if the problem has changed. 6. Do not replace a non-defective FRU: • System board • LCD assembly 154 Chapter 3 Intermittent Problems Intermittent system hang problems can be considered only ...FRU (do the following devices: • Non-Acer devices • Printer, mouse, and other external devices • Battery pack • Hard disk drive • DIMM • CD-ROM/Diskette drive Module • PC Cards 4. If the problem remains, replace the following FRU one at the time of the...
...that the power supply being used at a time until you find the failing FRU. 7. Determine if the problem has changed. 6. Do not replace a non-defective FRU: • System board • LCD assembly 154 Chapter 3 Intermittent Problems Intermittent system hang problems can be considered only ...FRU (do the following devices: • Non-Acer devices • Printer, mouse, and other external devices • Battery pack • Hard disk drive • DIMM • CD-ROM/Diskette drive Module • PC Cards 4. If the problem remains, replace the following FRU one at the time of the...

Acer Aspire 5739G Series Service Guide
Page 227
A Antennas 93 B Battery Pack 49 BIOS Utility 27-35 Advanced 30 Boot 33 Exit 34 Navigating 27 Save and Exit 34 Security 30 System Security 34 Bluetooth module ... 151 Euro 14 External Module Disassembly Flowchart 49 F Features 1, 5 Fingerprint Reader Failure 152 FLASH Utility 35 Flash Utility 35 Index FPC Cable 92 FRU (Field Replaceable Unit) List 169 H Hard Disk Drive Module 54 Hibernation mode hotkey 7 Hinge Covers 63 Hot Keys 12 I Intermittent Problems 154 Internal Microphone Failure 142 Internal...
A Antennas 93 B Battery Pack 49 BIOS Utility 27-35 Advanced 30 Boot 33 Exit 34 Navigating 27 Save and Exit 34 Security 30 System Security 34 Bluetooth module ... 151 Euro 14 External Module Disassembly Flowchart 49 F Features 1, 5 Fingerprint Reader Failure 152 FLASH Utility 35 Flash Utility 35 Index FPC Cable 92 FRU (Field Replaceable Unit) List 169 H Hard Disk Drive Module 54 Hibernation mode hotkey 7 Hinge Covers 63 Hot Keys 12 I Intermittent Problems 154 Internal Microphone Failure 142 Internal...


