
Aspire 5235 / 5535 Series User's Guide EN
Page 3
... clicking on how to functions or features which are marked in the Aspire product series. It is not installed on your notebook. For instructions on AcerSystem User Guide will occasionally refer to use your Acer notebook, we have designed a set of your notebook. 3 First things... the file requires Adobe Reader. Follow these steps to its nature, the Generic User Guide as well as system utilities, data recovery, expansion options and troubleshooting. Please understand that due to access it contains warranty information and the general regulations and safety notices for...
... clicking on how to functions or features which are marked in the Aspire product series. It is not installed on your notebook. For instructions on AcerSystem User Guide will occasionally refer to use your Acer notebook, we have designed a set of your notebook. 3 First things... the file requires Adobe Reader. Follow these steps to its nature, the Generic User Guide as well as system utilities, data recovery, expansion options and troubleshooting. Please understand that due to access it contains warranty information and the general regulations and safety notices for...
Aspire 5235 / 5535 Service Guide
Page 8
... Locations 117 Top and Bottom View 117 Clearing Password Check and BIOS Recovery 119 Clearing Password Check 119 BIOS Recovery by Crisis Disk 120 FRU (Field Replaceable Unit) List 121 Aspire 5235/5535 Series Exploded Diagram 122 Model Definition and Configuration 130 Aspire 5235/5535 Series 130 Test Compatible Components 155 Microsoft® Windows® Vista...
... Locations 117 Top and Bottom View 117 Clearing Password Check and BIOS Recovery 119 Clearing Password Check 119 BIOS Recovery by Crisis Disk 120 FRU (Field Replaceable Unit) List 121 Aspire 5235/5535 Series Exploded Diagram 122 Model Definition and Configuration 130 Aspire 5235/5535 Series 130 Test Compatible Components 155 Microsoft® Windows® Vista...
Aspire 5235 / 5535 Service Guide
Page 31
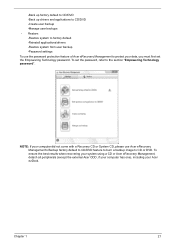
... 1 21 To set the Empowering Technology password. To ensure the best results when recovering your system using a CD or Acer eRecovery Management, detach all peripherals (except the external Acer ODD, if your computer has one), including your data, you must first set the password, refer to CD or DVD.... NOTE: If your computer did not come with a Recovery CD or System CD, please use the password protection feature of Acer eRecovery Management to protect your Acer ezDock. •Back up factory default to CD/DVD •Back up drivers and applications ...
... 1 21 To set the Empowering Technology password. To ensure the best results when recovering your system using a CD or Acer eRecovery Management, detach all peripherals (except the external Acer ODD, if your computer has one), including your data, you must first set the password, refer to CD or DVD.... NOTE: If your computer did not come with a Recovery CD or System CD, please use the password protection feature of Acer eRecovery Management to protect your Acer ezDock. •Back up factory default to CD/DVD •Back up drivers and applications ...
Aspire 5235 / 5535 Service Guide
Page 48
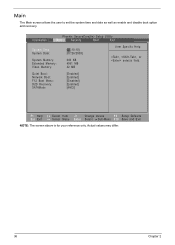
... Main screen allows the user to set the system time and date as well as enable and disable boot option and recovery. Quiet Boot: Network Boot: F12 Boot Menu: D2D Recovery: SATAMode [Enabled] [Enabled] [Disabled] [Enabled] [AHCI] F1 Help Esc Exit Select Item -/+ Change Values F9 Setup Defaults Select Menu Enter Select...
... Main screen allows the user to set the system time and date as well as enable and disable boot option and recovery. Quiet Boot: Network Boot: F12 Boot Menu: D2D Recovery: SATAMode [Enabled] [Enabled] [Disabled] [Enabled] [AHCI] F1 Help Esc Exit Select Item -/+ Change Values F9 Setup Defaults Select Menu Enter Select...

Aspire 5235 / 5535 Service Guide
Page 49
...in this screen. Enabled: Customer Logo is displayed, and Summary Screen is disabled or enabled. Option: Disabled or Enabled Enables, disables D2D Recovery function. Chapter 2 37 Settings in boldface are displayed with 24-hour format. shows Summary Screen is disabled. This is because the user...to disable or auto. Parameter System Time System Date System Memory Extended Memory VGA Memory Quiet Boot Network Boot F12 Boot Menu D2D Recovery SATA Mode Description Format/Option Sets the system time. The hours are the default and suggested parameter settings. Format MM/DD/YYYY...
...in this screen. Enabled: Customer Logo is displayed, and Summary Screen is disabled or enabled. Option: Disabled or Enabled Enables, disables D2D Recovery function. Chapter 2 37 Settings in boldface are displayed with 24-hour format. shows Summary Screen is disabled. This is because the user...to disable or auto. Parameter System Time System Date System Memory Extended Memory VGA Memory Quiet Boot Network Boot F12 Boot Menu D2D Recovery SATA Mode Description Format/Option Sets the system time. The hours are the default and suggested parameter settings. Format MM/DD/YYYY...
Aspire 5235 / 5535 Service Guide
Page 56
... memory update is not completely loaded. Then boot the system from the bootable diskette. NOTE: If you do not have a crisis recovery diskette at hand, then you should create a Crisis Recovery Diskette before you use the AC adaptor power supply when you may not boot the system because the BIOS is required...
... memory update is not completely loaded. Then boot the system from the bootable diskette. NOTE: If you do not have a crisis recovery diskette at hand, then you should create a Crisis Recovery Diskette before you use the AC adaptor power supply when you may not boot the system because the BIOS is required...

Aspire 5235 / 5535 Service Guide
Page 119
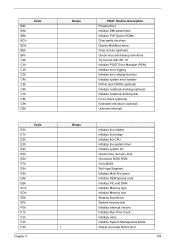
... Setup System Management Mode (SMM) area Display external L2 cache size Load custom defaults (optional) Display shadow-area message Display possible high address for UMB recovery Display error messages Check for configuration errors Check for keyboard errors Set up hardware interrupt vectors Initialize coprocessor if present Disable onboard Super I/O ports and...
... Setup System Management Mode (SMM) area Display external L2 cache size Load custom defaults (optional) Display shadow-area message Display possible high address for UMB recovery Display error messages Check for configuration errors Check for keyboard errors Set up hardware interrupt vectors Initialize coprocessor if present Disable onboard Super I/O ports and...
Aspire 5235 / 5535 Service Guide
Page 121
... Force check (optional) Extended checksum (optional) Unknown interrupt Initialize the chipset Initialize the bridge Initialize the CPU Initialize the system timer Initialize system I/O Check force recovery boot Checksum BIOS ROM Go to BIOS Set Huge Segment Initialize Multi Processor Initialize OEM special code Initialize PIC and DMA Initialize Memory type Initialize...
... Force check (optional) Extended checksum (optional) Unknown interrupt Initialize the chipset Initialize the bridge Initialize the CPU Initialize the system timer Initialize system I/O Check force recovery boot Checksum BIOS ROM Go to BIOS Set Huge Segment Initialize Multi Processor Initialize OEM special code Initialize PIC and DMA Initialize Memory type Initialize...

Aspire 5235 / 5535 Service Guide
Page 131
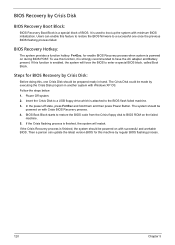
...5 119 Otherwise, please follow the steps and try again. Clearing Password Check and BIOS Recovery This section provide you the standard operating procedures of the HW Gap. • Plug in Aspire 5730Z/5330 Series is cleared. Clearing Password Check Hardware Open Gap Description Hardware Gap Default...for Clearing BIOS Password Check If users set BIOS Password (Supervisor Password and/or User Password) for Aspire 5730Z/5330 Series. NOTE: The steps are only for enabling BIOS Recovery. Aspire 5730Z/5330 Series provide one Hardware Open Gap on the system till BIOS POST finish.
...5 119 Otherwise, please follow the steps and try again. Clearing Password Check and BIOS Recovery This section provide you the standard operating procedures of the HW Gap. • Plug in Aspire 5730Z/5330 Series is cleared. Clearing Password Check Hardware Open Gap Description Hardware Gap Default...for Clearing BIOS Password Check If users set BIOS Password (Supervisor Password and/or User Password) for Aspire 5730Z/5330 Series. NOTE: The steps are only for enabling BIOS Recovery. Aspire 5730Z/5330 Series provide one Hardware Open Gap on the system till BIOS POST finish.
Aspire 5235 / 5535 Service Guide
Page 132
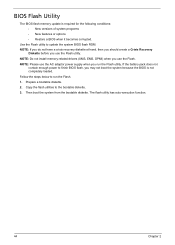
...code from the Crisis floppy disk to enter a special BIOS block, called Boot Block. Power Off system. 2. If the Crisis Recovery process is a special block of BIOS. BIOS Recovery by regular BIOS flashing process. 120 Chapter 5 Users can update the latest version BIOS for this function is attached to a ...BIOS flashing process failed. In the power-off state, press Fn+Esc and hold them and then press Power Button. Steps for enable BIOS Recovery process when system is finished, the system will force the BIOS to BIOS ROM on during BIOS POST. If the Crisis flashing process is...
...code from the Crisis floppy disk to enter a special BIOS block, called Boot Block. Power Off system. 2. If the Crisis Recovery process is a special block of BIOS. BIOS Recovery by regular BIOS flashing process. 120 Chapter 5 Users can update the latest version BIOS for this function is attached to a ...BIOS flashing process failed. In the power-off state, press Fn+Esc and hold them and then press Power Button. Steps for enable BIOS Recovery process when system is finished, the system will force the BIOS to BIOS ROM on during BIOS POST. If the Crisis flashing process is...


