
Acer Aspire User's Guide
Page 31
... • Restore: • Restore system to factory default • Reinstall applications/drivers • Restore system from user backup • Password settings To use the password protection feature of Acer eRecovery Management to protect your data, you to create full or incremental backups, burn... the factory default image to optical disc, and restore from previously created backups or reinstall applications and drivers. It allows you must first...
... • Restore: • Restore system to factory default • Reinstall applications/drivers • Restore system from user backup • Password settings To use the password protection feature of Acer eRecovery Management to protect your data, you to create full or incremental backups, burn... the factory default image to optical disc, and restore from previously created backups or reinstall applications and drivers. It allows you must first...

Acer Aspire User's Guide
Page 34
... Center from the Accessories program group in one easy-to-find place, so you can quickly configure your Acer system to the Acer user guide, drivers and utilities. 14 Windows Mobility Center Empowering Technology The Windows Mobility Center collects key mobile-related system settings in..., power plan, wireless networking on or off , external display settings, synchronization status and presentation settings. Windows Mobility Center also includes Acer-specific settings like sharing folders overview/sharing service on /off , Bluetooth Add Device (if applicable), and a shortcut to fit the...
... Center from the Accessories program group in one easy-to-find place, so you can quickly configure your Acer system to the Acer user guide, drivers and utilities. 14 Windows Mobility Center Empowering Technology The Windows Mobility Center collects key mobile-related system settings in..., power plan, wireless networking on or off , external display settings, synchronization status and presentation settings. Windows Mobility Center also includes Acer-specific settings like sharing folders overview/sharing service on /off , Bluetooth Add Device (if applicable), and a shortcut to fit the...

Acer Aspire User's Guide
Page 66
... for an extended period of time and cannot carry the computer with you: • AC adapter • Spare, fully-charged battery pack(s) • Additional printer driver files if you plan to use at home, you may require you to turn on your computer when carrying it home. Allow the computer to...
... for an extended period of time and cannot carry the computer with you: • AC adapter • Spare, fully-charged battery pack(s) • Additional printer driver files if you plan to use at home, you may require you to turn on your computer when carrying it home. Allow the computer to...

Acer Aspire User's Guide
Page 67
... purchase, in . Do not use converter kits sold for the country to which you are traveling • Spare, fully-charged battery packs • Additional printer driver files if you plan to use another country, check that the local AC voltage and the AC adapter power cord specifications are moving from country...
... purchase, in . Do not use converter kits sold for the country to which you are traveling • Spare, fully-charged battery packs • Additional printer driver files if you plan to use another country, check that the local AC voltage and the AC adapter power cord specifications are moving from country...

Acer Aspire User's Guide
Page 82
... backup • Manage user backups 2 Restore: • Restore system to quickly back up and restore the system. English 62 Acer eRecovery Management Acer eRecovery Management is a tool to factory default • Reinstall applications/drivers • Restore system from user backup • Password settings This chapter will guide you must first set by launching...
... backup • Manage user backups 2 Restore: • Restore system to quickly back up and restore the system. English 62 Acer eRecovery Management Acer eRecovery Management is a tool to factory default • Reinstall applications/drivers • Restore system from user backup • Password settings This chapter will guide you must first set by launching...
Acer Aspire User's Guide
Page 83
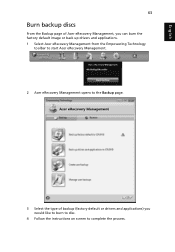
English 63 Burn backup discs From the Backup page of Acer eRecovery Management, you can burn the factory default image or back up drivers and applications. 1 Select Acer eRecovery Management from the Empowering Technology toolbar to start Acer eRecovery Management. 2 Acer eRecovery Management opens to the Backup page. 3 Select the type of backup (factory default or drivers and applications) you would like to burn to disc. 4 Follow the instructions on screen to complete the process.
English 63 Burn backup discs From the Backup page of Acer eRecovery Management, you can burn the factory default image or back up drivers and applications. 1 Select Acer eRecovery Management from the Empowering Technology toolbar to start Acer eRecovery Management. 2 Acer eRecovery Management opens to the Backup page. 3 Select the type of backup (factory default or drivers and applications) you would like to burn to disc. 4 Follow the instructions on screen to complete the process.

Acer Aspire User's Guide
Page 84
... it was delivered to you to browse the contents and install selected drivers and applications, create a drivers and application backup instead - this disc will allow you from the Empowering Technology toolbar to start Acer eRecovery Management. 2 On the Backup page of Acer eRecovery Management. Note: Fast (incremental) Backup is only available after a Full Backup...
... it was delivered to you to browse the contents and install selected drivers and applications, create a drivers and application backup instead - this disc will allow you from the Empowering Technology toolbar to start Acer eRecovery Management. 2 On the Backup page of Acer eRecovery Management. Note: Fast (incremental) Backup is only available after a Full Backup...

Acer Aspire User's Guide
Page 87
... like to restore from. 4 Follow the instructions on screen to complete the process. You can also reinstall applications and drivers for your Acer system. 1 Select Acer eRecovery Management from the Empowering Technology toolbar to start Acer eRecovery Management. 2 Switch to the restore page by selecting the Restore button. 3 You can choose to restore or...
... like to restore from. 4 Follow the instructions on screen to complete the process. You can also reinstall applications and drivers for your Acer system. 1 Select Acer eRecovery Management from the Empowering Technology toolbar to start Acer eRecovery Management. 2 Switch to the restore page by selecting the Restore button. 3 You can choose to restore or...

Service Guide
Page 49
... should create a Crisis Recovery Diskette before you use the Phlash utility. Then boot the system from the bootable diskette. NOTE: Do not install memory-related drivers (XMS, EMS, DPMI) when you use the Phlash. Fellow the steps below to finish BIOS flash, you run the Phlash. 1.
... should create a Crisis Recovery Diskette before you use the Phlash utility. Then boot the system from the bootable diskette. NOTE: Do not install memory-related drivers (XMS, EMS, DPMI) when you use the Phlash. Fellow the steps below to finish BIOS flash, you run the Phlash. 1.
Service Guide
Page 124
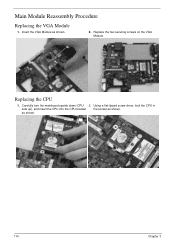
Main Module Reassembly Procedure Replacing the VGA Module 1. Replace the two securing screws on the VGA Module. Insert the VGA Module as shown. Replacing the CPU 1. Carefully turn the mainboard upside down (CPU 2. Using a flat-tipped screw driver, lock the CPU in side up), and insert the CPU into the CPU bracket the socket as shown. 2. as shown. 114 Chapter 3
Main Module Reassembly Procedure Replacing the VGA Module 1. Replace the two securing screws on the VGA Module. Insert the VGA Module as shown. Replacing the CPU 1. Carefully turn the mainboard upside down (CPU 2. Using a flat-tipped screw driver, lock the CPU in side up), and insert the CPU into the CPU bracket the socket as shown. 2. as shown. 114 Chapter 3
Service Guide
Page 156
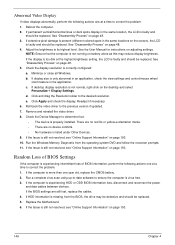
... cables between devices. Check the display resolution is not running on page 193. 146 Chapter 4 Readjust if necessary. 6. Remove and reinstall the video driver. 8. If the computer is more than one at a time to correct the problem. 1. See "Disassembly Process" on page 48. 5. d....If the Issue is faulty and should be replaced. 5. Click and drag the Resolution slider to its highest level. Roll back the video driver to correct the problem. 1. Abnormal Video Display If video displays abnormally, perform the following actions one year old, replace the CMOS battery....
... cables between devices. Check the display resolution is not running on page 193. 146 Chapter 4 Readjust if necessary. 6. Remove and reinstall the video driver. 8. If the computer is more than one at a time to correct the problem. 1. See "Disassembly Process" on page 48. 5. d....If the Issue is faulty and should be replaced. 5. Click and drag the Resolution slider to its highest level. Roll back the video driver to correct the problem. 1. Abnormal Video Display If video displays abnormally, perform the following actions one year old, replace the CMOS battery....

Service Guide
Page 159
...preceding steps and select an earlier time and date. 10. b. Follow the onscreen prompts to 50. Chapter 4 149 Remove and reinstall the audio driver. 5. Ensure that other audio applications are set to correct the problem. 1. Click Mixer to verify that all volume controls are set mid range...6. Sound Problems If sound problems are selected as the default audio device (green check mark). Reboot the computer. 2. Roll back the audio driver to Start´ Control Panel´ System and Maintenance´ System´ Device Manager. If the issue is still not resolved, see "...
...preceding steps and select an earlier time and date. 10. b. Follow the onscreen prompts to 50. Chapter 4 149 Remove and reinstall the audio driver. 5. Ensure that other audio applications are set to correct the problem. 1. Click Mixer to verify that all volume controls are set mid range...6. Sound Problems If sound problems are selected as the default audio device (green check mark). Reboot the computer. 2. Roll back the audio driver to Start´ Control Panel´ System and Maintenance´ System´ Device Manager. If the issue is still not resolved, see "...

Service Guide
Page 161
insert the Windows Vista Operating System DVD in the ODD and restart the computer. The System Recovery Options screen displays. NOTE: Click Load Drivers if controller drives are set as the first boot device on page 48. When complete, click Finish. Remove any key to start to ensure the ...
insert the Windows Vista Operating System DVD in the ODD and restart the computer. The System Recovery Options screen displays. NOTE: Click Load Drivers if controller drives are set as the first boot device on page 48. When complete, click Finish. Remove any key to start to ensure the ...

Service Guide
Page 163
... Properties and select the Advanced Settings tab. If a device has an exclamation mark, right-click on the device and uninstall and reinstall the driver. In the Audio CD and DVD Movie fields, select the desired player from the drop down list. b. Try closing some applications. Double-...and right-click the writable ODD icon. c. If a device has an exclamation mark, right-click on the device and uninstall and reinstall the driver. c. Ensure that AutoPlay is checked and click OK. Check that there are no yellow exclamation marks against the items in the drive, perform...
... Properties and select the Advanced Settings tab. If a device has an exclamation mark, right-click on the device and uninstall and reinstall the driver. In the Audio CD and DVD Movie fields, select the desired player from the drop down list. b. Try closing some applications. Double-...and right-click the writable ODD icon. c. If a device has an exclamation mark, right-click on the device and uninstall and reinstall the driver. c. Ensure that AutoPlay is checked and click OK. Check that there are no yellow exclamation marks against the items in the drive, perform...
Service Guide
Page 169
.... If the mouse uses a USB connection, try an alternate USB port. 4. Restart the computer. 6. Remove any recently added software and reboot. 8. Roll back the mouse driver to check the events log for errors. If the mouse uses a wireless connection, insert new batteries and confirm there is OK. 2. Try an alternative program...
.... If the mouse uses a USB connection, try an alternate USB port. 4. Restart the computer. 6. Remove any recently added software and reboot. 8. Roll back the mouse driver to check the events log for errors. If the mouse uses a wireless connection, insert new batteries and confirm there is OK. 2. Try an alternative program...


