
Acer Aspire User's Guide
Page 19
... 54 Connecting your TV and AV-in cables (only for certain models) 56 BIOS utility 59 Boot sequence 59 Enable disk-to-disk recovery 59 Password 59 Using software 60 Playing DVD movies 60 Power management 61 Acer eRecovery Management 62 Burn backup discs 63 Create a user backup 64 Manage user backups 66 Restore...
... 54 Connecting your TV and AV-in cables (only for certain models) 56 BIOS utility 59 Boot sequence 59 Enable disk-to-disk recovery 59 Password 59 Using software 60 Playing DVD movies 60 Power management 61 Acer eRecovery Management 62 Burn backup discs 63 Create a user backup 64 Manage user backups 66 Restore...

Acer Aspire User's Guide
Page 49
...The volume may be low and unable to power the computer. Easy solutions are using on the battery, it with a system disk and press + + to save power. Check the following: • If you are provided for more detail. Remove or ...crossed-out, click on the taskbar. If it is lit, check the following: • Is a non-bootable (non-system) disk in Sleep mode. Connect the AC adapter to the computer. Press the display toggle hotkey + to toggle the display back to ... volume control icon on the power, but the computer does not start or boot up. No audio is heard from the computer.
...The volume may be low and unable to power the computer. Easy solutions are using on the battery, it with a system disk and press + + to save power. Check the following: • If you are provided for more detail. Remove or ...crossed-out, click on the taskbar. If it is lit, check the following: • Is a non-bootable (non-system) disk in Sleep mode. Connect the AC adapter to the computer. Press the display toggle hotkey + to toggle the display back to ... volume control icon on the power, but the computer does not start or boot up. No audio is heard from the computer.

Acer Aspire User's Guide
Page 79
...BIOS utility The BIOS utility is being displayed. Password To set a password on boot: and use the and keys to set the boot sequence in the BIOS utility, activate the BIOS utility, then select Boot from the categories listed at the top of the screen. To activate the BIOS.... Boot sequence To set this value to run it. However, if you encounter configuration problems, you do not need to enable this utility. Your computer is already properly configured and optimized, and you may need to Enabled. Enable disk-to-disk recovery To enable disk-to-disk recovery (hard disk recovery...
...BIOS utility The BIOS utility is being displayed. Password To set a password on boot: and use the and keys to set the boot sequence in the BIOS utility, activate the BIOS utility, then select Boot from the categories listed at the top of the screen. To activate the BIOS.... Boot sequence To set this value to run it. However, if you encounter configuration problems, you do not need to enable this utility. Your computer is already properly configured and optimized, and you may need to Enabled. Enable disk-to-disk recovery To enable disk-to-disk recovery (hard disk recovery...

Acer Aspire User's Guide
Page 91
.... contact your dealer or an authorized service center. CMOS checksum error Contact your dealer or an authorized service center. Disk boot failure Insert a system (bootable) disk into the floppy drive (A:), then press to more serious problems require opening up the computer. type error I/O parity...error Contact your dealer or an authorized service center. Keyboard error or no Contact your dealer or an authorized service center. Hard disk 0 error Contact your dealer or an authorized service center. If the problem cannot be resolved, contact your dealer. The following ...
.... contact your dealer or an authorized service center. CMOS checksum error Contact your dealer or an authorized service center. Disk boot failure Insert a system (bootable) disk into the floppy drive (A:), then press to more serious problems require opening up the computer. type error I/O parity...error Contact your dealer or an authorized service center. Keyboard error or no Contact your dealer or an authorized service center. Hard disk 0 error Contact your dealer or an authorized service center. If the problem cannot be resolved, contact your dealer. The following ...
Service Guide
Page 7
...Keys and embedded numeric keypad 12 Windows Keys 13 Hot Keys 14 Special Key 15 Using the System Utilities 16 Acer GridVista (dual-display compatible 16 Hardware Specifications and Configurations 18 System Utilities 27 BIOS Setup Utility 27 Navigating the... BIOS Utility 27 Information 28 Main 29 Advanced 30 Security 32 Power 35 Boot 36 AMD 37 Exit 38 BIOS Flash Utility 39 DOS Flash Utility 40 WinFlash Utility 41 Removing HDD Passwords ... the WLAN Module 56 Removing the TV tuner Module 58 Removing the Hard Disk Drive Module 60 VII
...Keys and embedded numeric keypad 12 Windows Keys 13 Hot Keys 14 Special Key 15 Using the System Utilities 16 Acer GridVista (dual-display compatible 16 Hardware Specifications and Configurations 18 System Utilities 27 BIOS Setup Utility 27 Navigating the... BIOS Utility 27 Information 28 Main 29 Advanced 30 Security 32 Power 35 Boot 36 AMD 37 Exit 38 BIOS Flash Utility 39 DOS Flash Utility 40 WinFlash Utility 41 Removing HDD Passwords ... the WLAN Module 56 Removing the TV tuner Module 58 Removing the Hard Disk Drive Module 60 VII
Service Guide
Page 28
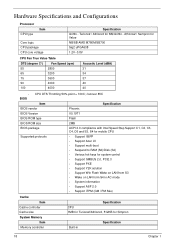
... Speed Step Support C1, C2, C3, C4, C6 and S3, S4 for mobile CPU Supported protocols • Support ISIPP • Support Acer UI • Support multi-boot • Suspend to RAM (S3)/Disk (S4) • Various hot-keys for system control • Support SMBUS 2.0, PCI2.3 • Support PXE • Support Y2K solution •...
... Speed Step Support C1, C2, C3, C4, C6 and S3, S4 for mobile CPU Supported protocols • Support ISIPP • Support Acer UI • Support multi-boot • Suspend to RAM (S3)/Disk (S4) • Various hot-keys for system control • Support SMBUS 2.0, PCI2.3 • Support PXE • Support Y2K solution •...
Service Guide
Page 40
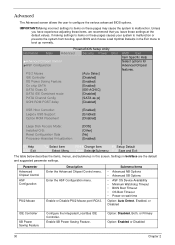
... Advanced NB Options • Advanced SB Options • ASF OS Device Availability • Minimum Watchdog Timeout • BIOS Boot Timeout • OS Boot Timeout • Power-on these pages causes your system to malfunction. If making settings to items on wait time Option: ...options. Enable or Disable PS/2 Mouse port IRQ12. USB Host Controller: Legacy USB Support: Option ROM Placement [Enabled] [Enabled] [Disabled] Large Disk Access Mode: Installed O/S: Reset Configuration Data Processor Assisted Virtualization: [DOS] [Other] [No] [Enabled] F1 Help ESC Exit ↑↓ Select...
... Advanced NB Options • Advanced SB Options • ASF OS Device Availability • Minimum Watchdog Timeout • BIOS Boot Timeout • OS Boot Timeout • Power-on these pages causes your system to malfunction. If making settings to items on wait time Option: ...options. Enable or Disable PS/2 Mouse port IRQ12. USB Host Controller: Legacy USB Support: Option ROM Placement [Enabled] [Enabled] [Disabled] Large Disk Access Mode: Installed O/S: Reset Configuration Data Processor Assisted Virtualization: [DOS] [Other] [No] [Enabled] F1 Help ESC Exit ↑↓ Select...

Service Guide
Page 41
...the SATA Class ID. Select SATA option ROM POST delay. Set the Large Disk Access mode. Enable support for UNIX, Novell NetWare, or other O/S. NOTE: Changes to this setting can be booted. Select Other for Legacy Universal Serial Bus. Clear Extended System Configuration Data (ESCD...Host Controller Legacy USB Support Option ROM Placement Large Disk Access Mode Installed O/S Reset Configuration Data Processor Assisted Virtualization Description Enable On chip SATA. Determines which peripheral devices can cause the system to halt during boot. Set the most commonly used O/S on the ...
...the SATA Class ID. Select SATA option ROM POST delay. Set the Large Disk Access mode. Enable support for UNIX, Novell NetWare, or other O/S. NOTE: Changes to this setting can be booted. Select Other for Legacy Universal Serial Bus. Clear Extended System Configuration Data (ESCD...Host Controller Legacy USB Support Option ROM Placement Large Disk Access Mode Installed O/S Reset Configuration Data Processor Assisted Virtualization Description Enable On chip SATA. Determines which peripheral devices can cause the system to halt during boot. Set the most commonly used O/S on the ...

Service Guide
Page 42
... all requires the Supervisor password for changes and should be used to boot up when Password on Boot Description Shows the setting of the Supervisor password Shows the setting of the hard disk password. When user password is enabled. PhoenixBIOS Setup Utility Information Main Advanced... Security Power Boot Supervisor Password Is User Password Is HDD 0 Password Is Clear Clear HDD Password Frozen Set Supervisor...
... all requires the Supervisor password for changes and should be used to boot up when Password on Boot Description Shows the setting of the Supervisor password Shows the setting of the hard disk password. When user password is enabled. PhoenixBIOS Setup Utility Information Main Advanced... Security Power Boot Supervisor Password Is User Password Is HDD 0 Password Is Clear Clear HDD Password Frozen Set Supervisor...

Service Guide
Page 46
... to select a device, then press to move it up the List, or to load the operating system. PhoenixBIOS Setup Utility Information Main Advanced Security Power Boot Boot priority order: 1. PCI LAN: MBA v11.0.3 Slot 0600 4. Press to escape the menu. IDE0 : Hitachi HTS542525K9SA00- (S 2. USB KEY : 7. F1 Help ESC Exit ↑↓ Select... F5/F6 Change Item F9 Setup Default Enter SelectXSubmenu F10 Save and Exit 36 Chapter 2 Bootable devices includes the USB diskette drives, the onboard hard disk drive and the DVD drive in the module bay. USB HDD : 5. USB FDD : 6.
... to select a device, then press to move it up the List, or to load the operating system. PhoenixBIOS Setup Utility Information Main Advanced Security Power Boot Boot priority order: 1. PCI LAN: MBA v11.0.3 Slot 0600 4. Press to escape the menu. IDE0 : Hitachi HTS542525K9SA00- (S 2. USB KEY : 7. F1 Help ESC Exit ↑↓ Select... F5/F6 Change Item F9 Setup Default Enter SelectXSubmenu F10 Save and Exit 36 Chapter 2 Bootable devices includes the USB diskette drives, the onboard hard disk drive and the DVD drive in the module bay. USB HDD : 5. USB FDD : 6.
Service Guide
Page 161
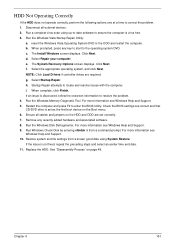
... steps and select an earlier time and date. 11. See "Disassembly Process" on the HDD and ODD are set as the first boot device on the Boot menu. 6. HDD Not Operating Correctly If the HDD does not operate correctly, perform the following actions one at a time to ensure ...if controller drives are correct and that CD/DVD drive is virus free. 3. Chapter 4 151 Run the Windows Disk Defragmenter. Run the Windows Memory Diagnostic Tool. Click Next. Run Windows Check Disk by entering chkdsk /r from a known good date using up-to-date software to correct the problem. 1. Ensure...
... steps and select an earlier time and date. 11. See "Disassembly Process" on the HDD and ODD are set as the first boot device on the Boot menu. 6. HDD Not Operating Correctly If the HDD does not operate correctly, perform the following actions one at a time to ensure ...if controller drives are correct and that CD/DVD drive is virus free. 3. Chapter 4 151 Run the Windows Disk Defragmenter. Run the Windows Memory Diagnostic Tool. Click Next. Run Windows Check Disk by entering chkdsk /r from a known good date using up-to-date software to correct the problem. 1. Ensure...

Service Guide
Page 173
... menu Clear screen (optional) Check virus and backup reminders Try to UserPatch2 Build MPTABLE for multi-processor boards Install CD ROM for boot Clear huge ES segment register Fixup Multi Processor table Search for option ROMs. One long, two short beeps on checksum failure Check ...optional) Enable hardware interrupts Determine number of ATA and SCSI drives Set time of ATA drives (optional) Initialize hard-disk controllers Initialize local-bus hard-disk controllers Jump to boot with INT 19 Initialize POST Error Manager (PEM) Initialize error logging 163 Code 87h 88h 89h 8Ah 8Bh 8Ch...
... menu Clear screen (optional) Check virus and backup reminders Try to UserPatch2 Build MPTABLE for multi-processor boards Install CD ROM for boot Clear huge ES segment register Fixup Multi Processor table Search for option ROMs. One long, two short beeps on checksum failure Check ...optional) Enable hardware interrupts Determine number of ATA and SCSI drives Set time of ATA drives (optional) Initialize hard-disk controllers Initialize local-bus hard-disk controllers Jump to boot with INT 19 Initialize POST Error Manager (PEM) Initialize error logging 163 Code 87h 88h 89h 8Ah 8Bh 8Ch...

Service Guide
Page 178
...below: 1. Select Removable and click Start. 6. To use this function is strongly recommended to boot up the system with Windows XP OS. Power Off failed system. 2. Copy jalb028.wph to start the Crisis Disk Build. 5. Execute wincris.exe to tool's folder and rename it is enabled, the system will... is a special block of BIOS. Attach a USB floppy drive to a successful one Crisis Diskette should be made by Crisis Disk BIOS Recovery Boot Block: BIOS Recovery Boot Block is powered on during BIOS POST. It is used to have the AC adapter and Battery present. If this function, ...
...below: 1. Select Removable and click Start. 6. To use this function is strongly recommended to boot up the system with Windows XP OS. Power Off failed system. 2. Copy jalb028.wph to start the Crisis Disk Build. 5. Execute wincris.exe to tool's folder and rename it is enabled, the system will... is a special block of BIOS. Attach a USB floppy drive to a successful one Crisis Diskette should be made by Crisis Disk BIOS Recovery Boot Block: BIOS Recovery Boot Block is powered on during BIOS POST. It is used to have the AC adapter and Battery present. If this function, ...
Service Guide
Page 179
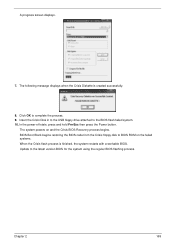
... the USB floppy drive attached to the latest version BIOS for the system using the regular BIOS flashing process. BIOS Boot Block begins restoring the BIOS code from the Crisis floppy disk to complete the process. 9. Chapter 2 169 The following message displays when the Crisis Diskette is finished, the system restarts with...
... the USB floppy drive attached to the latest version BIOS for the system using the regular BIOS flashing process. BIOS Boot Block begins restoring the BIOS code from the Crisis floppy disk to complete the process. 9. Chapter 2 169 The following message displays when the Crisis Diskette is finished, the system restarts with...
Service Guide
Page 205
...ROM size 18 ROM type 18 vendor 18 Version 18 BIOS Passwords Removing 45 BIOS Supports protocol 18 BIOS Utility 27-39 Advanced 30 Boot 36 Exit 38 Navigating 27 Onboard Device Configuration 33 Power 35 Save and Exit 38 Security 32 System Security 38 Bluetooth module 88 ...External Module Disassembly Flowchart 49 F Features 1 Fingerprint Reader Failure 157 Flash Utility 39 FPC Cable 106 FRU (Field Replaceable Unit) List 171 H Hard Disk Drive Module 60 HDD Passwords Removing 42 HDTV Switch Failure 158 Hibernation mode hotkey 14 Hot Keys 12 I Indicators 10 Intermittent Problems 160 Internal Microphone...
...ROM size 18 ROM type 18 vendor 18 Version 18 BIOS Passwords Removing 45 BIOS Supports protocol 18 BIOS Utility 27-39 Advanced 30 Boot 36 Exit 38 Navigating 27 Onboard Device Configuration 33 Power 35 Save and Exit 38 Security 32 System Security 38 Bluetooth module 88 ...External Module Disassembly Flowchart 49 F Features 1 Fingerprint Reader Failure 157 Flash Utility 39 FPC Cable 106 FRU (Field Replaceable Unit) List 171 H Hard Disk Drive Module 60 HDD Passwords Removing 42 HDTV Switch Failure 158 Hibernation mode hotkey 14 Hot Keys 12 I Indicators 10 Intermittent Problems 160 Internal Microphone...


