Service Guide
Page 7
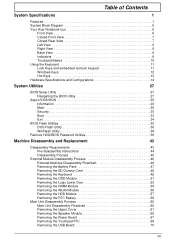
Table of Contents System Specifications 1 Features 1 System Block Diagram 5 Your Acer Notebook tour 6 Front View 6 Closed Front View 7 Closed Rear View 7 Left ... 27 BIOS Setup Utility 27 Navigating the BIOS Utility 27 Aspire 5336 BIOS 28 Information 28 Main 29 Security 30 Boot 33 Exit 34 BIOS Flash Utilities 35 DOS Flash Utility 36 WinFlash Utility 38 Remove HDD/BIOS Password ... DIMM Module 54 Removing the WLAN Module 55 Removing the HDD Module 57 Removing the RTC Battery 59 Main Unit Disassembly Process 60 Main Unit Disassembly Flowchart 60 Removing the Upper Cover 61...
Table of Contents System Specifications 1 Features 1 System Block Diagram 5 Your Acer Notebook tour 6 Front View 6 Closed Front View 7 Closed Rear View 7 Left ... 27 BIOS Setup Utility 27 Navigating the BIOS Utility 27 Aspire 5336 BIOS 28 Information 28 Main 29 Security 30 Boot 33 Exit 34 BIOS Flash Utilities 35 DOS Flash Utility 36 WinFlash Utility 38 Remove HDD/BIOS Password ... DIMM Module 54 Removing the WLAN Module 55 Removing the HDD Module 57 Removing the RTC Battery 59 Main Unit Disassembly Process 60 Main Unit Disassembly Flowchart 60 Removing the Upper Cover 61...
Service Guide
Page 8
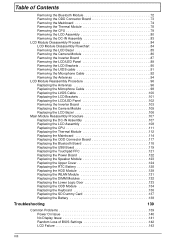
... Board 119 Replacing the Touchpad FFC 121 Replacing the Power Board 122 Replacing the Speaker Module 123 Replacing the Upper Cover 124 Replacing the RTC Battery 128 Replacing the HDD Module 129 Replacing the WLAN Module 131 Replacing the DIMM Modules 132 Replacing the Lower Logic Door 133 Replacing the ODD... Module 134 Replacing the Keyboard 136 Replacing the SD Dummy Card 137 Replacing the Battery 138 Troubleshooting 139 Common Problems 139 Power On Issue 140 No Display Issue 141 Random Loss of...
... Board 119 Replacing the Touchpad FFC 121 Replacing the Power Board 122 Replacing the Speaker Module 123 Replacing the Upper Cover 124 Replacing the RTC Battery 128 Replacing the HDD Module 129 Replacing the WLAN Module 131 Replacing the DIMM Modules 132 Replacing the Lower Logic Door 133 Replacing the ODD... Module 134 Replacing the Keyboard 136 Replacing the SD Dummy Card 137 Replacing the Battery 138 Troubleshooting 139 Common Problems 139 Power On Issue 140 No Display Issue 141 Random Loss of...
Service Guide
Page 12
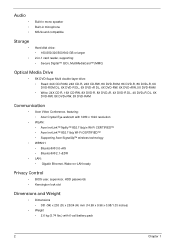
...• Acer InviLink™ 802.11b/g Wi-Fi CERTIFIED™ • Supporting Acer SignalUp™ wireless technology • WPAN:1 • Bluetooth® 3.0+HS • Bluetooth® 2.1+EDR • LAN: • Gigabit Ethernet, Wake-on-LAN ready Privacy Control • BIOS user, ...supervisor, HDD passwords • Kensington lock slot Dimensions and Weight • Dimensions • 381 (W) x 253 (D) x 25/34 (H) mm (14.99 x 9.96 x 0.98/1.33 inches) • Weight • 2.6 kg (5.74 lbs.) with 6-cell battery pack 2 Chapter 1
...• Acer InviLink™ 802.11b/g Wi-Fi CERTIFIED™ • Supporting Acer SignalUp™ wireless technology • WPAN:1 • Bluetooth® 3.0+HS • Bluetooth® 2.1+EDR • LAN: • Gigabit Ethernet, Wake-on-LAN ready Privacy Control • BIOS user, ...supervisor, HDD passwords • Kensington lock slot Dimensions and Weight • Dimensions • 381 (W) x 253 (D) x 25/34 (H) mm (14.99 x 9.96 x 0.98/1.33 inches) • Weight • 2.6 kg (5.74 lbs.) with 6-cell battery pack 2 Chapter 1
Service Guide
Page 45
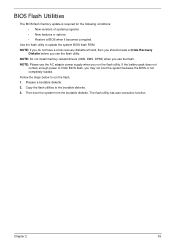
...you use the flash. The flash utility has auto-execution function. Follow the steps below to finish BIOS flash, you use the flash utility. Copy the flash utilities to update the system BIOS flash ROM. Then boot the system from the bootable diskette. Chapter 2 35 Prepare a bootable ... DPMI) when you may not boot the system because the BIOS is required for the following conditions: • New versions of system programs • New features or options • Restore a BIOS when it becomes corrupted. If the battery pack does not contain enough power to run the flash utility...
...you use the flash. The flash utility has auto-execution function. Follow the steps below to finish BIOS flash, you use the flash utility. Copy the flash utilities to update the system BIOS flash ROM. Then boot the system from the bootable diskette. Chapter 2 35 Prepare a bootable ... DPMI) when you may not boot the system because the BIOS is required for the following conditions: • New versions of system programs • New features or options • Restore a BIOS when it becomes corrupted. If the battery pack does not contain enough power to run the flash utility...
Service Guide
Page 152
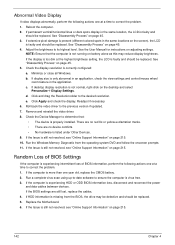
...experiencing HDD or ODD BIOS information loss, disconnect and reconnect the power and data cables between devices. Check the display resolution is missing from the operating system DVD and follow the onscreen prompts. 11. If display size is more than one year old, replace the CMOS battery. 2. If the ...computer is only abnormal in an application, check the view settings and control/mouse wheel zoom feature in the same locations on page 45. 5. If the BIOS settings are no red Xs or yellow exclamation marks. •...
...experiencing HDD or ODD BIOS information loss, disconnect and reconnect the power and data cables between devices. Check the display resolution is missing from the operating system DVD and follow the onscreen prompts. 11. If display size is more than one year old, replace the CMOS battery. 2. If the ...computer is only abnormal in an application, check the view settings and control/mouse wheel zoom feature in the same locations on page 45. 5. If the BIOS settings are no red Xs or yellow exclamation marks. •...
Service Guide
Page 171
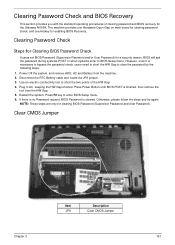
... (Supervisor Password and/or User Password) for clearing BIOS Password (Supervisor Password and User Password). Otherwise, please follow the steps and try again. Power Off the system, and remove HDD, AC and Battery from the HW Gap. 5. The machine provides one Hardware Open Gap on main board for clearing ...password check, and one Hotkey for the Gateway NV50A. Plug in AC, keeping the HW Gap shorted. Press Power Button until BIOS POST is cleared. If there ...
... (Supervisor Password and/or User Password) for clearing BIOS Password (Supervisor Password and User Password). Otherwise, please follow the steps and try again. Power Off the system, and remove HDD, AC and Battery from the HW Gap. 5. The machine provides one Hardware Open Gap on main board for clearing ...password check, and one Hotkey for the Gateway NV50A. Plug in AC, keeping the HW Gap shorted. Press Power Button until BIOS POST is cleared. If there ...
Service Guide
Page 172
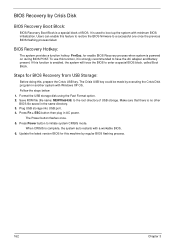
... strongly recommended to the root directory of BIOS. BIOS Recovery by regular BIOS flashing process. 162 Chapter 3 To use this function is powered on during BIOS POST. Save ROM file (file name: NEW70x64.fd) to have the AC adapter and Battery present. When CRISIS is a special block... of USB storage. Update the latest version BIOS for BIOS Recovery from USB Storage: Before doing this machine by Crisis Disk BIOS Recovery Boot Block: BIOS Recovery Boot Block is complete, the system auto...
... strongly recommended to the root directory of BIOS. BIOS Recovery by regular BIOS flashing process. 162 Chapter 3 To use this function is powered on during BIOS POST. Save ROM file (file name: NEW70x64.fd) to have the AC adapter and Battery present. When CRISIS is a special block... of USB storage. Update the latest version BIOS for BIOS Recovery from USB Storage: Before doing this machine by Crisis Disk BIOS Recovery Boot Block: BIOS Recovery Boot Block is complete, the system auto...
Service Guide
Page 227
A Antennas Removing 92, 94 Replacing 96 B Base View 9 Battery Replacing 138 Battery Pack Removing 47 BIOS Utility 27-35 Advanced 30 Boot 33 Exit 34 Navigating 27 Onboard Device Configuration 31 Power 33 Save and Exit 34 Security 30 System Security ...
A Antennas Removing 92, 94 Replacing 96 B Base View 9 Battery Replacing 138 Battery Pack Removing 47 BIOS Utility 27-35 Advanced 30 Boot 33 Exit 34 Navigating 27 Onboard Device Configuration 31 Power 33 Save and Exit 34 Security 30 System Security ...


