Service Guide
Page 7
Table of Contents System Specifications 1 Features 1 System Block Diagram 5 Your Acer Notebook tour 6 Front View 6 Closed Front View 7 Closed Rear View 7 Left View 8 Right View 8 Base View 9 Indicators 9 Touchpad Basics 10 Using the...13 Hardware Specifications and Configurations 14 System Utilities 27 BIOS Setup Utility 27 Navigating the BIOS Utility 27 Aspire 5336 BIOS 28 Information 28 Main 29 Security 30 Boot 33 Exit 34 BIOS Flash Utilities 35 DOS Flash Utility 36 WinFlash Utility 38 Remove HDD/BIOS Password Utilities 39 Machine Disassembly and Replacement 43 ...
Table of Contents System Specifications 1 Features 1 System Block Diagram 5 Your Acer Notebook tour 6 Front View 6 Closed Front View 7 Closed Rear View 7 Left View 8 Right View 8 Base View 9 Indicators 9 Touchpad Basics 10 Using the...13 Hardware Specifications and Configurations 14 System Utilities 27 BIOS Setup Utility 27 Navigating the BIOS Utility 27 Aspire 5336 BIOS 28 Information 28 Main 29 Security 30 Boot 33 Exit 34 BIOS Flash Utilities 35 DOS Flash Utility 36 WinFlash Utility 38 Remove HDD/BIOS Password Utilities 39 Machine Disassembly and Replacement 43 ...
Service Guide
Page 8
... the SD Dummy Card 137 Replacing the Battery 138 Troubleshooting 139 Common Problems 139 Power On Issue 140 No Display Issue 141 Random Loss of BIOS Settings 142 LCD Failure 143 VIII
... the SD Dummy Card 137 Replacing the Battery 138 Troubleshooting 139 Common Problems 139 Power On Issue 140 No Display Issue 141 Random Loss of BIOS Settings 142 LCD Failure 143 VIII
Service Guide
Page 9
...159 USB/B Board 160 ODD Board 160 Clearing Password Check and BIOS Recovery 161 Clearing Password Check 161 Clear CMOS Jumper 161 BIOS Recovery by Crisis Disk 162 FRU (Field Replaceable Unit) List 163 Aspire 5336 Exploded Diagrams 164 Main Assembly 164 Upper Assembly 165 LCD Assembly ...166 LED Assembly 167 Aspire 5336 FRU List 168 Screw List 187 Model Definition ...
...159 USB/B Board 160 ODD Board 160 Clearing Password Check and BIOS Recovery 161 Clearing Password Check 161 Clear CMOS Jumper 161 BIOS Recovery by Crisis Disk 162 FRU (Field Replaceable Unit) List 163 Aspire 5336 Exploded Diagrams 164 Main Assembly 164 Upper Assembly 165 LCD Assembly ...166 LED Assembly 167 Aspire 5336 FRU List 168 Screw List 187 Model Definition ...
Service Guide
Page 12
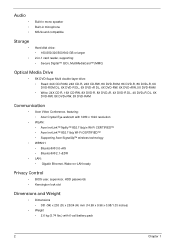
...8X DVD+RW, 5X DVD-RAM Communication • Acer Video Conference, featuring: • Acer Crystal Eye webcam with 1280 x 1024 resolution • WLAN: • Acer InviLink™ Nplify™ 802.11b/g/n Wi-Fi CERTIFIED™ • Acer InviLink™ 802.11b/g Wi-Fi CERTIFIED™... • Supporting Acer SignalUp™ wireless technology • WPAN:1 • Bluetooth® 3.0+HS • Bluetooth® 2.1+EDR • LAN: • Gigabit Ethernet, Wake-on-LAN ready Privacy Control • BIOS user, supervisor,...
...8X DVD+RW, 5X DVD-RAM Communication • Acer Video Conference, featuring: • Acer Crystal Eye webcam with 1280 x 1024 resolution • WLAN: • Acer InviLink™ Nplify™ 802.11b/g/n Wi-Fi CERTIFIED™ • Acer InviLink™ 802.11b/g Wi-Fi CERTIFIED™... • Supporting Acer SignalUp™ wireless technology • WPAN:1 • Bluetooth® 3.0+HS • Bluetooth® 2.1+EDR • LAN: • Gigabit Ethernet, Wake-on-LAN ready Privacy Control • BIOS user, supervisor,...
Service Guide
Page 23
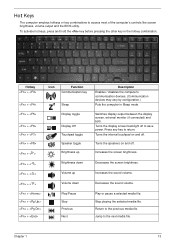
... screen brightness. Hot Keys The computer employs hotkeys or key combinations to access most of the computer's controls like screen brightness, volume output and the BIOS utility. Hotkey + Icon Function Communication key + + + + + + < > + < > + < > + < > + + + + Sleep Display toggle Display Off Touchpad toggle Speaker toggle Brightness up Brightness down Volume up Volume down Play/Pause...
... screen brightness. Hot Keys The computer employs hotkeys or key combinations to access most of the computer's controls like screen brightness, volume output and the BIOS utility. Hotkey + Icon Function Communication key + + + + + + < > + < > + < > + < > + + + + Sleep Display toggle Display Off Touchpad toggle Speaker toggle Brightness up Brightness down Volume up Volume down Play/Pause...

Service Guide
Page 24
... shut down at 100C; H/W shut down at 90C Item Specification BIOS vendor InsydeH20 BIOS Version V1.0 BIOS ROM type Flash BIOS ROM size 2 MB Features Support ISIPP Support Acer UI Support multi-boot Suspend to RAM (S3)/Disk (S4) Various hot-keys for system control Support SMBUS 3.0, PCI3.0 ACPI 3.0b... compliance with Intel Speed Step Support C1, C2, C3, C4 and S3, S4 for mobile CPU DMI utility for BIOS serial number configurable...
... shut down at 100C; H/W shut down at 90C Item Specification BIOS vendor InsydeH20 BIOS Version V1.0 BIOS ROM type Flash BIOS ROM size 2 MB Features Support ISIPP Support Acer UI Support multi-boot Suspend to RAM (S3)/Disk (S4) Various hot-keys for system control Support SMBUS 3.0, PCI3.0 ACPI 3.0b... compliance with Intel Speed Step Support C1, C2, C3, C4 and S3, S4 for mobile CPU DMI utility for BIOS serial number configurable...
Service Guide
Page 37
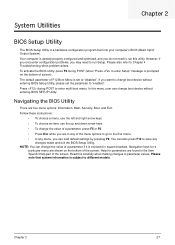
... are in square brackets. Read this menu, user can also press F10 to enter Setup" message is enclosed in any changes made and exit the BIOS Setup Utility. Help for a particular menu are five menu options: Information, Main, Security, Boot, and Exit. In this carefully when making changes ... set the parameter to Chapter 4 Troubleshooting when problem arises. Please also refer to "enabled". The default parameter of the screen. Navigating the BIOS Utility There are shown on the bottom of a parameter if it is prompted on the bottom of the menu options to go to the Exit...
... are in square brackets. Read this menu, user can also press F10 to enter Setup" message is enclosed in any changes made and exit the BIOS Setup Utility. Help for a particular menu are five menu options: Information, Main, Security, Boot, and Exit. In this carefully when making changes ... set the parameter to Chapter 4 Troubleshooting when problem arises. Please also refer to "enabled". The default parameter of the screen. Navigating the BIOS Utility There are shown on the bottom of a parameter if it is prompted on the bottom of the menu options to go to the Exit...

Service Guide
Page 38
...Information Main Security Boot Exit Rev. 3.5 CPU Type: CPU Speed: IDEO Model Name: IDEO Serial Number: ATAPI Model Name: System BIOS Version: VGA BIOS Version: Serial Number Asset Tag Number: Product Name: Manufacturer Name: UUID: Intel(R) Celeron(R) CPU 2.20GHz ST9320325As 6VE3DDCS Optiarc DVD RW ...of the system. This field displays the VGA firmware version of the system. This field shows product name of the system. Aspire 5336 BIOS Information The Information screen displays a summary of the Optical device installed in this screen. The table below describes the parameters in ...
...Information Main Security Boot Exit Rev. 3.5 CPU Type: CPU Speed: IDEO Model Name: IDEO Serial Number: ATAPI Model Name: System BIOS Version: VGA BIOS Version: Serial Number Asset Tag Number: Product Name: Manufacturer Name: UUID: Intel(R) Celeron(R) CPU 2.20GHz ST9320325As 6VE3DDCS Optiarc DVD RW ...of the system. This field displays the VGA firmware version of the system. This field shows product name of the system. Aspire 5336 BIOS Information The Information screen displays a summary of the Optical device installed in this screen. The table below describes the parameters in ...
Service Guide
Page 40
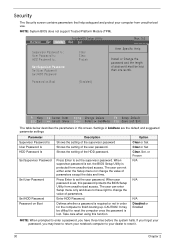
... your notebook computer to your computer from unauthorized use. When supervisor password is lost. When user password is set , the BIOS Setup Utility is required or not in boldface are the default and suggested parameter settings Parameter Supervisor Password Is User Password Is ...HDD Password Is Description Shows the setting of the supervisor password Shows the setting of parameters. NOTE: System BIOS does not support Trusted Platform Module (TPM). Defines whether a password is protected from unauthorized access. Shows the setting of parameters ...
... your notebook computer to your computer from unauthorized use. When supervisor password is lost. When user password is set , the BIOS Setup Utility is required or not in boldface are the default and suggested parameter settings Parameter Supervisor Password Is User Password Is ...HDD Password Is Description Shows the setting of the supervisor password Shows the setting of parameters. NOTE: System BIOS does not support Trusted Platform Module (TPM). Defines whether a password is protected from unauthorized access. Shows the setting of parameters ...
Service Guide
Page 41
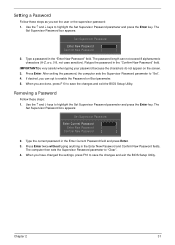
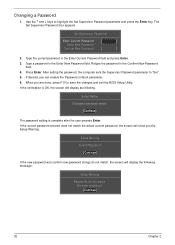
The password length can opt to save the changes and exit the BIOS Setup Utility. Retype the password in the "Enter New Password" field. After setting the password, the computer sets the Supervisor Password parameter to ... Supervisor Password Enter Current Password [ ] Enter New Password [ ] Confirm New Password [ ] 2. Use the ↑ and ↓ keys to save the changes and exit the BIOS Setup Utility. The Set Supervisor Password box appears: Set Supervisor Password Enter New Password [ ] Confirm New Password [ ] 2. Type a password in the "Confirm New Password" field...
The password length can opt to save the changes and exit the BIOS Setup Utility. Retype the password in the "Enter New Password" field. After setting the password, the computer sets the Supervisor Password parameter to ... Supervisor Password Enter Current Password [ ] Enter New Password [ ] Confirm New Password [ ] 2. Use the ↑ and ↓ keys to save the changes and exit the BIOS Setup Utility. The Set Supervisor Password box appears: Set Supervisor Password Enter New Password [ ] Confirm New Password [ ] 2. Type a password in the "Confirm New Password" field...
Service Guide
Page 42
... Enter Current Password field and press Enter. 3. After setting the password, the computer sets the Supervisor Password parameter to save the changes and exit the BIOS Setup Utility. Type the current password in the Confirm New Password field. 4. Setup Warning Passwords do not match, the screen will display the following . Press...
... Enter Current Password field and press Enter. 3. After setting the password, the computer sets the Supervisor Password parameter to save the changes and exit the BIOS Setup Utility. Type the current password in the Confirm New Password field. 4. Setup Warning Passwords do not match, the screen will display the following . Press...
Service Guide
Page 44
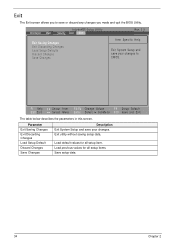
Exit The Exit screen allows you made and quit the BIOS Utility. Parameter Exit Saving Changes Exit Discarding Changes Load Setup Default Discard Changes Save Changes Description Exit System Setup and save or discard any changes ...
Exit The Exit screen allows you made and quit the BIOS Utility. Parameter Exit Saving Changes Exit Discarding Changes Load Setup Default Discard Changes Save Changes Description Exit System Setup and save or discard any changes ...
Service Guide
Page 45
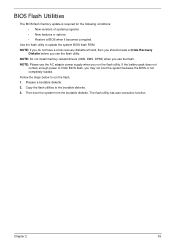
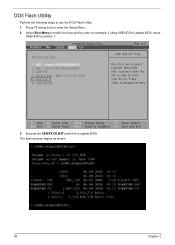
... memory update is not completely loaded. If the battery pack does not contain enough power to the bootable diskette. 3. Copy the flash utilities to finish BIOS flash, you use the flash. Chapter 2 35 NOTE: Do not install memory-related drivers (XMS, EMS, DPMI) when you run the flash. 1.... Follow the steps below to update the system BIOS flash ROM. NOTE: Please use the AC adaptor power supply when you use the flash utility. The flash utility has auto-execution function. Use the...
... memory update is not completely loaded. If the battery pack does not contain enough power to the bootable diskette. 3. Copy the flash utilities to finish BIOS flash, you use the flash. Chapter 2 35 NOTE: Do not install memory-related drivers (XMS, EMS, DPMI) when you run the flash. 1.... Follow the steps below to update the system BIOS flash ROM. NOTE: Please use the AC adaptor power supply when you use the flash utility. The flash utility has auto-execution function. Use the...
Service Guide
Page 46
... shown. 36 Chapter 2 USB CDROM: Use < > or < > to select a device, then press to move it down the list, or to move USB HDD to Update BIOS, move it up the list. Execute the XEWXX100.BAT batch file to enter the Setup Menu. 2. InsydeH20 Setup Utility Information Main Security Boot Exit Boot...
... shown. 36 Chapter 2 USB CDROM: Use < > or < > to select a device, then press to move it down the list, or to move USB HDD to Update BIOS, move it up the list. Execute the XEWXX100.BAT batch file to enter the Setup Menu. 2. InsydeH20 Setup Utility Information Main Security Boot Exit Boot...
Service Guide
Page 47
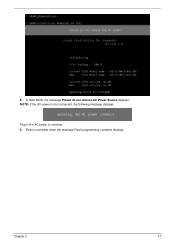
Flash is not connected, the following message displays. In flash BIOS, the message Please do not remove AC Power Source displays. Chapter 2 37 NOTE: If the AC power is complete when the message Flash programming complete displays. Plug in the AC power to continue. 5. 4.
Flash is not connected, the following message displays. In flash BIOS, the message Please do not remove AC Power Source displays. Chapter 2 37 NOTE: If the AC power is complete when the message Flash programming complete displays. Plug in the AC power to continue. 5. 4.
Service Guide
Page 49
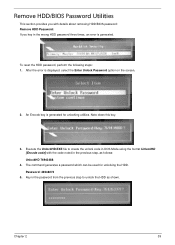
...password from the previous step to create the unlock code in DOS Mode using the format UnlockHD [Encode code] with details about removing HDD/BIOS password: Remove HDD Password: If you with the code noted in the wrong HDD password three times, an error is displayed, select ...the Enter Unlock Password option on the screen. 2. Note down this key. 3. Password: 46548274 5. Remove HDD/BIOS Password Utilities This section provides you key in the previous step, as shown. To reset the HDD password, perform the following steps: 1. The command generates...
...password from the previous step to create the unlock code in DOS Mode using the format UnlockHD [Encode code] with details about removing HDD/BIOS password: Remove HDD Password: If you with the code noted in the wrong HDD password three times, an error is displayed, select ...the Enter Unlock Password option on the screen. 2. Note down this key. 3. Password: 46548274 5. Remove HDD/BIOS Password Utilities This section provides you key in the previous step, as shown. To reset the HDD password, perform the following steps: 1. The command generates...
Service Guide
Page 50
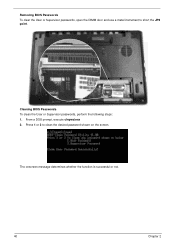
From a DOS prompt, execute clnpwd.exe 2. Press 1 or 2 to short the JP9 point. The onscreen message determines whether the function is successful or not. 40 Chapter 2 Removing BIOS Passwords To clear the User or Supervisor passwords, open the DIMM door and use a metal instrument to clean the desired password shown on the screen. Cleaning BIOS Passwords To clean the User or Supervisor passwords, perform the following steps: 1.
From a DOS prompt, execute clnpwd.exe 2. Press 1 or 2 to short the JP9 point. The onscreen message determines whether the function is successful or not. 40 Chapter 2 Removing BIOS Passwords To clear the User or Supervisor passwords, open the DIMM door and use a metal instrument to clean the desired password shown on the screen. Cleaning BIOS Passwords To clean the User or Supervisor passwords, perform the following steps: 1.
Service Guide
Page 51
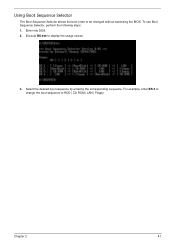
To use Boot Sequence Selector, perform the following steps: 1. Execute BS.exe to be changed without accessing the BIOS. Select the desired boot sequence by entering the corresponding sequence. Enter into DOS. 2. Chapter 2 41 Using Boot Sequence Selector The Boot Sequence Selector allows the boot order to display the usage screen. 3. For example, enter BS 2 to change the boot sequence to HDD | CD ROM | LAN | Floppy.
To use Boot Sequence Selector, perform the following steps: 1. Execute BS.exe to be changed without accessing the BIOS. Select the desired boot sequence by entering the corresponding sequence. Enter into DOS. 2. Chapter 2 41 Using Boot Sequence Selector The Boot Sequence Selector allows the boot order to display the usage screen. 3. For example, enter BS 2 to change the boot sequence to HDD | CD ROM | LAN | Floppy.
Service Guide
Page 52
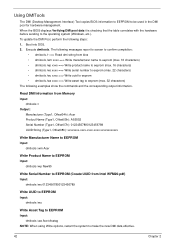
...show the commands and the corresponding output information. Read DMI Information from Memory Input: dmitools /r Output: Manufacturer (Type1, Offset04h): Acer Product Name (Type1, Offset05h): AS5552 Serial Number (Type1, Offset07h): 01234567890123456789 UUID String (Type1, Offset08h): xxxxxxxx-xxxx-xxxx-xxxx-xxxxxxxxxxxx... Write Manufacturer Name to EEPROM Input: dmitools /wm Acer Write Product Name to EEPROM Input: dmitools /wp New95 Write Serial Number to EEPROM (Create UUID from bios • dmitools /wm xxxx ==> Write manufacturer name to eeprom (max. 16...
...show the commands and the corresponding output information. Read DMI Information from Memory Input: dmitools /r Output: Manufacturer (Type1, Offset04h): Acer Product Name (Type1, Offset05h): AS5552 Serial Number (Type1, Offset07h): 01234567890123456789 UUID String (Type1, Offset08h): xxxxxxxx-xxxx-xxxx-xxxx-xxxxxxxxxxxx... Write Manufacturer Name to EEPROM Input: dmitools /wm Acer Write Product Name to EEPROM Input: dmitools /wp New95 Write Serial Number to EEPROM (Create UUID from bios • dmitools /wm xxxx ==> Write manufacturer name to eeprom (max. 16...
Service Guide
Page 152
... year old, replace the CMOS battery. 2. Run a complete virus scan using up-to-date software to ensure the computer is experiencing HDD or ODD BIOS information loss, disconnect and reconnect the power and data cables between devices. If the computer is virus free. 3. Replace the Motherboard. 6. If the ..., the LCD is missing from the operating system DVD and follow the onscreen prompts. 11. Run the Windows Memory Diagnostic from the BIOS, the drive may reduce display brightness. See "Disassembly Process" on page 45. 5. If display size is listed under Other Devices. 9. If the...
... year old, replace the CMOS battery. 2. Run a complete virus scan using up-to-date software to ensure the computer is experiencing HDD or ODD BIOS information loss, disconnect and reconnect the power and data cables between devices. If the computer is virus free. 3. Replace the Motherboard. 6. If the ..., the LCD is missing from the operating system DVD and follow the onscreen prompts. 11. Run the Windows Memory Diagnostic from the BIOS, the drive may reduce display brightness. See "Disassembly Process" on page 45. 5. If display size is listed under Other Devices. 9. If the...


