
Aspire 5050 / 3050 User's Guide - EN
Page 10
...8226; placing your display in one fixed posture • avoid slouching forward and/or leaning backward • stand up and walk around regularly to remove the strain on your leg muscles • take short rests to relax your neck and shoulders • avoid tensing your muscles or shrugging your ...shoulders • install the external display, keyboard and mouse properly and within comfortable reach • if you view your monitor more than the top edge of the display so your eyes point...
...8226; placing your display in one fixed posture • avoid slouching forward and/or leaning backward • stand up and walk around regularly to remove the strain on your leg muscles • take short rests to relax your neck and shoulders • avoid tensing your muscles or shrugging your ...shoulders • install the external display, keyboard and mouse properly and within comfortable reach • if you view your monitor more than the top edge of the display so your eyes point...
Aspire 5050 / 3050 User's Guide - EN
Page 77
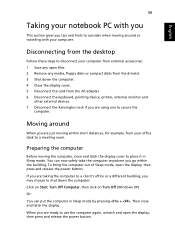
Disconnecting from the desktop Follow these steps to disconnect your computer from external accessories: 1 Save any open files. 2 Remove any media, floppy disks or compact disks from the drive(s). 3 Shut down the computer: Click on Start, Turn Off Computer, then click ...gives you tips and hints to shut down the computer. 4 Close the display cover. 5 Disconnect the cord from the AC adapter. 6 Disconnect the keyboard, pointing device, printer, external monitor and other external devices. 7 Disconnect the Kensington lock if you are just moving within the building. Preparing the computer...
Disconnecting from the desktop Follow these steps to disconnect your computer from external accessories: 1 Save any open files. 2 Remove any media, floppy disks or compact disks from the drive(s). 3 Shut down the computer: Click on Start, Turn Off Computer, then click ...gives you tips and hints to shut down the computer. 4 Close the display cover. 5 Disconnect the cord from the AC adapter. 6 Disconnect the keyboard, pointing device, printer, external monitor and other external devices. 7 Disconnect the Kensington lock if you are just moving within the building. Preparing the computer...

Aspire 5050 / 3050 Service Guide
Page 7
... the Keyboard 15 Lock Keys and embedded numeric keypad 15 Windows Keys 15 Hot Keys 16 Special Key 17 Acer Empowering Technology 19 Empowering Technology password 19 Acer ePower Management 19 Acer ePresentation Management 21 Acer eDataSecurity Management (for selected models 22 Acer eLock Management 24 Acer eRecovery Management 25 Acer eSettings Management 26 Acer ePerformance Management 26 Acer OrbiCam...
... the Keyboard 15 Lock Keys and embedded numeric keypad 15 Windows Keys 15 Hot Keys 16 Special Key 17 Acer Empowering Technology 19 Empowering Technology password 19 Acer ePower Management 19 Acer ePresentation Management 21 Acer eDataSecurity Management (for selected models 22 Acer eLock Management 24 Acer eRecovery Management 25 Acer eSettings Management 26 Acer ePerformance Management 26 Acer OrbiCam...
Aspire 5050 / 3050 Service Guide
Page 8
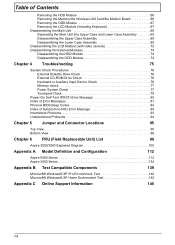
... Memory/the Wireless LAN Card/the Modem Board 66 Removing the ODD Module 67 Removing the LCD Module (including Keyboard 67 Disassembling the Main Uint 69 Separating the Main Unit into Upper Case and Lower Case Assembly 69 Disassembling the ... and Connector Locations 95 Top View 95 Bottom View 96 Chapter 6 FRU (Field Replaceable Unit) List 99 Aspire 5050/3050 Exploded Diagram 100 Appendix A Model Definition and Configuration 112 Aspire 5050 Series 112 Aspire 3050 Series 134 Appendix B Test Compatible Components 139 Microsoft® Windows® XP Pro Environment Test 140 ...
... Memory/the Wireless LAN Card/the Modem Board 66 Removing the ODD Module 67 Removing the LCD Module (including Keyboard 67 Disassembling the Main Uint 69 Separating the Main Unit into Upper Case and Lower Case Assembly 69 Disassembling the ... and Connector Locations 95 Top View 95 Bottom View 96 Chapter 6 FRU (Field Replaceable Unit) List 99 Aspire 5050/3050 Exploded Diagram 100 Appendix A Model Definition and Configuration 112 Aspire 5050 Series 112 Aspire 3050 Series 134 Appendix B Test Compatible Components 139 Microsoft® Windows® XP Pro Environment Test 140 ...
Aspire 5050 / 3050 Service Guide
Page 71
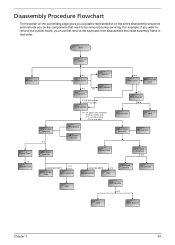
.... For example, if you want to be removed during servicing. Disassembly Procedure Flowchart The flowchart on the succeeding page gives you a graphic representation on the entire disassembly sequence and instructs you must first remove the keyboard, then disassemble the inside assembly frame in that... need to remove the system board, you on rear side H*3 HDD Cover Wireless LAN Card O*4 HDD Module M*4...
.... For example, if you want to be removed during servicing. Disassembly Procedure Flowchart The flowchart on the succeeding page gives you a graphic representation on the entire disassembly sequence and instructs you must first remove the keyboard, then disassemble the inside assembly frame in that... need to remove the system board, you on rear side H*3 HDD Cover Wireless LAN Card O*4 HDD Module M*4...

Aspire 5050 / 3050 Service Guide
Page 75
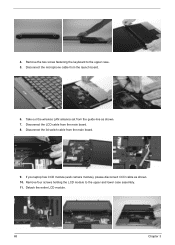
... 180 degree as shown. 8. Detach the modem board from the main unit. Remove one screw holding the keyboard cover to the main board as shown. 3. Removing the LCD Module (including Keyboard) 1. Carefully detach the keyboard cover from the main board then disconnect the modem board cable. Remove the wireless LAN card from the socket. 7. Chapter 3 67 6.
... 180 degree as shown. 8. Detach the modem board from the main unit. Remove one screw holding the keyboard cover to the main board as shown. 3. Removing the LCD Module (including Keyboard) 1. Carefully detach the keyboard cover from the main board then disconnect the modem board cable. Remove the wireless LAN card from the socket. 7. Chapter 3 67 6.
Aspire 5050 / 3050 Service Guide
Page 76
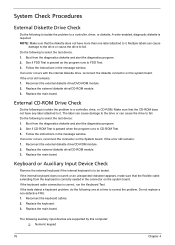
Remove four screws holding the LCD module to the upper case. 5. Disconnect the microphone cable from the main board. 8. Disconnect the LCD cable from the launch board. 6. If you laptop has CCD module (web camera module), please disconnect CCD cable as shown. 7. Detach the entire LCD module. 68 Chapter 3 4. Remove the two screw fastening the keyboard to the upper and lower case assembly. 11. Take out the wireless LAN antenna set from the main board. . 9. Disconnect the lid switch cable from the guide-line as shown. 10.
Remove four screws holding the LCD module to the upper case. 5. Disconnect the microphone cable from the main board. 8. Disconnect the LCD cable from the launch board. 6. If you laptop has CCD module (web camera module), please disconnect CCD cable as shown. 7. Detach the entire LCD module. 68 Chapter 3 4. Remove the two screw fastening the keyboard to the upper and lower case assembly. 11. Take out the wireless LAN antenna set from the main board. . 9. Disconnect the lid switch cable from the guide-line as shown. 10.
Aspire 5050 / 3050 Service Guide
Page 84
... connection is required. External CD-ROM Drive Check Do the following to isolate the problem to be tested. Keyboard or Auxiliary Input Device Check Remove the external keyboard if the internal keyboard is passed when the program runs to select the test device. 1. Multiple labels can cause the drive to fail. Follow the instructions...
... connection is required. External CD-ROM Drive Check Do the following to isolate the problem to be tested. Keyboard or Auxiliary Input Device Check Remove the external keyboard if the internal keyboard is passed when the program runs to select the test device. 1. Multiple labels can cause the drive to fail. Follow the instructions...

Aspire 5050 / 3050 Service Guide
Page 85
T External keyboard If any of the following list: T "Check the Power Adapter" on page 78 T "Check the Battery Pack" on page 79 Chapter 4 77 Press F2 in ... refer to the diagnostic memory in the following power sources: 1. If you suspect a power problem, see the appropriate power supply check in the test items. 3. Remove the battery pack. 2. Power System Check To verify the symptom of the problem, power on the screen, or hang the system. 1. NOTE: Make sure that...
T External keyboard If any of the following list: T "Check the Power Adapter" on page 78 T "Check the Battery Pack" on page 79 Chapter 4 77 Press F2 in ... refer to the diagnostic memory in the following power sources: 1. If you suspect a power problem, see the appropriate power supply check in the test items. 3. Remove the battery pack. 2. Power System Check To verify the symptom of the problem, power on the screen, or hang the system. 1. NOTE: Make sure that...
Aspire 5050 / 3050 Service Guide
Page 99
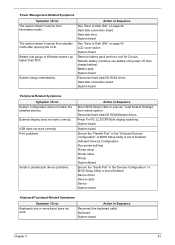
...42. Refresh battery (continue use battery until power off, then charge battery). Device driver Device cable Device System board Keyboard/Touchpad-Related Symptoms Symptom / Error Keyboard (one or more keys) does not work correctly. Action in Windows doesn't go higher than 90%. Power Management-... devices. System hangs intermittently. LCD cover switch System board Remove battery pack and let it cool for 2 hours. Reconnect hard disk/CD-ROM/diskette drives. Onboard Devices Configuration Run printer self-test. Keyboard System board Chapter 4 91 Press Fn+F5, LCD/CRT...
...42. Refresh battery (continue use battery until power off, then charge battery). Device driver Device cable Device System board Keyboard/Touchpad-Related Symptoms Symptom / Error Keyboard (one or more keys) does not work correctly. Action in Windows doesn't go higher than 90%. Power Management-... devices. System hangs intermittently. LCD cover switch System board Remove battery pack and let it cool for 2 hours. Reconnect hard disk/CD-ROM/diskette drives. Onboard Devices Configuration Run printer self-test. Keyboard System board Chapter 4 91 Press Fn+F5, LCD/CRT...


