Aspire 5020 Service Guide
Page 25
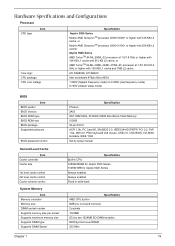
... SempronTM processor 2600+/3000+ or higher with 128 KB L2 cache, or Mobile AMD SempronTM processor 2800+/3100+ or higher with 256 KB L2 cacher Aspire 5020 Series AMD TurionTM 64 ML-28/ML-32 processor at 1.6/1.8 GHz or higher with 128 KB L1 cache and 512 KB L2 cache, or AMD... CMOS Boot Block Flash Memory 512KB 32-pin PLCC ACPI 1.0b, PC Card 95, SM BIOS 2.3, IEEE1284-ECP/EPP, PCI 2.2, PnP 1.0a, DMI 2.0, PS/2 keyboard and mouse, USB 2.0, VGA BIOS, CD-ROM bootable, IEEE 1394 Set by setup manual Specification Built-in CPU 128KB/256KB for Aspire 3020 Series 512KB/1MB for Aspire 5020 Series...
... SempronTM processor 2600+/3000+ or higher with 128 KB L2 cache, or Mobile AMD SempronTM processor 2800+/3100+ or higher with 256 KB L2 cacher Aspire 5020 Series AMD TurionTM 64 ML-28/ML-32 processor at 1.6/1.8 GHz or higher with 128 KB L1 cache and 512 KB L2 cache, or AMD... CMOS Boot Block Flash Memory 512KB 32-pin PLCC ACPI 1.0b, PC Card 95, SM BIOS 2.3, IEEE1284-ECP/EPP, PCI 2.2, PnP 1.0a, DMI 2.0, PS/2 keyboard and mouse, USB 2.0, VGA BIOS, CD-ROM bootable, IEEE 1394 Set by setup manual Specification Built-in CPU 128KB/256KB for Aspire 3020 Series 512KB/1MB for Aspire 5020 Series...

Aspire 5020 Service Guide
Page 40
...describes the parameters in boldface are the default and suggested parameter settings. . PhoenixBIOS Setup Utility Info. Main Advanced Security Boot Exit Infrared Port (FIR) Base I /O address Interrupt DMA channel Serial Port A Parallel Port Description Options Enables, disables...I /O address: Interrupt: DMA channel: [Enabled] [2F8] [IRQ 3] [DMA 1] Serial port A: Parallel port: [Disabled] [Disabled] Legacy USB Support [Enabled] Item Specific Help Configure Infrared Port using options: [Disable] No configuration [Enabled] User configuration F1 Help Esc Exit ↑ ↓...
...describes the parameters in boldface are the default and suggested parameter settings. . PhoenixBIOS Setup Utility Info. Main Advanced Security Boot Exit Infrared Port (FIR) Base I /O address Interrupt DMA channel Serial Port A Parallel Port Description Options Enables, disables...I /O address: Interrupt: DMA channel: [Enabled] [2F8] [IRQ 3] [DMA 1] Serial port A: Parallel port: [Disabled] [Disabled] Legacy USB Support [Enabled] Item Specific Help Configure Infrared Port using options: [Disable] No configuration [Enabled] User configuration F1 Help Esc Exit ↑ ↓...

Aspire 5020 User's Guide
Page 8
...Connectivity options 45 Fax/data modem 45 Built-in network feature 46 Fast Infrared 46 Universal Serial Bus (USB) 47 IEEE 1394 port 47 PC Card slot 48 BIOS utility 49 Boot sequence 49 Enable disk-to-disk recovery 50 Password 50 Using software 50 Playing DVD movies 50 Power ...management 51 Acer eRecovery 52 Create backup 52 Restore from backup 53 Create factory default image CD 53 Re-...
...Connectivity options 45 Fax/data modem 45 Built-in network feature 46 Fast Infrared 46 Universal Serial Bus (USB) 47 IEEE 1394 port 47 PC Card slot 48 BIOS utility 49 Boot sequence 49 Enable disk-to-disk recovery 50 Password 50 Using software 50 Playing DVD movies 50 Power ...management 51 Acer eRecovery 52 Create backup 52 Restore from backup 53 Create factory default image CD 53 Re-...

Aspire 5020 User's Guide
Page 32
...not full-screen on the computer or on the battery, it with a system disk and press + + to resume. Image is in the external USB floppy drive? If you are using on an external monitor. The computer's power management system automatically blanks the screen to turn the display back on.... Press and release the power button to restart the system. I pressed the power button and opened the display, but the computer does not start or boot-up the "Display Properties" dialog box. Check the following: • If you set to fill the computer display. Press + (increase) to adjust ...
...not full-screen on the computer or on the battery, it with a system disk and press + + to resume. Image is in the external USB floppy drive? If you are using on an external monitor. The computer's power management system automatically blanks the screen to turn the display back on.... Press and release the power button to restart the system. I pressed the power button and opened the display, but the computer does not start or boot-up the "Display Properties" dialog box. Check the following: • If you set to fill the computer display. Press + (increase) to adjust ...

Aspire 5020 User's Guide
Page 34
...your Operating System. Before performing a restore operation, please check the BIOS settings. 1 Check to see if Acer disk-to-disk recovery is enabled or not. 2 Make sure the D2D Recovery setting in Main is set...your system is the multilingual version, the operating system and language you choose when you first turn on first booting your notebook, that you need to set up my location to use your communication software (e.g. After the ... connected securely to the computer's parallel port or a USB port and the corresponding port on Dialing Properties and begin setting up your location.
...your Operating System. Before performing a restore operation, please check the BIOS settings. 1 Check to see if Acer disk-to-disk recovery is enabled or not. 2 Make sure the D2D Recovery setting in Main is set...your system is the multilingual version, the operating system and language you choose when you first turn on first booting your notebook, that you need to set up my location to use your communication software (e.g. After the ... connected securely to the computer's parallel port or a USB port and the corresponding port on Dialing Properties and begin setting up your location.

Aspire 5020 User's Guide
Page 62
... systems that do not have a built-in optical disk burner, plug in an external USB or IEEE 1394-compatible optical disk burner before entering Acer eRecovery for optical disk-related tasks. Note: This feature is six zeros. 4 In the Acer eRecovery window, select Recovery settings and click Next. 5 In the Recovery settings window... Backup to HDD to store the backup image on drive D:. Create backup You can create and save backup images to hard drive, CD, or DVD. 1 Boot to Windows XP 2 Press + to open the Acer eRecovery utility. 3 Enter the password to hard drive, CD or DVD.
... systems that do not have a built-in optical disk burner, plug in an external USB or IEEE 1394-compatible optical disk burner before entering Acer eRecovery for optical disk-related tasks. Note: This feature is six zeros. 4 In the Acer eRecovery window, select Recovery settings and click Next. 5 In the Recovery settings window... Backup to HDD to store the backup image on drive D:. Create backup You can create and save backup images to hard drive, CD, or DVD. 1 Boot to Windows XP 2 Press + to open the Acer eRecovery utility. 3 Enter the password to hard drive, CD or DVD.

