Quick Start Guide
Page 5
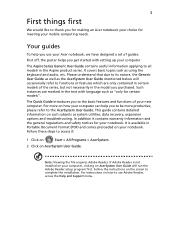
Please understand that due to its nature, the Generic User Guide as well as using the keyboard and audio, etc. Note: Viewing the file requires Adobe Reader. For instructions on how to use your Acer notebook, we have designed a set of guides: First off, the poster helps you purchased...certain models of your new computer. Follow these steps to the basic features and functions of the series, but not necessarily in the Aspire product series. The Quick Guide introduces you to access it contains warranty information and the general regulations and safety notices for meeting your...
Please understand that due to its nature, the Generic User Guide as well as using the keyboard and audio, etc. Note: Viewing the file requires Adobe Reader. For instructions on how to use your Acer notebook, we have designed a set of guides: First off, the poster helps you purchased...certain models of your new computer. Follow these steps to the basic features and functions of the series, but not necessarily in the Aspire product series. The Quick Guide introduces you to access it contains warranty information and the general regulations and safety notices for meeting your...
Quick Start Guide
Page 7
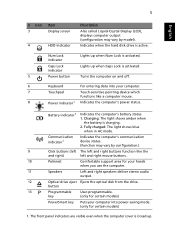
... when the hard disk drive is activated. Num Lock indicator Lights up when Caps Lock is activated. 5 Power button Turns the computer on and off. 6 Keyboard For entering data into power-saving mode. (only for certain models) PowerSmart key Puts your hands when you use the computer. Fully charged: The light...
... when the hard disk drive is activated. Num Lock indicator Lights up when Caps Lock is activated. 5 Power button Turns the computer on and off. 6 Keyboard For entering data into power-saving mode. (only for certain models) PowerSmart key Puts your hands when you use the computer. Fully charged: The light...
Service Guide
Page 7
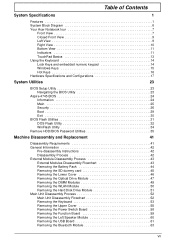
... of Contents System Specifications 1 Features 1 System Block Diagram 6 Your Acer Notebook tour 7 Front View 7 Closed Front View 9 Left View 9 Right View 10 Bottom View 11 Indicators 11 TouchPad Basics 13 Using the Keyboard 14 Lock Keys and embedded numeric keypad 14 Windows Keys 15 Hot Keys... 16 Hardware Specifications and Configurations 17 System Utilities 23 BIOS Setup Utility 23 Navigating the BIOS Utility 23 Aspire 4745 BIOS 24 Information 24 Main ...
... of Contents System Specifications 1 Features 1 System Block Diagram 6 Your Acer Notebook tour 7 Front View 7 Closed Front View 9 Left View 9 Right View 10 Bottom View 11 Indicators 11 TouchPad Basics 13 Using the Keyboard 14 Lock Keys and embedded numeric keypad 14 Windows Keys 15 Hot Keys... 16 Hardware Specifications and Configurations 17 System Utilities 23 BIOS Setup Utility 23 Navigating the BIOS Utility 23 Aspire 4745 BIOS 24 Information 24 Main ...

Service Guide
Page 8
... 95 Replacing the Left Speaker Module 96 Replacing the Function Board 97 Replacing the Power Switch Board 97 Replacing the Upper Cover 98 Replacing the Keyboard 101 Replacing the Hard Disk Drive Module 101 Replacing the WLAN Board 103 Replacing the DIMM Modules 103 Replacing the ODD Module 104 Replacing the... 106 Troubleshooting 107 Common Problems 107 Power On Issue 108 No Display Issue 109 Random Loss of BIOS Settings 110 LCD Failure 111 Built-In Keyboard Failure 111 VIII
... 95 Replacing the Left Speaker Module 96 Replacing the Function Board 97 Replacing the Power Switch Board 97 Replacing the Upper Cover 98 Replacing the Keyboard 101 Replacing the Hard Disk Drive Module 101 Replacing the WLAN Board 103 Replacing the DIMM Modules 103 Replacing the ODD Module 104 Replacing the... 106 Troubleshooting 107 Common Problems 107 Power On Issue 108 No Display Issue 109 Random Loss of BIOS Settings 110 LCD Failure 111 Built-In Keyboard Failure 111 VIII
Service Guide
Page 14
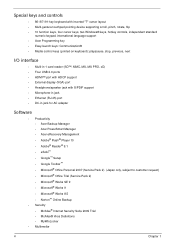
... keys, four cursor keys, two Windows® keys, hotkey controls, independent standard numeric keypad, international language support • Acer Programming key • Easy-launch keys: Communication® • Media control keys (printed on keyboard): play/pause, stop, previous, next I/O interface • Multi-in-1 card reader (SD™, MMC, MS, MS PRO, xD...
... keys, four cursor keys, two Windows® keys, hotkey controls, independent standard numeric keypad, international language support • Acer Programming key • Easy-launch keys: Communication® • Media control keys (printed on keyboard): play/pause, stop, previous, next I/O interface • Multi-in-1 card reader (SD™, MMC, MS, MS PRO, xD...
Service Guide
Page 16
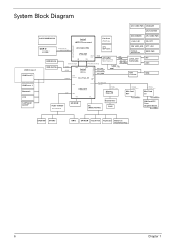
... RTL ALC271X SPI ROM EC (NPCE781/783) Transformer RJ45 SIM Card FFC Conn daughter board USB5 SPDIF/HP INT MIC DMIC SPI ROM Touch Pad Keyboard Button on mechanical key 6 Chapter 1
... RTL ALC271X SPI ROM EC (NPCE781/783) Transformer RJ45 SIM Card FFC Conn daughter board USB5 SPDIF/HP INT MIC DMIC SPI ROM Touch Pad Keyboard Button on mechanical key 6 Chapter 1
Service Guide
Page 18
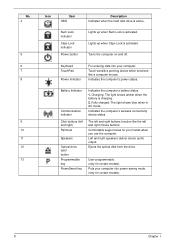
... status. 1. Fully charged: The light shows blue when in AC mode. Left and right speakers deliver stereo audio output. Turns the computer on and off. Keyboard TouchPad Power Indicator For entering data into your computer into power-saving mode. (only for certain models) 8 Chapter 1 User-programmable. (only for your hands when...
... status. 1. Fully charged: The light shows blue when in AC mode. Left and right speakers deliver stereo audio output. Turns the computer on and off. Keyboard TouchPad Power Indicator For entering data into your computer into power-saving mode. (only for certain models) 8 Chapter 1 User-programmable. (only for your hands when...

Service Guide
Page 24
Using the Keyboard The keyboard has full-sized keys and an embedded numeric keypad, separate cursor, lock, Windows, function and special keys. Lock Keys and embedded numeric keypad The keyboard has two lock keys which you can toggle on , all alphabetic characters typed are in numeric mode. 14 Chapter 1 Lock key Caps Lock Num Lock Description When Caps Lock is in uppercase. When Num Lock is on, the embedded keypad is on and off.
Using the Keyboard The keyboard has full-sized keys and an embedded numeric keypad, separate cursor, lock, Windows, function and special keys. Lock Keys and embedded numeric keypad The keyboard has two lock keys which you can toggle on , all alphabetic characters typed are in numeric mode. 14 Chapter 1 Lock key Caps Lock Num Lock Description When Caps Lock is in uppercase. When Num Lock is on, the embedded keypad is on and off.

Service Guide
Page 25
... on your edition of Windows, some shortcuts may not function as clicking on the Windows Start button; it launches the Start menu. Windows Keys The keyboard has two keys that perform Windows-specific functions. Chapter 1 15
... on your edition of Windows, some shortcuts may not function as clicking on the Windows Start button; it launches the Start menu. Windows Keys The keyboard has two keys that perform Windows-specific functions. Chapter 1 15

Service Guide
Page 32
... Part Name Package General Features RealTek RT5160 5-in-1 card reader • PCI-E interface • Push-push type • Dummy card Specification 22 Chapter 1 Power and Keyboard Controller Item Controller ACPI 2.0 Specification Total number of keypads Windows logo key Hotkeys 99-/100-/103-key...
... Part Name Package General Features RealTek RT5160 5-in-1 card reader • PCI-E interface • Push-push type • Dummy card Specification 22 Chapter 1 Power and Keyboard Controller Item Controller ACPI 2.0 Specification Total number of keypads Windows logo key Hotkeys 99-/100-/103-key...

Service Guide
Page 52
... AC adapter and all peripherals. 2. Place the system on a flat, stable surface. 4. Turn off the power to remove the mainboard, you must first remove the keyboard, then disassemble the inside assembly frame in the succeeding disassembly sections illustrate the entire disassembly sequence. For example, if you do the following stages: •...
... AC adapter and all peripherals. 2. Place the system on a flat, stable surface. 4. Turn off the power to remove the mainboard, you must first remove the keyboard, then disassemble the inside assembly frame in the succeeding disassembly sections illustrate the entire disassembly sequence. For example, if you do the following stages: •...

Service Guide
Page 53
... Remove HDD . For example, if you want to remove the main board, you on the entire disassembly sequence and instructs you must first remove the keyboard, then disassemble the inside assembly frame in that need to be removed during servicing.
... Remove HDD . For example, if you want to remove the main board, you on the entire disassembly sequence and instructs you must first remove the keyboard, then disassemble the inside assembly frame in that need to be removed during servicing.
Service Guide
Page 62
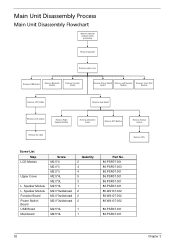
... 86.W4107.002 86.PSR07.001 86.PSR07.001 52 Chapter 3 Main Unit Disassembly Process Main Unit Disassembly Flowchart Remove external modules before proceeding Remove keyboard Remove upper cover Remove USB Board Remove Bluetooth Module Remove Function Board Remove Power Switch Remove Left Speaker Board Module Remove Touch Pad Bracket Remove...
... 86.W4107.002 86.PSR07.001 86.PSR07.001 52 Chapter 3 Main Unit Disassembly Process Main Unit Disassembly Flowchart Remove external modules before proceeding Remove keyboard Remove upper cover Remove USB Board Remove Bluetooth Module Remove Function Board Remove Power Switch Remove Left Speaker Board Module Remove Touch Pad Bracket Remove...

Service Guide
Page 63
It is recommended that must be released in order to remove the keyboard. Step Keyboard (red callout) Size M2.5*6.5 Quantity 9 Screw Type Keyboard M2.5*4L 2 (green callout) Keyboard 3 (blue callout) 3. See "Removing the Battery Pack" on page 44. 2. Turn the computer over and fully open the lid. Remove the 14 securing screws from the lower cover. There are five (5) securing clips that you only use your fingers to the outer casing. Removing the Keyboard CAUTION: Using tools to remove the Keyboard may cause damage to remove the Keyboard. 1. Chapter 3 53
It is recommended that must be released in order to remove the keyboard. Step Keyboard (red callout) Size M2.5*6.5 Quantity 9 Screw Type Keyboard M2.5*4L 2 (green callout) Keyboard 3 (blue callout) 3. See "Removing the Battery Pack" on page 44. 2. Turn the computer over and fully open the lid. Remove the 14 securing screws from the lower cover. There are five (5) securing clips that you only use your fingers to the outer casing. Removing the Keyboard CAUTION: Using tools to remove the Keyboard may cause damage to remove the Keyboard. 1. Chapter 3 53

Service Guide
Page 64
4. Release each clip, working from one side to the other. 5. Lift the keyboard clear of the chassis. 54 Chapter 3 Open the locking latch on the FFC, and disconnect the cable as shown and turn it over. 6. Using both hands, gently pry up the cover as shown. 7.
4. Release each clip, working from one side to the other. 5. Lift the keyboard clear of the chassis. 54 Chapter 3 Open the locking latch on the FFC, and disconnect the cable as shown and turn it over. 6. Using both hands, gently pry up the cover as shown. 7.

Service Guide
Page 65
Touchpad FFC c. Removing the Upper Cover 1. Left speaker cable b. Function Board FFC C D A B Chapter 3 55 See "Removing the Keyboard" on page 53. 2. Disconnect the following four cables from the Mainboard: a. Power Switch FFC d. Turn the computer over.
Touchpad FFC c. Removing the Upper Cover 1. Left speaker cable b. Function Board FFC C D A B Chapter 3 55 See "Removing the Keyboard" on page 53. 2. Disconnect the following four cables from the Mainboard: a. Power Switch FFC d. Turn the computer over.

Service Guide
Page 111
Reconnect keyboard FFCs to secure the carrier. Replacing the Hard Disk Drive Module 1. Place the HDD in place. Chapter 3 101 Press down on the Upper Cover. Replacing the Keyboard 1. Place the keyboard face down as indicated to secure the Keyboard in the HDD carrier replace the two (2) screws to the mainboard, and secure the locking latch. 2. Slide the Keyboard front edge first into the Upper Cover, ensuring that the four locating tabs are correctly seated. 3.
Reconnect keyboard FFCs to secure the carrier. Replacing the Hard Disk Drive Module 1. Place the HDD in place. Chapter 3 101 Press down on the Upper Cover. Replacing the Keyboard 1. Place the keyboard face down as indicated to secure the Keyboard in the HDD carrier replace the two (2) screws to the mainboard, and secure the locking latch. 2. Slide the Keyboard front edge first into the Upper Cover, ensuring that the four locating tabs are correctly seated. 3.
Service Guide
Page 117
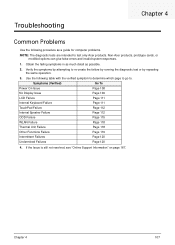
... to determine which page to go to re-create the failure by running the diagnostic test or by repeating the same operation. 3. Non-Acer products, prototype cards, or modified options can give false errors and invalid system responses. 1. Symptoms (Verified) Go To Power On Issue ...Page 108 No Display Issue Page 109 LCD Failure Page 111 Internal Keyboard Failure Page 111 TouchPad Failure Page 112 Internal Speaker Failure Page 112 ODD Failure Page 115 WLAN Failure Page 118 Thermal Unit Failure Page...
... to determine which page to go to re-create the failure by running the diagnostic test or by repeating the same operation. 3. Non-Acer products, prototype cards, or modified options can give false errors and invalid system responses. 1. Symptoms (Verified) Go To Power On Issue ...Page 108 No Display Issue Page 109 LCD Failure Page 111 Internal Keyboard Failure Page 111 TouchPad Failure Page 112 Internal Speaker Failure Page 112 ODD Failure Page 115 WLAN Failure Page 118 Thermal Unit Failure Page...

Service Guide
Page 121
Do not replace a non-defective FRUs: Chapter 4 111 Do not replace a nondefective FRUs: Built-In Keyboard Failure If the built-in Keyboard fails, perform the following actions one at a time to correct the problem. LCD Failure If the LCD fails, perform the following actions one at a time to correct the problem.
Do not replace a non-defective FRUs: Chapter 4 111 Do not replace a nondefective FRUs: Built-In Keyboard Failure If the built-in Keyboard fails, perform the following actions one at a time to correct the problem. LCD Failure If the LCD fails, perform the following actions one at a time to correct the problem.
Service Guide
Page 133
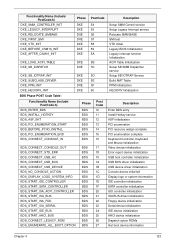
... 21 22 23 24 25 26 27 Description Enter BDS entry Install Hotkey service ASF Initialization PCI enumeration PCI resource assign complete PCI enumeration complete Keyboard Controller, Keyboard and Mouse initialization Video device initialization Error report device initialization USB host controller initialization USB BUS driver initialization USB device driver initialization Console device...
... 21 22 23 24 25 26 27 Description Enter BDS entry Install Hotkey service ASF Initialization PCI enumeration PCI resource assign complete PCI enumeration complete Keyboard Controller, Keyboard and Mouse initialization Video device initialization Error report device initialization USB host controller initialization USB BUS driver initialization USB device driver initialization Console device...


